Transforming your garage or basement into a serious strength training sanctuary often hits one major roadblock: that 7-foot ceiling standing between you and your power rack dreams. You’re not alone in this vertical challenge. Thousands of home gym enthusiasts face the same frustration when they realize most standard power racks tower well above 84 inches, leaving zero room for overhead presses, pull-ups, or even basic bar placement. But here’s the good news—compact power racks engineered specifically for low-ceiling environments have revolutionized what’s possible in confined spaces. These specialized units don’t just squeeze into tight spots; they deliver the same training versatility as their full-height counterparts while keeping your skull and ceiling intact.
This comprehensive guide cuts through the marketing noise to equip you with everything you need to know about selecting, installing, and maximizing a compact power rack with an integrated pull-up bar for your 7-foot ceiling space. We’ll decode the critical measurements that make or break your setup, explore the engineering trade-offs that define quality in shorter racks, and reveal the hidden considerations that separate a frustrating purchase from a decade-long investment. Whether you’re working with a basement gym, garage conversion, or low-clearance spare room, understanding these fundamentals ensures you won’t sacrifice safety, functionality, or your fitness goals to vertical limitations.
Top 10 Compact Power Racks for 7-Foot Ceilings
Detailed Product Reviews
1. BTU Power Strip Surge Protector Rack-Mount PDU, 8 Right Angle Outlets Wide-Spaced, Mountable Power Strip Heavy Duty for Server Racks, Commercial, 300J,ETL (Black 6FT)
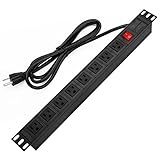
Overview: The BTU Rack-Mount PDU delivers eight wide-spaced, right-angle outlets in a 1U metal chassis designed for standard 19-inch server racks. With a six-foot cord and 300 Joules of surge protection, it targets budget-conscious buyers needing flexible installation options for workshops, offices, or data closets. The unit supports both horizontal and vertical mounting, includes a covered ON/OFF switch, and features a built-in circuit breaker for basic equipment protection.
What Makes It Stand Out: This PDU’s primary differentiator is its wide-spaced, right-angle outlet configuration, which accommodates bulky transformers without blocking adjacent sockets—a common frustration with standard rack strips. The rotating mounting brackets offer genuine versatility for unconventional installations beyond traditional rack enclosures, including wall-mounting or under-counter placement. The manufacturer also advertises customization services for specialized outlet configurations, appealing to users with unique deployment requirements.
Value for Money: At $32.99, this unit sits in the competitive mid-tier range. It undercuts premium brands like StarTech while offering better outlet spacing than bare-bones alternatives. The 300J surge protection rating is modest but adequate for clean power environments. The 12-month warranty is serviceable, though shorter than professional-grade alternatives. For small businesses or home labs prioritizing physical flexibility over maximum electrical protection, the price-to-feature ratio is compelling.
Strengths and Weaknesses: Strengths: Wide outlet spacing prevents plug crowding; versatile mounting bracket system; right-angle outlets optimize cable management; rugged metal construction; ETL certification ensures baseline safety standards.
Weaknesses: 300J surge protection is relatively low for critical equipment; no individual outlet control; LED status indicators absent; warranty period limited to one year; surge protection rating not competitive with similarly priced units.
Bottom Line: This PDU excels for users needing outlet spacing flexibility and alternative mounting options on a moderate budget. While surge protection is modest, it’s a solid choice for non-critical applications where physical layout matters more than maximum electrical safeguarding. Consider upgrading if protecting high-value equipment in surge-prone areas.
2. StarTech.com 8 Outlet Horizontal 1U Rack Mount PDU Power Strip for Network Server Racks - Surge Protection - 120V/15A - w/ 6ft Power Cord (RKPW081915)
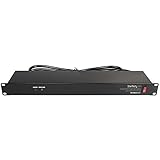
Overview: StarTech.com’s 1U PDU delivers eight NEMA 5-15 outlets in a rugged steel chassis built explicitly for IT infrastructure. The six-foot cord and horizontal mounting design conform to ANSI/EIA RS-310-D standards for 19-inch racks four inches or deeper. Integrated LED indicators display ground and surge protection status, while power and reset switches provide direct control. Backed by a two-year warranty and lifetime 24/5 technical support, this unit targets professional deployments where uptime is non-negotiable.
What Makes It Stand Out: The standout feature is the enterprise-grade support structure—two-year warranty with lifetime multi-lingual technical assistance—which competitors rarely match. The LED status indicators offer at-a-glance verification of protective circuitry, critical for remote troubleshooting. StarTech’s brand reputation in IT infrastructure lends confidence for mission-critical installations. The unit’s compliance with rigorous ANSI standards ensures compatibility across diverse rack environments, from network closets to data centers.
Value for Money: Priced at $59.99, this is the premium option in this roundup. The cost is justified through professional build quality, validated safety standards, and unparalleled support infrastructure. For businesses where equipment failure costs exceed the PDU’s price, the investment is prudent. However, for home labs or budget-constrained deployments, the price premium over functionally similar units may be difficult to rationalize without leveraging the support services.
Strengths and Weaknesses: Strengths: Professional-grade construction; LED protection indicators; two-year warranty with lifetime technical support; ANSI standard compliance; reliable circuit breaker with reset switch; trusted IT brand reputation.
Weaknesses: Highest price point; no individual outlet switching; surge protection rating not explicitly stated; eight outlets may be limiting compared to nine-outlet alternatives; lacks advanced noise filtering.
Bottom Line: This PDU is the definitive choice for IT professionals managing business-critical infrastructure. The support infrastructure alone warrants the premium for organizations requiring guaranteed uptime. For home users or non-critical applications, however, more affordable options deliver comparable electrical performance without the enterprise overhead.
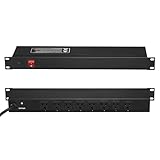
3. Pyle 15 Amp Power Supply Control Unit - 9 Outlet Rack Mount Power Strip with AC Noise Filter - 1U Steel Chassis - 6ft Cord - Surge Protection for Equipment Control - PDBC70

Overview: Pyle’s PDU distinguishes itself with nine outlets, each controlled by dedicated front-panel switches, housed in a 1U steel chassis. The unit features a six-foot cord, 150 Joules of surge protection, and an integrated AC noise filter designed to minimize electromagnetic interference. With 1200 Amps peak impulse current capacity and a 15A rating, it targets audio studios, labs, and environments where individual device control and clean power are paramount.
What Makes It Stand Out: The nine individual power switches provide granular control impossible with traditional master-switch PDUs, allowing selective power cycling without disrupting entire racks. The AC noise filter is a rare feature in this price class, significantly benefiting sensitive audio, video, or measurement equipment susceptible to line noise. The front-panel switch array creates an organized power management interface, ideal for troubleshooting or staged equipment startup sequences.
Value for Money: At $42.99, this PDU commands a modest premium over basic eight-outlet units but delivers unique functionality. The individual switches justify the cost for users requiring per-device control, while the noise filter adds value in interference-sensitive applications. However, the 150J surge protection is disappointingly low for the price, potentially necessitating additional upstream protection. For studios or labs, the specialized features offer strong ROI; for standard server deployments, the trade-offs may not balance.
Strengths and Weaknesses: Strengths: Individual outlet switches enable precise power management; AC noise filter benefits sensitive electronics; nine outlets exceed standard capacity; front-panel control simplifies operation; sturdy steel construction.
Weaknesses: Low 150J surge protection rating; no LED status indicators; warranty details unspecified; switch layout may increase accidental actuation risk; less ideal for high-density server environments.
Bottom Line: This PDU is purpose-built for studios, labs, and workshops where individual outlet control and power cleanliness outweigh raw surge protection. The noise filter and switched outlets are genuinely useful features, but pair it with a robust upstream surge protector for comprehensive protection. Avoid for critical server deployments prioritizing surge suppression over switching convenience.
4. VEVOR 8 Outlet Horizontal 1U Rack Mount PDU Power Strip for Network Server Racks, Surge Protection & Overload Protection, 110-125V/15A, with 6ft 14AWG Power Cord
Overview: VEVOR’s 1U PDU packs eight NEMA 5-15 outlets into a reinforced metal chassis with an extraordinary 1800 Joules surge protection rating. The six-foot 14AWG cord handles 15A continuous loads, while an integrated resettable circuit breaker provides overload and short-circuit protection. Designed for standard 19-inch racks, this unit emphasizes maximum electrical safeguarding for valuable equipment in environments with unstable power or frequent electrical storms.
What Makes It Stand Out: The 1800J surge protection rating dramatically outclasses competitors, offering six times the protection of the BTU unit and twelve times that of the Pyle. The resettable breaker provides a user-serviceable alternative to disposable fuses, reducing downtime during overload events. Lightning protection circuitry adds another layer rarely specified in budget PDUs. The reinforced, fire-resistant metal casing and 14AWG cord gauge demonstrate attention to safety margins often compromised in entry-level units.
Value for Money: At $33.99, this PDU delivers the best surge protection-per-dollar ratio in the lineup. It matches budget pricing while providing premium-level safeguarding, making it ideal for lightning-prone regions or protecting high-value equipment. The omission of individual outlet switches or LED indicators keeps costs low while focusing resources on core protective circuitry. For pure protection value, it’s unmatched; users needing advanced management features must look elsewhere.
Strengths and Weaknesses: Strengths: Exceptional 1800J surge protection rating; lightning and overload protection; resettable circuit breaker; heavy-duty 14AWG power cord; fire-resistant metal casing; competitive pricing.
Weaknesses: No individual outlet control; lacks LED status indicators; warranty details not specified; brand recognition lower than established IT vendors; mounting hardware quality unspecified.
Bottom Line: If surge protection is your primary concern, this PDU is the clear winner. The 1800J rating provides substantial peace of mind for equipment in electrically hostile environments. While it lacks management frills, its protective capabilities rival units costing twice as much. Perfect for regional offices, remote installations, or anywhere power quality is suspect.
5. 19" 1U Rack Mount PDU Power Strips 8 Outlet Mountable Power Strip, Wall Mount Outlet Power Strip Heavy Duty, Wide Spaced 15A 125V 1875W, 6 FT SJT 14AWG Power Cord (6FT) (8 Outlet)

Overview: This no-frills 1U PDU provides eight wide-spaced outlets in a mountable metal chassis, rated for 15A/125V/1875W. The six-foot 14AWG cord and integrated on/off switch deliver basic power distribution for rack or wall-mount applications. With wide outlet spacing and heavy-duty metal construction, it targets cost-sensitive buyers needing straightforward power expansion without premium features or specified surge protection ratings.
What Makes It Stand Out: The aggressive $26.99 pricing makes it the most accessible rack PDU in this comparison. Wide-spaced outlets accommodate bulky adapters without crowding—a practical feature often sacrificed in budget units. The simple on/off master switch provides unambiguous control, while the unspecified but implied surge protection offers baseline safeguarding. Its generic design prioritizes universal compatibility over brand-specific ecosystems.
Value for Money: This is the budget champion, undercutting all competitors by at least $6. For simple applications like powering network gear in stable electrical environments, it delivers essential functionality at minimal cost. The wide-spaced outlets add practical value exceeding some pricier alternatives. However, the absence of documented surge protection ratings, warranty information, or advanced features means you’re trading transparency and support for savings. Ideal for non-critical deployments where every dollar counts.
Strengths and Weaknesses: Strengths: Lowest price point; wide outlet spacing prevents plug interference; heavy-duty metal construction; 14AWG cord adequate for 15A loads; simple, reliable master switch operation.
Weaknesses: No specified surge protection rating; warranty details absent; lacks LED indicators; no individual outlet control; unknown certification standards; minimal manufacturer support.
Bottom Line: This PDU is a utilitarian choice for budget-driven installations where basic power distribution suffices. The wide-spaced outlets are genuinely useful, but the lack of documented protection specs makes it unsuitable for high-value equipment. Deploy with confidence in low-risk environments like home labs or secondary network racks, but supplement with a separate surge protector for anything business-critical.
6. Power Rack Package (PAC)

Overview: The Power Rack Package (PAC) positions itself as a comprehensive strength training solution for serious home gym enthusiasts. At $1,899.99, this bundle eliminates the guesswork of piecing together compatible equipment by offering an integrated system. While the exact components aren’t detailed, packages of this nature typically include a heavy-duty power rack, Olympic barbell, weight plates, and potentially a bench. The advertised $200 savings immediately signals value for those looking to build a complete lifting station without the hassle of a la carte purchasing.
What Makes It Stand Out: The primary differentiator is the curated bundle approach. Rather than researching individual components for compatibility, buyers receive a matched system designed to work seamlessly together. The $200 discount represents meaningful savings compared to purchasing items separately, and the PAC designation suggests this is a standardized, proven configuration. For home gym owners wanting commercial-grade equipment without the trial-and-error of mixing brands, this package offers a turnkey solution that gets you training faster.
Value for Money: At $1,899.99 with built-in savings, this package sits in the mid-to-premium range. The value proposition hinges on component quality—if the included barbell and plates meet Olympic standards and the rack offers adequate weight capacity and safety features, the price is competitive. Comparable setups assembled individually often exceed $2,100, making the discount genuine rather than marketing fluff. The real value is time saved and assurance of compatibility.
Strengths and Weaknesses: Strengths include convenience, cost savings, assured component compatibility, and single-vendor warranty support. The package likely includes essential accessories like J-hooks and safety arms. Weaknesses involve potential inclusion of unwanted items, significant space requirements, and the need for professional assembly. The lack of detailed component specifications makes it difficult to assess individual item quality beforehand.
Bottom Line: This package suits intermediate to advanced lifters ready to invest in a permanent home setup. Verify exact contents before purchasing, but the $200 savings and bundled convenience make it compelling for those prioritizing quality and time over absolute budget minimization.
7. Power Systems Horizontal Plate Rack with Handle and Wheels

Overview: The Power Systems Horizontal Plate Rack addresses a fundamental home gym challenge: organized, mobile weight storage. Measuring 36" L x 16" W x 14" H (plus handle/wheels), this unit offers 10 slots for bumper plates and 6 additional slots for smaller plates. At $437.99, it’s positioned as a premium storage solution for serious lifters who value both organization and flexibility. The integrated wheels and ergonomic handle transform static storage into a portable system that adapts to your workout space.
What Makes It Stand Out: Mobility defines this rack. Unlike fixed storage solutions, the dual-wheel and handle design allows effortless repositioning between exercises or for space cleaning. The dedicated bumper plate slots accommodate the larger diameter plates that many racks struggle with, while separate smaller plate slots maximize organization. The comfortable grip handle demonstrates attention to user experience, making movement smooth even when fully loaded. This hybrid approach serves both as storage and as a transport cart.
Value for Money: Priced at $437.99, this sits at the higher end of plate storage. However, the dual-function mobility feature justifies the premium over basic vertical trees or wall mounts. For home gym owners with limited space, the ability to roll plates out of the way creates valuable floor space. Commercial facilities benefit from easy reconfiguration. The construction quality must be robust to justify this price point—look for heavy-gauge steel and commercial-grade wheels.
Strengths and Weaknesses: Strengths include exceptional mobility, smart slot configuration for mixed plate types, space-efficient horizontal design, and professional aesthetics. The ergonomic handle enhances usability significantly. Weaknesses include the premium price, potential wheel durability concerns under maximum loads, and limited capacity for users with extensive plate collections beyond 16 slots. The horizontal orientation requires more floor space than vertical alternatives.
Bottom Line: Ideal for dedicated home gyms and boutique fitness studios where flexibility matters. If your training area serves multiple purposes, the mobility justifies the investment. Ensure your plate collection fits the slot configuration before purchasing.
Understanding the 7-Foot Ceiling Challenge
The 84-inch ceiling height represents a critical threshold in home gym design because it sits precisely at the intersection of standard construction practices and strength training equipment engineering. Most residential homes built after 1980 feature 8-foot ceilings on main floors, but basements, garages, and older homes frequently drop to 7 feet due to ductwork, beams, or foundation constraints. This single foot difference eliminates roughly 70% of power racks on the market, forcing you into a specialized category where every inch matters. The challenge isn’t merely about fitting the rack itself—it’s about preserving functional movement patterns, ensuring safe bar trajectories, and maintaining the psychological feeling of unrestricted training space.
Critical Height Measurements You Must Know
Rack Height vs. Assembled Height
Manufacturers list two different height specifications, and confusing them leads to costly returns. The “rack height” typically refers to the upright steel dimensions only, while “assembled height” includes the pull-up bar, bolt heads, and any mounting hardware that adds 2-4 inches. For 7-foot ceilings, you need the assembled height to measure no more than 82 inches, leaving a mandatory 2-inch buffer for floor unevenness, mat compression, and thermal expansion. Always request the assembled height from the manufacturer, not the marketing height.
Pull-Up Bar Clearance Requirements
Your pull-up bar needs more than just enough space to mount—it requires adequate clearance for full range-of-motion exercises. Kipping pull-ups demand at least 12-16 inches above the bar for safe head clearance, while strict pull-ups need a minimum of 8 inches. Muscle-ups and chest-to-bar variations push this requirement to 18+ inches. With a 7-foot ceiling, this means your pull-up bar should sit no higher than 76 inches from the floor, forcing you to consider inside-the-rack mounting or low-profile bar designs that sacrifice some grip options.
Your Personal Height Factor
Your own wingspan and height directly impact rack feasibility. A 6'2" lifter needs approximately 88 inches of vertical space to perform overhead presses inside the rack without ducking, while a 5'6" lifter requires only 78 inches. Calculate your personal “functional height” by standing straight and measuring from the floor to your fingertips with arms extended overhead. Add 4 inches for bar diameter and safety margin. If this number exceeds 82 inches, you’ll need to perform overhead work outside the rack or switch to seated variations.
Flooring and Ceiling Considerations
Concrete basement floors often slope toward drains, creating a 1-2 inch height differential across a 4-foot rack footprint. Use a laser level to identify your highest floor point, then measure ceiling height at that exact location. Drop ceilings offer hidden opportunities—you can often remove panels above the rack to gain 4-6 inches of clearance, though this requires permanent modifications. Drywall ceilings compress slightly under load, so measure to the joist, not the finished surface.
Compact Power Rack Design Fundamentals
Short vs. Standard vs. Tall Racks
Short racks (72-78 inches) sacrifice some pull-up bar height but guarantee fit in any 7-foot space. Standard-height compact racks (80-82 inches) maximize functionality but require precise measurement. The engineering difference extends beyond cutting uprights shorter—quality compact racks reinforce joints with gusset plates, increase steel gauge thickness to compensate for reduced leverage, and redesign pull-up bar geometry to maintain structural integrity without the full triangular bracing of tall racks.
Upright Height Variations
The 72-inch upright represents the sweet spot for most 7-foot ceilings, leaving ample room for mounting hardware and pull-up bars. Some manufacturers offer 74-inch uprights with integrated low-profile pull-up bars that curve downward, effectively lowering the grip position while maintaining rack height. Avoid 80+ inch uprights unless you’re certain of your measurements—these typically require ceiling modification or limit you to floor-mounted pull-up bars.
Footprint Optimization
Compact racks reduce horizontal footprint alongside vertical height, typically measuring 36" x 36" vs. the standard 48" x 48". This 25% reduction in floor space comes with trade-offs: decreased lateral stability requiring floor anchoring, reduced walk-in space for exercise variety, and limited attachment compatibility. Premium compact designs offset these limitations with heavier gauge steel (11-gauge instead of 14-gauge) and wider, thicker foot plates that distribute load more effectively.
Pull-Up Bar Configurations for Low Ceilings
Multi-Grip vs. Straight Bars
Multi-grip bars with parallel, neutral, and angled handles typically add 4-6 inches of height compared to straight bars due to their complex geometry. For 7-foot ceilings, straight bars mounted inside the rack uprights offer the lowest profile, often sitting just 2 inches above the top crossmember. Some manufacturers produce “slim multi-grip” bars that sacrifice handle variety for a 3-inch height reduction, maintaining neutral grip options while preserving clearance.
Inside-the-Rack vs. Outside Mounting
Mounting your pull-up bar inside the rack uprights drops the functional height by 4-8 inches compared to front-mounted designs, but creates a narrower grip width (typically 42 inches vs. 48 inches). This configuration works exceptionally well for strict pull-ups and hanging knee raises but limits kipping movements due to reduced lateral clearance. Outside-mounted bars provide better kipping space but push the total height to 86+ inches, eliminating them from most 7-foot ceiling applications.
Adjustable Height Pull-Up Systems
Some innovative compact racks feature pull-up bars that bolt into different upright holes, allowing you to lower the bar for pull-ups and raise it for overhead exercises. These systems use a split-bar design where each side mounts independently, requiring careful torque specification to prevent rotation under load. While versatile, they add 15-20 minutes to workout transitions and may develop slight wobble over time if not regularly retightened.
Non-Negotiable Safety Features
Spotter Arm Length and Height
Compact racks demand spotter arms that extend at least 20 inches from the upright to catch a failed bench press safely. Shorter arms (16 inches) common on budget compact models place the catch point too close to your face. The arm height adjustment range should span from 17 inches (for floor-level benching) to 66 inches (for squats just below shoulder height), using Westside spacing (1-inch increments) in the critical bench zone to fine-tune safety positioning.
J-Hook Design and Placement
Look for J-hooks with UHMW plastic liners that wrap around the entire hook lip, preventing bar knurling damage during re-racking. The hook depth should measure at least 4 inches to securely cradle an Olympic bar under tilt conditions. For low ceilings, ensure the highest J-hook position sits at least 6 inches below the pull-up bar to prevent interference, and the lowest position allows full stretch during floor presses without the bar contacting the floor.
Stability and Base Construction
Compact racks inherently lack the stability of tall, wide units, making base construction paramount. Demand 2" x 3" minimum upright dimensions with 2" x 2" base supports that run the full depth of the rack. The base should include at least four pre-drilled ½-inch anchor holes positioned at the outer corners. Without floor anchoring, a compact rack will walk during kipping pull-ups and feel unnerving during heavy rack pulls, regardless of weight storage additions.
Weight Capacity Considerations
Static vs. Dynamic Load Ratings
Manufacturers often list static capacity (weight sitting motionless on J-hooks) exceeding 1,000 pounds, but dynamic capacity (weight dropped from 12 inches onto spotter arms) may be only 600-700 pounds. For compact racks, the dynamic rating matters more because the shorter uprights create stiffer impact forces. Look for racks with documented dynamic drop-test ratings, not just static load claims. A quality compact rack should handle 500+ pound dynamic loads without permanent upright deformation.
How Capacity Relates to Rack Height
Shorter uprights actually increase theoretical load capacity by reducing leverage on the base, but compact racks often use thinner gauge steel to cut costs and weight. This creates a deceptive relationship where a 72-inch rack might list a 700-pound capacity but use 14-gauge steel that fatigues faster than an 11-gauge 90-inch rack. The gauge matters more than height for long-term durability—insist on 11-gauge steel (⅛-inch thick) for any rack supporting over 400 pounds regularly.
Realistic Home Gym Needs
Most home lifters never exceed 315 pounds on squats or 225 pounds on bench press, making a 700-pound capacity rack more than sufficient. However, consider your 5-year strength goals, not just current abilities. A rack that’s perfect today becomes a limiting factor if you progress to 400-pound squats. Compact racks with 1,000-pound capacities exist but command premium prices due to reinforced engineering. Calculate your target weight plus 50% for safety margin when evaluating capacity claims.
Material Quality and Gauge Steel
Understanding Steel Gauges
Steel gauge runs counterintuitively—lower numbers mean thicker, stronger steel. 11-gauge (⅛" or 3mm) represents the commercial standard and should be your baseline for compact racks where structural integrity is compromised by height reduction. 12-gauge (7/64" or 2.8mm) offers acceptable home gym performance at lower cost, while 14-gauge (5/64" or 2mm) bends under heavy loads and develops permanent J-hook slot deformation. Test gauge quality by examining the upright ends—thinner steel shows visible flex when you press on the walls with your thumb.
Powder Coating Durability
Low-quality powder coating chips at J-hook contact points within months, exposing bare steel to rust. Look for textured black powder coat with a matte finish, indicating a multi-stage application process. The coating should measure 2-3 mils thick (test by scratching an inconspicuous area with a key—quality coating resists marking). Avoid glossy finishes on compact racks; they show scratches more visibly and typically indicate single-stage application that won’t withstand plate storage abrasion.
Welding Quality Indicators
Inspect weld photos for continuous bead patterns without gaps or spatter. Quality compact racks use robotic MIG welding for upright-to-base joints, creating uniform penetration. Hand-welded joints often show inconsistent bead width and may fail under cyclic loading. Look for gusset plates at all 90-degree connections—these triangular reinforcements distribute stress and compensate for the reduced bracing angle of short uprights. Absence of gussets indicates cost-cutting that compromises safety.
Hole Spacing and Adjustment Precision
Westside Spacing vs. Standard
Westside spacing places holes 1-inch apart through the bench press zone (typically 17-25 inches from floor) and 2-inch spacing above and below. This allows precise J-hook positioning for optimal arm angle and arch maintenance. Compact racks sometimes skip Westside spacing to reduce manufacturing costs, using uniform 2-inch spacing throughout. This forces you to choose between J-hooks that are slightly too high (losing leg drive) or too low (excessive stretch). Insist on Westside spacing unless you’re willing to compromise on bench press bio-mechanics.
Hole Diameter Consistency
Upright holes should measure ⅝-inch or 16mm for standard attachments, with clean edges free of burrs. Inconsistent hole diameter—common on budget compact racks—causes attachments to fit loosely or not at all. Test by asking the manufacturer for hole tolerance specifications; quality racks maintain ±0.005-inch consistency. Oversized holes (¾-inch) accommodate more attachments but reduce upright strength by 15-20% due to material removal.
Numbered Uprights
Laser-etched numbering on every fifth hole saves countless setup minutes and prevents dangerous misalignment. On compact racks where you’re adjusting J-hooks frequently due to multiple users or exercise variations, numbered uprights become essential. Ensure numbers are etched, not stickers—stickers peel under plate storage vibration. The numbering should be visible from both inside and outside the rack, using high-contrast white or yellow on black powder coat.
Attachment Compatibility and Expansion
Must-Have Attachments for Compact Racks
Dip stations, landmine attachments, and plate storage pins are non-negotiable for maximizing compact rack utility. However, dip stations add 8-12 inches of width, potentially interfering with narrow room layouts. Look for flip-down dip attachments that store flush against uprights when not in use. Landmine attachments should mount to the rack base, not the uprights, to preserve hole spacing for J-hooks. Plate storage pins must be positioned on the rear uprights only—side mounting creates dangerous pinch points and compromises rack access.
Proprietary vs. Universal Systems
Major brands use proprietary attachment mounting systems that lock you into their ecosystem. While these systems offer tighter tolerances and cleaner aesthetics, they limit future expansion. Universal ⅝-inch hole spacing accepts third-party attachments from companies like Titan, Rogue, and REP Fitness, creating a competitive market for add-ons. Some compact racks hybridize—proprietary primary attachments with universal secondary holes—giving you the best of both worlds if you verify compatibility before purchasing.
Future-Proofing Your Investment
Even if you only need basic functionality today, choose a rack with attachment points for future upgrades. Lat pulldown/low row combos require specific top-mount brackets that many compact racks lack. Cable crossover attachments need reinforced upper crossmembers rated for lateral loads. Check that your chosen rack supports these additions, even if you don’t purchase them immediately. A rack that can’t grow with your training is a temporary solution, not a lifetime investment.
Floor Space and Room Layout Strategy
Minimum Footprint Requirements
A compact rack’s 36" x 36" footprint expands to a 9’ x 9’ minimum workout zone when you account for barbell length (7 feet), plate loading clearance (18 inches on each side), and safe bailout space (3 feet in front). In a 7-foot ceiling room, you likely have limited square footage overall, making precise layout critical. Position the rack so the barbell ends point toward the longest wall dimension, not the shortest, to maximize loading space. Ensure 4 feet of clearance behind the rack for plate storage access and maintenance.
Workout Zone Clearance
The area directly in front of your rack needs 6 feet of depth for squats and bench press setup. With compact racks, there’s temptation to push this to 5 feet to save space, but this places your face dangerously close to the rack during heavy lifts. Measure from the front of the J-hooks (when set at squat height) to the nearest obstruction—wall, equipment, or doorway. If this distance is under 6 feet, you’ll develop subconscious lifting restrictions that limit progress. Consider a foldable wall rack if space is this tight, though these sacrifice pull-up functionality.
Mirror and Equipment Placement
Wall-mounted mirrors should sit 24 inches off the floor minimum, angled slightly upward to reflect your full range of motion without showing ceiling limitations. This psychological trick makes the space feel taller. Place dumbbell racks perpendicular to the rack front, not parallel, to create a natural workflow that doesn’t cross the barbell path. Cardio equipment belongs behind the rack, not in front, to preserve the rack’s visual dominance and functional priority in the space.
Installation and Assembly Realities
Anchor Requirements for Low Ceilings
Compact racks must be anchored to concrete or plywood platforms; their reduced mass and height make them inherently unstable unanchored. Use four ½-inch x 3-inch concrete wedge anchors rated for 1,500 pounds pull-out strength each. Drill holes with a hammer drill, not a standard drill, to prevent anchor loosening under vibration. For wooden floors, bolt through ¾-inch plywood into joists with 3-inch lag bolts. Never anchor only to subfloor—pull-up kipping generates lateral forces that rip through plywood alone.
Tools and Skill Level Needed
Assembly requires two people minimum, three hours, and a complete socket set (17mm, 19mm, and 21mm sockets). A torque wrench set to 18-20 ft-lbs is critical—over-tightening 14-gauge steel strips threads, while under-tightening creates dangerous wobble. You’ll need a rubber mallet for upright insertion, a level accurate to 1/16-inch over 4 feet, and a stud finder for wall anchor positioning. Electrical experience helps if you’re adding rack-mounted lighting or fans, which become essential in low-ceiling spaces where heat concentrates.
Professional Installation vs. DIY
Professional installation costs $200-400 but guarantees safety and typically includes load testing. DIY saves money and builds familiarity with your equipment, but mistakes void warranties and create hazards. The compromise: assemble the rack loosely yourself, then hire a handyman for final leveling, anchoring, and torque verification. This costs $100-150 and ensures critical steps are performed correctly while you handle the time-consuming bolt sorting and initial assembly.
Budget Tiers and Value Proposition
Entry-Level Considerations
Sub-$400 compact racks use 14-gauge steel, skip Westside spacing, and limit attachments. They’re viable for loads under 300 pounds but develop wobble within a year. The real cost includes replacement—budget racks last 2-3 years under regular use versus 10+ years for premium units. Calculate cost-per-year: a $350 rack replaced every 3 years costs $117/year, while an $800 rack lasting 12 years costs $67/year. Entry-level makes sense only for uncertain commitment or temporary living situations.
Mid-Range Sweet Spots
The $600-900 range delivers 11-gauge steel, Westside spacing, numbered uprights, and comprehensive attachment compatibility. These racks represent the optimal intersection of durability, features, and price. Manufacturers in this tier compete on engineering rather than price, resulting in innovative solutions like offset pull-up bars and reinforced base designs specifically for low ceilings. Warranty coverage jumps from 1-2 years to lifetime on frames, indicating manufacturer confidence. This tier is where most serious home gym owners should focus.
Premium Features Worth the Cost
Racks exceeding $1,000 for compact models offer laser-cut precision, robotic welding, custom powder coat colors, and integrated cable systems. The key value-add is modularity—premium racks accept leg press attachments, belt squat systems, and monolift arms that transform a compact footprint into a full commercial setup. For 7-foot ceilings, the premium feature that matters most is engineered pull-up bar geometry that maximizes grip options while minimizing height. If you’re building a forever gym, this one-time investment eliminates future upgrade costs.
Common Mistakes to Avoid
Measuring Errors
The most frequent mistake is measuring ceiling height at the room’s center, then installing the rack in a corner where ceiling height drops 2-3 inches due to joist variations. Always measure at the exact installation location, accounting for drywall seams and ceiling texture that can reduce clearance. Another error: forgetting to measure with flooring installed. Those ¾-inch rubber mats you planned to add? They reduce your pull-up bar clearance by the same amount, potentially making the difference between fitting and failing.
Ignoring Pull-Up Bar Height
Focusing solely on rack upright height while ignoring pull-up bar placement is a recipe for disappointment. Some “compact” racks achieve low height by mounting the pull-up bar at 70 inches—perfect for clearance but forcing tall users to bend their knees during pull-ups. Others mount the bar outside the rack, adding 6 inches to total height. Always calculate your pull-up bar grip height: floor to bar minus your standing reach equals required knee bend. If this exceeds 6 inches of knee flexion, look for alternative configurations.
Overlooking Future Needs
Buying for your current program without considering exercise evolution is short-sighted. Today you only bench and squat, but next year you might want belt squats, cable work, or pin presses. A rack without attachment compatibility becomes obsolete. Similarly, ignoring ceiling access panels or removable drywall sections eliminates future expansion options. Document your rack’s exact placement and keep ceiling modification options open—even if you don’t need them now, they double your resale value and adaptability.
Maximizing Your Low-Ceiling Setup
Alternative Exercises for Height Restrictions
When overhead presses inside the rack are impossible, switch to seated military presses on an adjustable bench set to 85 degrees. This reduces vertical requirement by 12-18 inches while maintaining shoulder development. For pull-ups, use rings or straps hung from the bar at varying lengths to create neutral grip options without additional height. Landmine presses become your overhead press substitute, developing core stability while keeping the load path well below ceiling height. Floor presses replace bench presses when spotter arm height limitations exist, building lockout strength with zero vertical clearance concerns.
Creative Storage Solutions
Low ceilings eliminate vertical storage, so maximize the 6-inch gap between rack top and ceiling with magnetic strip hangers for collars and resistance bands. Mount plate storage horizontally on the rear uprights using 8-inch pins rather than 12-inch, sacrificing capacity for clearance. Store fractional plates in a wall-mounted cabinet at waist height, not on the rack, to preserve attachment points. Use the space under the rack for deadlift jack storage, and mount a retractable cable system to the ceiling joists between the rack and ceiling gap for face pulls and tricep pressdowns.
Lighting and Ambiance
Low ceilings create shadows that make the space feel cramped and hide form errors. Install LED strip lights on the underside of the rack’s top crossmember, pointing downward to illuminate the platform without ceiling reflection. Use 5000K daylight temperature bulbs to make the space feel larger and improve video recording quality for form checks. Paint walls matte white or light gray to reflect light upward, creating the illusion of height. Avoid dark colors that absorb light and emphasize ceiling proximity.
Maintenance and Longevity
Regular Inspection Points
Monthly, check all bolt torque with a wrench—vibration from pull-ups and drops loosens fasteners faster in compact racks due to higher force concentration. Inspect J-hook plastic liners for wear; replace when you see metal-through spots to protect your barbell. Examine uprights for paint cracking around holes, indicating metal fatigue. Pull on the rack aggressively while anchored to test for developing wobble. This 5-minute monthly routine prevents catastrophic failure and extends rack life by years.
Cleaning and Rust Prevention
Low-ceiling spaces trap humidity, accelerating rust. Weekly, wipe down uprights with a dry microfiber cloth to remove sweat salt. Monthly, clean with mild soap solution, then apply a silicone-based protectant (not oil-based, which attracts dust). In humid climates, place a rechargeable dehumidifier inside the rack between sessions. Inspect anchor points quarterly for rust rings, which indicate moisture penetration and require immediate resealing with epoxy anchor coating.
Bolt Tightening Schedules
Create a tightening schedule: after first 10 workouts, then after 25, then every 50 workouts thereafter. This accounts for initial settling and cyclic loading. Use a paint marker to indicate proper bolt position—if the mark moves, torque has loosened. Replace bolts showing thread wear or deformation immediately; never reuse high-strength bolts after they’ve been fully torqued and loosened. Keep a spare hardware kit with 4 bolts, washers, and nuts specific to your rack model to avoid downtime.
Frequently Asked Questions
Will I hit my head on the pull-up bar with a 7-foot ceiling?
If you select a rack with an assembled height under 82 inches and you’re under 6'2", proper pull-up form keeps your head safely below the bar. The key is mounting the bar inside the rack uprights, not on top, which drops the grip height by 4-6 inches. Always test your actual ceiling height at the installation location, as joist variations can create local low spots.
What’s the maximum rack height I should consider?
For a true 7-foot (84-inch) ceiling, your maximum assembled rack height is 82 inches, leaving a 2-inch safety buffer for floor mats and ceiling texture. If your ceiling measures exactly 84 inches, consider racks with 80-inch assembled heights to ensure comfortable pull-up clearance. Never trust manufacturer height specs without confirming they include all hardware and the pull-up bar.
Can I mount a compact rack to my ceiling for extra stability?
Ceiling mounting is not recommended for 7-foot ceilings. The attachment hardware reduces pull-up clearance by 2-3 inches, and the ceiling itself may not support lateral loads. Instead, focus on proper floor anchoring with wedge anchors and consider adding rear support brackets that attach to wall studs at mid-height, providing lateral stability without ceiling contact.
Are wall-mounted racks better for low ceilings?
Wall-mounted folding racks save floor space but typically require 90+ inches of ceiling height for the folding mechanism to operate. They also eliminate walk-through capability and limit pull-up bar options. For 7-foot ceilings, a floor-mounted compact rack with wall brackets offers better functionality and stability than a pure wall-mounted solution.
How much weight can a short power rack actually hold?
Height doesn’t determine capacity—steel gauge and engineering do. A properly built 72-inch rack with 11-gauge steel handles 1,000+ pounds static load, identical to full-height versions. However, dynamic drop capacity may be 15-20% lower due to reduced shock absorption distance. Always verify dynamic load ratings specifically, as these reflect real-world lifting scenarios.
Do I need to bolt my rack to the floor with limited ceiling height?
Yes, absolutely. Compact racks have a higher center of gravity relative to their base footprint, making them prone to tipping during pull-ups and heavy lifts. Floor anchoring is non-negotiable for safety. The only exception is if your rack exceeds 200 pounds assembled weight and you only perform strict movements without kipping, but even then, anchoring is strongly recommended.
What if I’m over 6 feet tall—can I still use these racks?
Tall lifters can absolutely use compact racks but must modify exercise selection. Overhead presses become seated variations, and pull-ups require knee bending. Focus on the rack’s interior working height rather than total height—many 6'4" lifters successfully use 72-inch racks for squats, bench press, and pin presses. Your standing reach matters more than your height; measure it directly to determine compatibility.
Can I add a lat pulldown attachment to a compact rack?
Most compact racks support lat pulldown attachments, but ceiling height limits the weight stack travel. Low-profile cable systems with 6-inch plate posts work best, though you’ll sacrifice total weight capacity. Ensure the attachment’s top pulley sits at least 4 inches below your ceiling to allow full cable travel. Some manufacturers offer shortened cable columns specifically for 7-foot ceilings that sacrifice 2-3 plates of stack height.
Will a compact rack feel unstable compared to a full-size one?
A properly anchored compact rack with 11-gauge steel feels as stable as a full-size unit for all vertical movements. The difference emerges in lateral stability—kipping pull-ups and heavy landmine rotations transfer more force to the anchors. This is solved with wall brackets, not a larger rack. Unanchored, any compact rack feels unstable regardless of price. With proper installation, the difference is psychological, not functional.
How do I measure my ceiling height accurately?
Use a laser level, not a tape measure. Place the laser on the floor at your intended rack location, mark the wall at the laser line, then measure from that mark to the floor with a rigid ruler. Measure at dawn and dusk when temperature fluctuations are minimal, as ceiling height can vary ¼-inch with thermal expansion. Check three points: where each front upright will sit and the midpoint between them. Use the lowest measurement for your rack selection.