The first blast of wind hits like a freight train, snapping your tent poles before you’ve even secured the second guyline. In alpine zones, where storms materialize from benign blue skies in under an hour, your shelter isn’t just equipment—it’s survival infrastructure. The difference between a miserable retreat and a triumphant summit bid often boils down to minutes: the minutes it takes to pitch your tent before hypothermia sets in, before winds hit 60 mph, before visibility drops to zero.
Fast-pitch technology has revolutionized high-altitude camping, but not all quick-setup tents are created equal for storm-prone environments. The alpine arena demands a precise alchemy of rapid deployment, bombproof construction, and intelligent design that laughs in the face of katabatic winds and surprise blizzards. This guide dismantles the marketing fluff and dives deep into the engineering principles, material sciences, and field-proven features that separate a genuine alpine fortress from a dangerously inadequate pretender.
Top 10 Fast-Pitch Camping Tents for Storm-Prone Alpine Zones
Detailed Product Reviews
1. Coleman 8-Person Tenaya Lake Fast Pitch Cabin Camping Tent with Closet, Light Blue
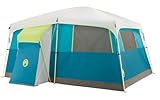
Overview: The Coleman Tenaya Lake Fast Pitch Cabin Tent redefines family camping with its innovative built-in closet and rapid deployment system. Designed for eight people, this light blue cabin-style shelter prioritizes organization and convenience without sacrificing weather protection. The integrated storage solution addresses a common camping frustration where gear and clothes become cluttered.
What Makes It Stand Out: The standout feature is undoubtedly the built-in closet with shelves and a hanger bar—a rarity in tents. Combined with the Fast Pitch system that sets up 55% faster than conventional tents through pre-attached color-coded poles and Insta-Clip suspension, it saves precious time at camp. Illumiline reflective guy lines enhance nighttime safety, while the WeatherTec system’s welded floors and inverted seams provide reliable water protection.
Value for Money: At $229.99, this tent sits in the mid-to-high range for 8-person cabin tents. You’re paying a premium for the unique closet feature and time-saving Fast Pitch technology. Compared to standard tents requiring separate organizers, the integrated solution justifies the cost for organized campers.
Strengths and Weaknesses: Strengths include rapid setup, innovative closet organization, superior weather protection, and enhanced visibility features. The main weakness is the closet’s footprint reducing interior sleeping space. The light blue color may also show dirt easily, and the tent’s weight could challenge solo setup.
Bottom Line: Ideal for families who value organization and quick setup, the Tenaya Lake tent delivers unique storage solutions and reliable performance. If you prioritize gear management over maximum sleeping capacity, this tent deserves serious consideration.
2. Coleman 8-Person Camping Tent with Built-in Closet | Tenaya Lake Cabin Tent with Fast Pitch Setup
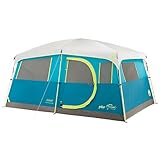
Overview: The Coleman Tenaya Lake Cabin Tent offers eight-person capacity with an emphasis on privacy and organization. This cabin-style tent features a built-in closet and room divider, creating separate living spaces for comfortable family camping. The Fast Pitch design promises setup in approximately nine minutes, making it practical for frequent campers.
What Makes It Stand Out: The combination of a built-in closet with shelves and hanger bar plus a removable room divider sets this apart from typical family tents. The generous 6-foot 8-inch center height allows most adults to stand comfortably. The 13 x 9-foot interior with an additional 2 x 2-foot closet provides defined storage without compromising living space.
Value for Money: Priced at $299.99, this is a premium 8-person tent. The cost reflects the convenience features: Fast Pitch system, closet organization, and privacy divider. While more expensive than basic cabin tents, it eliminates the need for separate tent organizers and tarps, offering integrated solutions that justify the investment for serious campers.
Strengths and Weaknesses: Strengths include quick nine-minute setup, versatile room divider, tall standing height, effective WeatherTec water protection, and smart closet integration. Weaknesses include the higher price point and the closet reducing overall sleeping capacity. First-time users may need practice to achieve the promised nine-minute setup.
Bottom Line: Perfect for families seeking both organization and privacy, this tent excels in comfort and convenience. If your budget allows, the Tenaya Lake delivers features that transform camping from survival to enjoyment.
3. Dome Tent Ozark Trail 10-Person Family Camping Tent with 3 Rooms and Screen Porch, blue
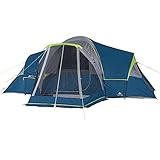
Overview: The Ozark Trail 10-Person Dome Tent offers exceptional space and versatility for large families on a budget. With three configurable rooms and a screened porch, this tent provides multiple living zones at a fraction of premium brand prices. The 80-inch center height and ability to fit three queen air beds make it a spacious shelter.
What Makes It Stand Out: The front screen porch creates bug-free outdoor lounging, while two removable dividers allow customization from one large room to three separate spaces. The mesh roof offers stargazing opportunities, and extensive ventilation comes from three windows plus mesh walls. The roll-back fly provides adjustable airflow without full exposure.
Value for Money: At $207.53, this tent delivers remarkable value. It undercuts comparable 10-person tents by $50-100 while offering features like a screen porch and modular rooms typically found in pricier models. For budget-conscious families needing maximum space, it’s hard to beat.
Strengths and Weaknesses: Strengths include massive capacity, versatile room configuration, excellent ventilation, screen porch, and unbeatable price. Weaknesses include potentially lower durability than premium brands, more complex setup without Fast Pitch features, and limited weatherproofing details compared to Coleman’s WeatherTec system.
Bottom Line: An outstanding choice for large families prioritizing space and affordability over premium brand assurance. If you need maximum room and features on a budget, this Ozark Trail tent delivers impressive functionality without breaking the bank.
Understanding Alpine Storm Dynamics and Tent Requirements
Alpine weather operates under different physics than valley systems. At 10,000 feet and above, air density drops by roughly 30%, allowing wind to accelerate with less resistance and temperature swings to become violent. Your tent must contend with forces rarely experienced in lower-elevation backpacking.
The Science Behind Rapid Weather Changes at High Altitude
The orographic effect forces moist air masses upward, cooling them at approximately 3.3°F per 1,000 feet gained. When that air crosses the dew point suddenly—often in afternoon thermal cycles—condensation becomes instantaneous precipitation. Combined with jet stream proximity and reduced friction at altitude, wind speeds can double in minutes. A shelter designed for predictable weather patterns will fail catastrophically here.
Why Traditional Tents Fail in Extreme Alpine Conditions
Standard three-season tents prioritize ventilation and weight savings over structural integrity. Their cross-pole designs create flat panels that act as sails, and their 1,200mm hydrostatic head ratings might repel rain but buckle under wind-driven snow. The stake-out loops often rip at 35 mph winds, and non-reinforced seams split under lateral stress. Alpine-specific engineering addresses these failure points systemically, not incrementally.
Decoding “Fast-Pitch” Technology for Mountain Use
“Fast-pitch” has become a buzzword, but true rapid-deployment systems for alpine use involve more than pre-bent poles. The mechanism must remain functional with gloved hands, in zero visibility, and when you’re operating on autopilot at 18 hours of exertion.
Integrated Pole Systems vs Hub Designs
Integrated pole systems thread permanently into the tent body, creating a unified structure that pops into shape like a giant spring. While brilliant for car camping, they sacrifice packability and often use thinner pole sections. Hub designs, where poles clip into a central junction, offer superior strength-to-weight ratios and allow field replacement of individual sections. For alpine use, look for hubs machined from aircraft-grade aluminum with positive-locking mechanisms that won’t slip under torsional loads.
Color-Coded and Sleeveless Attachment Systems
In whiteout conditions, you can’t read labels. Premium alpine tents use tactile differences—guyline tabs of varying shapes, pole clips with distinct snap sounds, and color systems visible in low light. Sleeveless attachment systems (all clips) shave precious minutes but require precise pole tensioning. Hybrid systems (clips on body, sleeves on fly) offer the best compromise, distributing wind load while maintaining speed.
Critical Fabric Technologies for Storm Resistance
The difference between a $400 tent and an $800 tent often lies invisible to the eye—woven into the molecular structure of the fabric itself. Understanding these technical specifications prevents costly mistakes.
Denier Ratings and Tear Strength Explained
Denier measures linear density, not necessarily strength. A 40D ripstop nylon with high-tenacity yarn can outperform 70D standard nylon. More critical is the tear strength rating (ASTM D2261), which should exceed 30 lbs for alpine use. Look for “high-tenacity” or “HT” designations, and understand that silicone-coated fabrics (silnylon, silpoly) achieve significantly higher tear resistance than polyurethane-coated equivalents at the same denier.
Waterproofing Beyond the Rating: Hydrostatic Head Deep Dive
A 3,000mm hydrostatic head rating means the fabric withstands 3,000mm of water column pressure before leaking. But alpine conditions involve wind-driven snow and ice particles that exert dynamic pressure far exceeding static water columns. True alpine tents start at 5,000mm ratings, but more importantly, they use dual-coating processes: silicone on the exterior for UV resistance and PU on the interior for seam taping compatibility. Single-coated fabrics will delaminate after repeated freeze-thaw cycles.
UV Degradation and Cold-Crack Resistance
At altitude, UV intensity increases by 10-12% per 1,000 meters. Standard nylon loses 50% of its tear strength after 500 hours of high-altitude sun exposure. Premium alpine fabrics incorporate titanium dioxide or other UV inhibitors in the coating. Cold-crack resistance, tested via ASTM D2136, ensures the coating remains flexible at -40°F. A tent that passes this test will have “CC” or “arctic-grade” in its specifications.
Geometric Design Elements That Deflect Destruction
Shape determines survivability more than any other factor. Wind doesn’t just push—it creates vortices, pressure differentials, and harmonic oscillations that can shake a tent apart.
Aerodynamic Profiles and Wind Tunnel Testing
The ideal alpine profile is a low, asymmetrical wedge with a 30-35° windward angle. This creates laminar flow separation, preventing the vacuum effect that rips flat walls. Some manufacturers now publish wind tunnel data; look for tents tested at 70+ mph with dynamic loads, not just static pressure. The trailing edge should taper gradually to prevent eddy shedding that induces vibration.
Guy-Out Points and Vestibule Engineering
Adequate guy-out points number at least 12 for a two-person tent, positioned at pole junctions where stress concentrates. These should be reinforced with bartacked webbing loops, not simple fabric tabs. Vestibules must create a pressure buffer zone—double-vestibule designs with offset doors prevent wind from slamming directly into the inner tent. The vestibule should pitch taut with its own dedicated pole structure, not just drape from the main tent body.
The Four-Season vs. Alpine-Specific Distinction
Many mountaineers learn this lesson the hard way: a four-season tent is not necessarily an alpine tent. The categories overlap but serve different primary design briefs.
Why Mountaineering Tents Differ from Winter Camping Shelters
Four-season tents excel in deep snow and moderate winds (up to 40 mph), prioritizing livability and ventilation for multi-day basecamping. Alpine-specific tents sacrifice some interior space and breathability for pure structural integrity in extreme winds. They feature smaller mesh panels (or zip-shut options), minimal interior volume to reduce heat loss, and pole configurations that prioritize strength over headroom. The distinction matters: using a winter basecamp tent on an exposed ridge can be fatal.
Weight vs. Fortress: The Ultralight Compromise
The ultralight movement has created tents that weigh under two pounds but claim four-season capability. In alpine storms, this is often a dangerous fallacy.
Calculating Your “Storm Safety Ratio”
Divide the tent’s packed weight by its wind load rating (if available). A ratio under 0.03 (pounds per mph of wind resistance) indicates a structure optimized for weight over strength. For storm-prone alpine zones, aim for 0.04-0.05. A 4.5-pound tent rated to 80 mph winds (0.056 ratio) will serve you better than a 2.5-pound tent rated to 45 mph (0.056 ratio). The math reveals the engineering priority.
Essential Features Checklist for Storm-Prone Zones
Beyond broad categories, specific features determine field performance. Use this checklist as a non-negotiable filter when evaluating options.
Ventilation Systems That Prevent Condensation in High Winds
Paradoxically, the most sealed tent often becomes the wettest. High winds force moist exhalation through fabric, where it condenses on the cold fly interior. Look for dual-stage vents: low, leeward intake vents with snow-proof baffles and peak exhaust vents with overlapping rain flaps. The system must remain functional when guyed out for storm mode. Some designs incorporate fly vents that can be adjusted from inside the tent—a critical feature when escape means frostbite.
Snow-Worthiness: Fly Coverage and Bathtub Floor Design
The fly should extend within 4 inches of the ground on all sides, with a snow skirt (reinforced fabric flap) that can be buried for a seal. The bathtub floor needs 6-8 inch walls minimum, constructed from a heavier denier fabric than the canopy (70D floor vs 40D body is standard). Taped seams on the floor are useless if the coating fails; look for factory seam sealing that extends 1/4 inch beyond the stitch line.
Door Configurations and Storm-Entry Strategies
Single-door designs save weight but create a wind funnel every time you exit. Dual opposing doors allow you to always use the leeward side, but increase complexity. The best compromise: an offset single door with an interior vestibule (a “gear closet”) that acts as an airlock. Door zippers should be #8 or larger coil zippers with dual sliders; tooth zippers freeze solid. Storm flaps must cover the zipper entirely, secured by Velcro that remains functional when iced over.
Setup Strategies for Violent Weather
A perfect tent pitched poorly will fail. In extreme conditions, technique matters as much as technology.
The “Storm-Ready” Pitching Sequence
First, stake the windward side before raising any poles. Use deadman anchors (buried horizontally) rather than vertical stakes. Erect the pole structure with the fly attached as a single unit if possible—this is where fast-pitch designs prove their worth. Guy out the windward side completely before tensioning the leeward side. In winds over 40 mph, use a “partial pitch”: set up just the fly and footprint as a windbreak, then complete the tent in the lee of this shelter.
Anchor Systems Beyond Standard Stakes
Standard shepherd’s hook stakes pull out in alpine soils. Carry a mix: Y-beam stakes for hardpack, sand/snow stakes (wide, curved) for soft conditions, and 6-inch steel nails for rocky terrain. In emergencies, use “deadman” anchors: bury stuff sacks filled with rocks or snow, attached to guylines with trucker’s hitches. Always orient the anchor horizontally to the load direction, and bury it at least 12 inches deep.
Maintenance and Field Repairs
A storm-damaged tent is useless. Proactive maintenance and field-repair capability separate prepared alpinists from statistics.
Pre-Trip Inspection Protocols
Set up the tent in your backyard during a rainstorm. Spray it with a hose nozzle on jet setting to simulate wind-driven rain. Check for misting through the fabric—a sign of delamination. Flex all poles and listen for cracking sounds indicating microfractures. Test zippers with fine grit in the teeth; they should still operate. Inspect guy-out points with a headlamp for fraying webbing. This 30-minute ritual prevents epic failures.
Emergency Repair Kits for Alpine Environments
Your repair kit should include: 2 feet of spare pole section with a ferrule, nylon repair tape (not duct tape, which freezes), seam grip adhesive, a Speedy Stitcher awl, and 50 feet of Spectra cord. Know how to splint a broken pole with a tent stake and cordage. Practice in your living room so muscle memory takes over when your fingers are numb.
Budget Considerations and Long-Term Value
Alpine-grade tents represent significant investments. Understanding cost drivers helps allocate your budget intelligently.
When to Invest Premium and Where to Save
Spend on the fly fabric and pole structure—these are non-negotiable. You can compromise slightly on floor denier if you always use a footprint. Premium brands charge for R&D and verified testing; generic copies may look identical but use lower-grade coatings that fail in year two. A $700 tent that lasts 8 seasons costs $87.50 per season. A $300 tent that fails catastrophically on season two costs far more. Consider used gear from reputable brands; alpine tents often see minimal use and their designs change slowly.
Frequently Asked Questions
What’s the minimum hydrostatic head rating I should accept for alpine storm use?
For the rainfly, accept nothing below 5,000mm. For the floor, 10,000mm is the practical minimum since you’ll be kneeling on snow and ice. Remember that dynamic pressure from wind-driven precipitation effectively doubles the water pressure on fabric, so these numbers provide necessary safety margins.
Can a three-season tent ever work in alpine storms?
Only as an emergency shelter for a single night in forecasted stable weather. Three-season tents lack the pole geometry, fabric strength, and guy-out reinforcement to survive sustained alpine winds above 35 mph. Using one as a primary shelter in storm-prone zones is reckless and has contributed to numerous rescue scenarios.
How do I know if a tent has been genuinely wind tunnel tested?
Look for published test reports citing ASTM D4976 standards, wind speeds in mph (not km/h, which sounds more impressive), and dynamic load testing rather than just static pressure. Legitimate manufacturers will specify the test facility and provide data sheets. Vague claims like “tested in the Himalaya” are marketing, not engineering.
Is a single-wall tent ever appropriate for alpine use?
Single-wall designs excel in weight savings but require impeccable ventilation management. They’re viable for fast-and-light ascents where you’ll strike camp daily, but for multi-day storm riding, double-wall tents prevent insidious condensation buildup that can soak sleeping bags. Some hybrid designs offer removable inner tents, providing versatility.
How many guy-out points does a tent really need?
For a two-person alpine tent, 12 is the functional minimum. More important than quantity is placement: points should align with pole intersections and mid-span reinforcement patches. A tent with 8 properly placed guy-outs outperforms one with 16 haphazardly positioned tabs.
What’s the ideal packed size for an alpine tent?
Packability matters when you’re sharing a small pack with winter gear. Aim for a packed size under 7x20 inches for a two-person tent. However, never compress the tent body and fly together long-term; store them loosely to preserve coating integrity. Pack poles separately to prevent abrasion.
Should I prioritize weight or durability for alpine storm tents?
For storm-prone zones, durability is safety. A 4-5 pound tent with proven 70+ mph wind rating is more valuable than a 2.5 pound tent rated to 45 mph. The weight penalty is offset by survivability. Ultralight has its place, but not when storms are probable rather than possible.
How often should I re-waterproof my alpine tent?
Factory coatings last 3-5 years with proper care. Re-treat when you notice “wetting out”—water no longer beads but soaks into the fabric surface. Use a technical wash-in treatment like Nikwax TX.Direct, never household products. Apply in a bathtub, rinse thoroughly, and dry completely to prevent coating delamination.
What’s the difference between “mountaineering” and “alpine” tent categories?
Mountaineering tents prioritize livability for basecamping and moderate wind protection. Alpine-specific tents optimize for extreme wind and rapid deployment, often sacrificing interior space and features. If your route involves exposed ridges and high winds, choose alpine-specific. For glacier camps with deep snow but moderate exposure, mountaineering designs work better.
Can I use sand stakes in snow? Are they the same?
Sand stakes and snow stakes share wide profiles but differ critically. Snow stakes have holes along their length to freeze in place, creating a solid anchor. Sand stakes rely purely on surface area. In firm snow, sand stakes work adequately, but in powder, only dedicated snow stakes or deadman anchors provide reliable holding power. Always carry both types for variable conditions.