If you’re tired of choosing between your car and your cardio equipment for garage space, you’re not alone. The modern home gym revolution has collided with reality: square footage is finite, and traditional cardio machines demand far too much of it. Enter the wall-mounted ski ergometer—a brilliant reinterpretation of Nordic skiing that trades floor-sucking footprints for vertical efficiency without sacrificing an ounce of training stimulus. These machines transform underutilized wall space into a high-performance training zone, delivering full-body, low-impact cardio that burns calories and builds posterior chain power simultaneously.
Unlike their floor-standing cousins, wall-mounted ski ergometers liberate your living area while providing the same brutal effectiveness that makes this modality a favorite among CrossFit athletes, endurance skiers, and anyone who appreciates data-driven suffering. But not all wall-mount systems are created equal, and the difference between a rock-solid installation and a disastrous drywall failure comes down to understanding what lies beneath the surface—both literally and metaphorically. Let’s dissect everything you need to know before drilling those first holes.
Top 10 Ski Ergometers with Wall-Mount Options
 | Hikeen Ski & Snowboard Wall Mount,Fits Any Ski or Snowboard, Ski Wall Rack Non-Slip Storage for Garage Organization,Space-Saving Winter Gear Organizer,1 Pack | Check Price |
Detailed Product Reviews
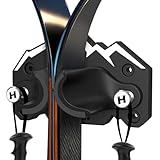
1. Hikeen Ski & Snowboard Wall Mount,Fits Any Ski or Snowboard, Ski Wall Rack Non-Slip Storage for Garage Organization,Space-Saving Winter Gear Organizer,1 Pack
Overview: The Hikeen Ski & Snowboard Wall Mount provides a streamlined storage solution for winter sports enthusiasts seeking to declutter garages or indoor spaces. Designed for a single pair of skis or one snowboard, it uses gravity-lock technology and non-slip TPE pads to secure equipment without damage. Its compact profile suits small cabins, apartments, or crowded garages where floor space is precious.
What Makes It Stand Out: This mount’s adaptive swivel arms automatically adjust to different ski widths and snowboard shapes without manual tweaking. Integrated side hooks store poles, creating a unified system. The gravity-lock mechanism is genuinely clever—push equipment upward into the grippers and physics handles security. Installation is remarkably straightforward with the included pre-drilled template, accessible even for DIY novices.
Value for Money: At $19.99, this single-pack rack delivers solid value for casual skiers with limited storage needs. Comparable mounts cost $25-40, making this an affordable entry point. Included hardware and templates eliminate extra purchases, and the durable construction supports 20 pounds—sufficient for most standard gear. However, families needing multiple units will see costs add up.
Strengths and Weaknesses: Strengths include the secure non-slip grip, universal compatibility, space-saving design, simple installation, and integrated pole hooks. The gravity-lock system provides quick access while maintaining stability. Weaknesses are the single-item capacity, the 20-pound limit that may struggle with heavy alpine gear, and required wall drilling. Extra-wide powder skis may challenge the “universal fit” claim.
Bottom Line: The Hikeen Wall Mount excels for solo skiers wanting affordable, space-efficient storage. Its clever design and easy installation suit renters and homeowners alike. Those with extensive collections should consider multi-slot alternatives, but for single-equipment storage, this rack punches above its weight class.
Why Wall-Mounted Ski Ergometers Dominate Small Spaces
The Vertical Advantage
Wall-mounted ski ergometers leverage the one resource most home gyms waste: vertical real estate. By anchoring directly to wall studs, these units eliminate the 4-6 square feet of floor space traditional ergometers require for stability. This isn’t just about saving space—it’s about reclaiming it. You can park your car, roll out a yoga mat, or perform kettlebell swings directly beneath your ski erg without compromise. The mounting height also positions the drive mechanism at eye level, creating a natural pulling plane that mimics actual poling motion more faithfully than floor-based alternatives.
Biomechanical Benefits of Nordic Skiing
The standing, upright nature of ski ergometer training activates your entire posterior chain while demanding core stabilization that seated cardio simply cannot replicate. Each poling stroke recruits lats, triceps, deltoids, abdominals, glutes, and calves in a coordinated effort that improves both aerobic capacity and functional strength. Wall-mounted models enforce proper posture because you can’t lean on a frame for support—you must engage your entire body as a single unit. This translates to better ski simulation and carries over to hiking, running, and everyday movement patterns.
Critical Features to Evaluate
Mounting System Engineering
The mounting bracket is the literal backbone of your investment. Look for laser-cut steel plates with multiple bolt holes that allow you to hit at least two studs simultaneously—never trust a single-point mount. Premium systems incorporate vibration-dampening gaskets between the bracket and wall, preventing micro-movements that can loosen bolts over time. The bracket should also offer micro-adjustments for leveling post-installation, because even a 2-degree tilt will feel unnatural during long sessions.
Resistance Mechanism Types
Air-resistance flywheels remain the gold standard for consistent, scalable intensity. The faster you pull, the harder it gets—mimicking the exponential resistance of poling through snow. Some models supplement air resistance with magnetic dampening, allowing finer control over baseline tension. Avoid purely magnetic systems; they lack the dynamic feel that makes ski erg training effective. Check the flywheel housing material: polymer composites reduce noise but steel or aluminum dissipate heat better during marathon sessions.
Height Adjustability Range
A quality wall-mounted ski ergometer accommodates users from 5'0" to 6'6" without requiring reinstallation. This typically means 12-18 inches of vertical adjustment within the mounting system itself, not just the handle position. The adjustment mechanism should lock positively—pinned or cam-locked—rather than relying on friction alone. Consider your household: if multiple people will use it, this feature moves from convenient to non-negotiable.
Console Technology and Data Tracking
Modern consoles should display pace (time per 500m), watts, strokes per minute, calories, and heart rate (via ANT+ or Bluetooth). Look for interval programming capabilities and the ability to save custom workouts. Bluetooth connectivity to apps like Zwift or proprietary training platforms transforms solo suffering into guided, competitive experiences. Backlit displays matter if your gym lacks direct lighting, and button size becomes crucial when your hands are sweaty and you’re gasping for air.
Acoustic Profile and Vibration Control
A ski ergometer’s acoustic signature affects household harmony. Air-resistance models generate white noise from the flywheel—pleasant to some, maddening to others. The real culprit is vibration transmitted through wall studs, which can resonate like a drum in adjacent rooms. Quality mounts include isolation bushings, and some manufacturers specify rubber dampening strips for the bracket. Test decibel ratings if available; anything under 65 dB at full sprint is respectably quiet.
Installation: The Make-or-Break Factor
Wall Structure Assessment
This is where dreams meet drywall. Your wall must have 16" or 24" on-center studs made of dimensional lumber (2x4 or 2x6 minimum). Use a magnetic stud finder to locate fasteners, then verify with a finish nail. Don’t guess—drywall anchors will fail catastrophically under dynamic load. For concrete or brick walls, you’ll need expansion anchors rated for at least 300 lbs shear load each. Metal studs? Forget it unless you reinforce with plywood backing spanning multiple studs. Manufactured homes with 2x3 studs require professional assessment.
DIY vs. Professional Installation
If you own a drill, level, torque wrench, and understand load paths, DIY installation is achievable in 90 minutes. The critical step is drilling pilot holes exactly centered in studs—off-center holes weaken the connection and invite wobbling. Professional installation ($150-$300) includes liability insurance and guarantees the mount will hold specified weight. For rental properties, professional installation provides documentation that protects your security deposit. Most manufacturers void warranties if improper installation causes failure.
Safety Clearance Requirements
You need a minimum 6-foot radius clear of obstacles in front of the machine—more if you perform lateral movements. Behind the unit, allow 2 inches between the flywheel housing and the wall for air circulation. Side clearance of 3 feet prevents handle impacts and allows easy console access. Ceiling height becomes critical: you need at least 8 inches above the highest handle position to avoid knuckle scrapes. For tall users, this often means 9-foot ceilings are the practical minimum.
Space Planning Essentials
Wall Space and Ceiling Height
Measure your available wall width: most units require 32-40 inches of horizontal space for the bracket and handle travel. Account for doorways, windows, and electrical outlets. The mounting height typically places the console at 60-72 inches from the floor—ensure this doesn’t interfere with light switches. For ceiling height, calculate: user height + arm reach + 8 inches clearance. A 6'2" user needs roughly 8'6" ceilings minimum. Sloped ceilings work if the highest point accommodates full arm extension.
Flooring Considerations
While the machine mounts to the wall, you still need appropriate flooring beneath. Rubber gym mats (3/8" minimum) protect against dropped handles and provide stable footing. Avoid thick foam tiles that create unstable poling platforms. If installing over carpet, place a 3/4" plywood sheet under the mat to distribute load and prevent rocking. The flooring should extend 2 feet beyond the clear zone to catch any sweat drips or equipment drops.
Performance Metrics Decoded
Power, Pace, and Stroke Rate
Power output (watts) reflects your true intensity—ignore calorie estimates and focus here. Pace (time per 500m) provides comparable benchmarks across sessions. Stroke rate (SPM) indicates efficiency; elite skiers maintain 40-45 SPM at high power, while beginners often over-spin at 55+ SPM with poor force application. Look for consoles that display force curve graphs, showing how your power application changes through the stroke. This feedback loop accelerates technique improvement dramatically.
Heart Rate Integration
ANT+ and Bluetooth heart rate monitoring allow you to train in specific zones. Ski ergometer training typically operates at 75-85% max heart rate for steady-state work and 90-95% for intervals. The standing position elevates heart rate faster than seated cardio, so your zones may shift 5-10 beats higher. Use this data to prevent overtraining and structure interval recovery periods accurately. Some consoles adjust resistance automatically to keep you in target zones—game-changing for structured programming.
Maintenance for Longevity
Regular Cleaning and Dust Management
Air-resistance flywheels suck in dust, hair, and debris, creating a grimy coating that reduces efficiency. Vacuum the flywheel cage monthly using a brush attachment. Wipe down the monorail and handle grips with mild soap weekly—sweat corrodes aluminum and degrades rubber over time. The wall bracket collects dust that can abrade paint; a quick wipe prevents rust. Never use harsh chemicals near the console; sweat alone can cloud LCD screens if left to dry.
Drive System Care
Chain-drive systems require quarterly lubrication with Teflon-based chain oil—never use WD-40, which attracts dust. Belt-drive systems are lower maintenance but inspect for cracking annually. Check chain/belt tension monthly; a loose drive feels spongy and reduces power transfer efficiency. Most systems include tension adjustment bolts. Listen for clicking or grinding, which signals misalignment or wear. Address these sounds immediately before they damage sprockets or pulleys.
Budget Reality Check
True Cost of Ownership
Entry-level wall-mounted ski ergometers start around $600, but quality units with robust mounts and advanced consoles run $900-$1,400. Add $50-$150 for installation hardware (if not included) and $150-$300 for professional installation. Factor in $100-$200 for flooring, heart rate monitors, and maintenance supplies. Budget models often skimp on mounting brackets, forcing you to purchase upgraded hardware separately. A $600 unit with a $200 bracket upgrade costs more than a $750 unit with an included quality mount.
Common Buyer Pitfalls
Wall Strength Miscalculations
The most expensive mistake is assuming your wall can handle dynamic loads. A 180-pound user generating 300 watts creates momentary forces exceeding 400 pounds on the mount. Drywall alone has 5-10 pounds shear strength—nowhere near enough. Even studs can fail if you mount to a single member or miss the center. Always verify stud spacing and composition. When in doubt, open the wall and install horizontal blocking between studs—cheap insurance against catastrophic failure.
Overlooking User Height Variations
That perfect mounting height for your 5'6" frame becomes a cramped, inefficient stroke for your 6'2" partner. Without adequate vertical adjustment range, you’ll either compromise technique or need separate machines. Measure everyone who’ll use it: floor to extended fingertips. The handle’s lowest position should match the shortest user’s waist height; highest position should clear the tallest user’s shoulders. Some families solve this with two mounting brackets installed at different heights, though this looks cluttered.
Workout Integration Strategies
Programming for Results
Treat ski ergometer training as skill work, not just cardio. Begin with 5-minute technique sessions focusing on hip hinge and core engagement. Progress to 10-minute steady-state pieces at 60-70% max heart rate, then introduce intervals: 30 seconds max effort, 90 seconds recovery, repeated 8-10 times. Advanced users can tackle Tabata protocols (20/10 intervals) or pyramid workouts (1-2-3-4-3-2-1 minute intervals). The wall-mounted nature makes it perfect for supersets: 250m sprint, 10 kettlebell swings, 10 push-ups, repeat for rounds.
Frequently Asked Questions
Can I mount a ski ergometer to drywall without hitting studs?
Absolutely not. Drywall anchors, even toggle bolts rated for 100+ pounds, will fail under the dynamic, repetitive loading of ski ergometer use. You must anchor into at least two structural studs using lag bolts. If your wall lacks studs in the right location, install plywood backing that spans multiple studs or reconsider a floor-standing model.
What ceiling height is truly necessary for safe operation?
For users under 6'0", 8-foot ceilings suffice if you mount the unit optimally. For anyone taller, 8'6" or 9-foot ceilings are strongly recommended. Measure from the floor to your fingertips when reaching overhead, then add 6-8 inches for handle clearance and safety margin. Sloped ceilings can work if the high side accommodates your full reach.
How much weight can a properly installed wall-mounted ski ergometer support?
Quality mounting systems are rated for 300-500 pounds static load, but dynamic loads during intense intervals can momentarily exceed this. The limiting factor is your wall structure, not the bracket. Two 2x4 studs properly bolted can handle dynamic loads exceeding 600 pounds. Always check manufacturer specifications and add a 20% safety margin for your body weight plus peak force generation.
Will vibrations from the ski ergometer disturb people in adjacent rooms?
Potentially, yes. The vibration transfers through wall studs and can resonate like a drum. Minimize this by using isolation mounts with rubber dampening, ensuring all bolts are torqued to specification (loose bolts amplify vibration), and avoiding shared walls with bedrooms or quiet spaces. Adding mass-loaded vinyl behind the bracket can further dampen transmission.
Can I install a wall-mounted ski ergometer in a rental property?
Only with explicit written permission from your landlord. Installation requires permanent structural modifications. Some landlords approve if you agree to professionally patch and paint upon move-out. Better options for renters include floor-standing ski ergs with small footprints or using a reinforced freestanding rig that doesn’t attach to walls. Document the installation with photos to protect your security deposit.
How do I know if my wall studs are positioned correctly?
Use a magnetic stud finder to locate drywall screws, marking each stud at multiple heights to confirm vertical alignment. Standard spacing is 16" or 24" on-center. Measure from a corner to the first stud—if it’s 16", your walls likely follow standard spacing. Drill a small pilot hole at the proposed mount height to verify solid wood; you should feel consistent resistance and see wood shavings, not just drywall dust.
What’s the difference between chain-drive and belt-drive systems?
Chain drives, like bicycle chains, are durable and provide a direct, responsive feel but require quarterly lubrication and occasional tension adjustment. Belt drives are quieter, lower maintenance, and smoother but can stretch slightly over time and may feel less “connected” to the flywheel. For most home users, belt drives offer better long-term convenience, while performance purists often prefer chain-drive feedback.
Can children or shorter adults use a wall-mounted ski ergometer safely?
Yes, if the unit offers adequate height adjustability. The handle should reach waist height at its lowest setting for a child around 4'6". Ensure the child understands proper technique—poor form combined with excessive handle height can cause shoulder strain. Supervise closely and consider a step platform for very young users to reach optimal starting position safely.
How often should I inspect the mounting hardware?
Perform a visual inspection monthly, checking for rust, loose bolt heads, or wall cracks around the bracket. Every three months, torque all bolts to manufacturer specifications using a torque wrench—vibration naturally loosens fasteners over time. After any unusually intense session or if you hear creaking, inspect immediately. Annual professional assessment is wise for heavy-use installations.
Are wall-mounted ski ergometers suitable for rehabilitation or physical therapy?
Absolutely, with caveats. The standing, low-impact nature is excellent for rebuilding shoulder mobility, core stability, and cardiovascular endurance post-injury. However, the fixed movement pattern can aggravate certain shoulder conditions. Start with very low resistance, focus on technique over intensity, and consult your physical therapist. Some PT clinics use ski ergs specifically because the wall mount allows precise height adjustment for different rehab protocols and patient sizes.