You’ve been riding for a while now, watching your average speed creep up and your Strava segments turn from red to green. But something’s missing—that next level of performance insight that separates enthusiastic riders from truly data-driven cyclists. Here’s the reality: power meters aren’t just for the pros anymore, and they definitely don’t require a pro-level budget.
The landscape has fundamentally shifted. What cost over a thousand dollars just five years ago can now be found for a fraction of that price. But navigating the budget power meter market requires more than just finding the lowest price tag—it demands understanding the trade-offs, compatibility minefields, and feature sets that actually matter for your specific riding goals. This guide cuts through the marketing noise to help you make an intelligent investment that won’t leave you regretting your choice halfway through your first training block.
Top 10 Power Meters for Road Cyclists on a Budget
Detailed Product Reviews
1. Favero Assioma PRO RS-1/MX Single-Sensing Power Meter Set, Road & Off-Road Riding – Shimano SPD-SL & SPD MTB Compatibility, Easy-to-Transfer, Cycling Dynamics w/ Wearable4U PowerBank Bundle
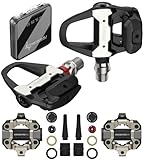
Overview: The Favero Assioma PRO RS-1/MX Single-Sensing Power Meter Set delivers professional-grade power measurement across road and mountain bike platforms in one cost-effective package. This innovative bundle includes both SPD-SL road and SPD MTB pedal bodies with a single removable power sensor, allowing cyclists to train with precision on multiple bikes without purchasing separate power meters. The system installs like standard pedals and transfers quickly between bikes.
What Makes It Stand Out: The modular dual-system design is genuinely revolutionary—offering two complete pedal systems for the price of one premium power meter. The quick-swap sensor transfers between road and off-road pedal bodies in minutes, making discipline-switching seamless. It provides advanced cycling dynamics including Power Phase, Torque Effectiveness, Pedal Smoothness, and Platform Center Offset (PCO) with ±1% accuracy, rivaling systems costing significantly more.
Value for Money: At $629, this bundle saves approximately 30% compared to purchasing separate road and MTB power meters. Considering most single-sided power meters alone cost $400-500, getting two complete pedal systems represents exceptional value for multi-bike cyclists. The included Wearable4U PowerBank adds further utility for long rides.
Strengths and Weaknesses: Strengths include unmatched versatility, pro-level accuracy, easy installation, and significant cost savings. The quick-transfer design works flawlessly. Weaknesses are inherent to single-sensing systems: no independent left/right leg data, potential accuracy limitations with oval chainrings, and reliance on doubling left-side power. For most riders, these limitations are minor.
Bottom Line: Perfect for budget-conscious cyclists who train across disciplines. The RS-1/MX delivers reliable power data and exceptional versatility without breaking the bank.
2. Favero Assioma PRO RS-2/MX Dual-Sensing Power Meter Set, Road & Off-Road Riding – Shimano SPD-SL & SPD MTB Compatibility, Easy-to-Transfer, Cycling Dynamics w/ Wearable4U PowerBank Bundle
Overview: The Favero Assioma PRO RS-2/MX Dual-Sensing Power Meter Set represents the pinnacle of versatility for serious cyclists who demand complete power data across multiple disciplines. This premium bundle includes both SPD-SL road and SPD MTB pedal bodies with a removable dual-sensing spindle that captures independent left and right leg metrics. The system maintains ±1% accuracy even with oval chainrings, delivering professional-grade data whether you’re racing road or shredding trails.
What Makes It Stand Out: True dual-sensing technology provides independent left/right power balance, torque effectiveness, and pedal smoothness for each leg—critical data for injury prevention and performance optimization. The modular design allows seamless swaps between road and MTB setups while maintaining the same sensor. Unlike single-sided systems, it accurately measures power with oval chainrings, eliminating a common data integrity issue.
Value for Money: At $949, this dual-sensing bundle still saves roughly 30% compared to buying separate dual-sided road and MTB power meters, which could easily exceed $1,300. For athletes requiring bilateral data across multiple bikes, this represents substantial savings while delivering uncompromised precision.
Strengths and Weaknesses: Strengths include true left/right balance, oval chainring compatibility, easy transferability, and professional-grade accuracy. The modular system is brilliantly engineered. The primary weakness is price—nearly $320 more than the single-sensing version. For riders not needing bilateral data, the premium may be unnecessary.
Bottom Line: Ideal for serious athletes, data-driven riders, and those using oval chainrings who need comprehensive power analysis across road and mountain bikes.
Why Power Meters Have Become Essential for Serious Cyclists
Power data transforms subjective feelings into objective metrics. While heart rate responds to temperature, caffeine, fatigue, and stress, wattage tells you exactly what your muscles are producing in real-time. For budget-conscious cyclists, this means every training minute counts double—no more wasted miles guessing if you’re in the right zone. The democratization of power meter technology means you can now train with the same precision as elite athletes without financing your purchase over six months.
What “Budget-Friendly” Really Means in 2024
The term “budget” in the power meter world has shifted dramatically. Today, a budget power meter typically falls between $250 and $600—roughly the cost of a decent carbon handlebar upgrade. This price point represents the sweet spot where manufacturers have sacrificed premium materials and marginal weight savings while preserving core accuracy and reliability. Understanding this range helps set realistic expectations: you’re buying precision measurement, not jewelry. The key is recognizing which corners have been cut and whether those compromises affect your specific use case.
The Five Main Types of Power Meters Explained
Before diving into features, you need to understand the fundamental architectures available. Each type measures force at a different location in your drivetrain, creating distinct advantages and limitations that directly impact budget considerations. The physics remain constant, but the implementation varies wildly in complexity, compatibility, and long-term value.
Crank Arm-Based Systems: Pros and Cons
Crank arm power meters attach to either your left or right crank arm, measuring the deflection as you apply force. They’re among the most budget-friendly options because they leverage your existing crankset—only the arm itself gets replaced. The single-sided measurement means you’re essentially doubling left-leg power to estimate total output, which introduces a margin of error for riders with significant leg imbalances. However, for consistent training and trend analysis, this limitation often proves acceptable. The real advantage lies in their simplicity: fewer moving parts, straightforward installation, and compatibility across multiple bike frames.
Pedal-Based Options: Maximum Versatility
Pedal power meters house the strain gauges and electronics directly in the spindle, making them the most transferable between bikes. This versatility creates exceptional value for riders with multiple road bikes or those who travel frequently. The budget versions typically offer single-sided measurement, though dual-sided options exist at higher price points. Thread compatibility becomes your primary concern—ensuring the pedals match your crank arms’ threading is non-negotiable. Q-factor changes are minimal with modern designs, but cleat compatibility requires careful attention if you use proprietary pedal systems.
Spider-Based Solutions: The Accuracy Sweet Spot
Spider-based meters measure torque at the crank spider, capturing power from both legs simultaneously. This location provides excellent accuracy and consistency because it’s close to the source of force application while remaining protected from impacts. Budget options in this category often come as complete cranksets, which can actually save money if you’re due for a drivetrain refresh anyway. The downside? Compatibility becomes a complex puzzle involving bottom bracket standards, chainring interfaces, and frame clearance. These systems reward meticulous research but punish impulsive purchases.
Hub-Based Alternatives: Simplicity and Value
Hub power meters integrate into the rear wheel, measuring power at the point where it translates to forward motion. This design makes them incredibly durable and immune to most frame compatibility issues. The budget appeal is strong—you’re essentially buying a training wheel with power measurement built-in. However, this becomes a limitation if you race or train on multiple wheelsets. Power readings can also be slightly lower than crank-based systems due to drivetrain efficiency losses, though this consistency matters more than absolute numbers for personal training.
Features That Actually Justify the Price Tag
When every dollar counts, feature prioritization becomes critical. Temperature compensation prevents accuracy drift between summer climbs and winter base miles—this isn’t marketing fluff, it’s essential for reliable data. Active temperature compensation adjusts in real-time, while passive systems require manual calibration when conditions change significantly. Auto-zero functionality saves you from remembering to calibrate before every ride, though you should still perform manual zero-offsets weekly. Waterproof ratings matter more than you’d think; IPX7 should be your minimum standard for year-round riding.
The Accuracy vs. Consistency Debate
Here’s where budget buyers need to recalibrate their expectations. Elite power meters advertise ±1% accuracy, but budget options might claim ±2-3%. The secret? Consistency often trumps absolute accuracy for training purposes. If your meter reads 2% high but does so reliably every single ride, your training zones, intervals, and trend analysis remain perfectly valid. The problem arises with inconsistent readings—data that jumps around based on temperature, cadence, or power fluctuations. Focus on user reviews that mention data repeatability rather than obsessing over laboratory-grade accuracy claims you’ll never verify outside a conti testing facility.
The Compatibility Checklist Every Cyclist Needs
Compatibility failures represent the most expensive mistake in budget power meter shopping. Start with your bottom bracket: Is it BSA threaded, PF86, BB30, PF30, or T47? Each standard requires specific spindle diameters and crank interfaces. Next, examine your frame’s chainstay clearance—some modern aero frames have minimal space around the crank area. Check your drivetrain generation: 10-speed, 11-speed, and 12-speed systems use different chainring spacing and tooth profiles. Don’t forget your head unit: Ensure it supports both ANT+ and Bluetooth Smart for maximum flexibility. Finally, verify your bike’s internal routing doesn’t interfere with crank rotation if you’re considering spider-based systems.
Single-Sided vs. Dual-Sided: The Budget Dilemma
The single-sided versus dual-sided debate intensifies at budget price points. Single-sided meters (typically left-only) cost 40-60% less while providing sufficient data for 90% of training scenarios. They assume your legs produce equal power, which most riders don’t, but the assumption holds consistently enough for effective training. Dual-sided systems reveal leg imbalances and true total power, valuable for injury rehabilitation or advanced pedaling technique work. For budget buyers, the question becomes: Would you rather have dual-sided data from a budget brand or single-sided data from a more established manufacturer? Most coaches recommend the latter for reliability and support.
The Hidden Costs of Budget Power Meters
That attractive sticker price rarely tells the full story. Factor in potential bottom bracket replacement if your current standard isn’t compatible—$30-80 for parts plus labor. Consider the tools needed for installation: torque wrenches, bottom bracket presses, and specialty sockets can add $100-200 if you don’t already own them. Some budget meters require proprietary chargers or batteries, creating future replacement costs. Software subscriptions for advanced analytics might be locked behind paywalls after initial free periods. Most importantly, calculate the cost of potential downtime: A budget meter with poor reliability could cost you an entire training block if it fails during a critical build phase.
Installation Complexity: DIY or Shop Visit?
Your mechanical confidence directly impacts the true cost of a power meter. Crank arm meters often require just a hex wrench and five minutes—perfect for home mechanics. Pedal systems need only a pedal wrench but demand proper torque specification to avoid damaging carbon crank arms. Spider-based installations can involve complete crankset removal, bottom bracket servicing, and precise chainring alignment—often worth the $50-100 shop fee. Hub-based systems require wheel building or replacement, definitely shop territory unless you own a truing stand and spoke tension meter. Be honest about your skills; a botched installation that damages your new meter voids warranty and savings simultaneously.
Data Protocols and Device Pairing
Modern power meters communicate via ANT+ or Bluetooth Smart (BLE). ANT+ offers robust, interference-resistant connections preferred by Garmin users and provides standardized power data that any head unit can read. Bluetooth Smart enables direct smartphone connections and is essential for indoor training apps. Budget meters sometimes cut costs by offering only one protocol—this becomes a critical limitation if you later upgrade your head unit or want to use multiple devices simultaneously. Look for dual-protocol support even at budget prices; the flexibility future-proofs your investment and eliminates frustrating connectivity issues mid-ride.
Battery Management in the Real World
Battery type significantly affects long-term satisfaction and cost. Coin cell batteries (CR2032) last 200-400 hours and cost pennies to replace, making them ideal for budget-conscious riders. Rechargeable lithium-ion batteries eliminate replacement costs but require remembering to charge yet another device—failures mid-ride are common. Some budget meters use proprietary battery packs that cost $30-50 to replace, negating initial savings. Consider your charging habits: If you already struggle to keep your head unit and lights charged, adding another rechargeable device creates a failure point. Cold weather also impacts battery life; coin cells perform more reliably in freezing conditions than rechargeables.
Calibration Best Practices for Consistent Data
Proper calibration separates reliable data from expensive random numbers. Perform a manual zero-offset before every important ride—most head units make this a 10-second process. Do it with the drive side crank at 6 o’clock, unclipped from the pedal, and the bike stationary. Temperature changes of more than 10°C (50°F) require recalibration; budget meters without active compensation drift more noticeably. Check your head unit’s calibration settings weekly—some units default to auto-calibration that can introduce errors if performed while clipped in. Never calibrate immediately after a ride; let the meter cool down for 15 minutes to avoid thermal drift affecting the zero point.
Software Ecosystems and Long-Term Viability
Your power meter is only as good as the software that interprets its data. Budget manufacturers sometimes skimp on app development, leaving you with buggy firmware updates and incompatible file formats. Investigate whether the company provides regular firmware updates—check their support forums for recent activity. Ensure the meter exports standard .FIT files that work with TrainingPeaks, Strava, and other major platforms. Some budget brands lock advanced features behind proprietary apps that may disappear if the company folds. Open ecosystem support means your data remains yours even if the manufacturer abandons the product.
Warranty Coverage and Support Quality
A two-year warranty should be your minimum expectation, even at budget prices. Read the fine print: Some warranties exclude water damage despite IPX7 ratings, or require professional installation to remain valid. Check how the company handles support—do they offer email, phone, or just a web form? Search cycling forums for actual user experiences with warranty claims; a company that ghosts customers after purchase transforms a minor issue into a total loss. Consider the manufacturer’s history: Have they been producing power meters for at least three years, or are they a new entrant that might not survive market consolidation? A warranty is only valuable if the company exists to honor it.
Common Pitfalls That Void Your Savings
Rushing to buy without verifying frame clearance is the number one budget killer. That unbeatable deal becomes worthless if the meter contacts your chainstay on every pedal stroke. Buying based on price alone often means overlooking critical features like temperature compensation, resulting in data so inconsistent it’s unusable. Ignoring compatibility charts and assuming “it’ll probably fit” leads to expensive returns or forced component upgrades. Choosing a meter from a brand with no domestic support means weeks of downtime for international shipping if issues arise. Perhaps most costly: buying more accuracy than you need—a ±1% meter offers no practical training advantage over a ±2% meter if you don’t race for money.
Future-Proofing Strategies
Smart budget buying means anticipating tomorrow’s needs. If you’re currently on an 11-speed drivetrain but plan to upgrade to 12-speed within two years, ensure your power meter supports both chainring standards. Choose a meter with user-replaceable batteries rather than sealed units—you can always upgrade the battery type later. Opt for brands that offer trade-in programs toward dual-sided upgrades; some manufacturers credit 50% of your single-sided purchase toward a future dual-system. Consider modular designs where you can replace individual components rather than the entire unit. Most importantly, buy from companies that demonstrate commitment to firmware updates for at least three product generations.
Timing Your Purchase: Market Cycles and Sales
The power meter market follows predictable cycles. New models typically launch in late summer, making previous generations available at 20-30% discounts. Major sales events like Black Friday and post-Christmas clearances often feature genuine deals on current models. Spring brings fewer discounts as demand peaks. Consider buying during the off-season when you’re not desperate for immediate installation—this patience often saves $50-100. Follow manufacturers on social media for flash sales and refurbished units with full warranties. Some brands offer “blemished” units with cosmetic defects at significant discounts; these function identically to perfect units and carry the same warranty.
Frequently Asked Questions
1. Can I really get a reliable power meter for under $300?
Yes, but with strategic compromises. At this price point, you’ll be looking at single-sided crank arm meters from newer market entrants. These units provide consistent, usable data for training purposes but may lack advanced features like dual-sided measurement or premium materials. The key is choosing a model with proven temperature compensation and strong user reviews for data consistency rather than absolute accuracy claims.
2. Will a budget power meter work with my indoor trainer setup?
Most modern budget meters transmit via both ANT+ and Bluetooth, making them compatible with Zwift, TrainerRoad, and other indoor platforms. The main consideration is ensuring your trainer doesn’t create electromagnetic interference—some wheel-on trainers can affect power readings. Direct-drive trainers generally pose no issues. For the best experience, look for meters that support simultaneous broadcasting to multiple devices.
3. How much accuracy am I sacrificing by going budget?
Premium meters advertise ±1% accuracy, while budget options typically claim ±2-3%. In practical training terms, this difference is negligible for zone-based workouts and trend analysis. The more important factor is consistency—whether the meter reads the same power for the same effort day after day. A budget meter that consistently reads 2% high provides better training data than a premium meter with erratic readings.
4. Can I install a power meter myself or do I need a shop?
It depends entirely on the type. Pedal and left-side crank arm meters are DIY-friendly with basic tools. Spider-based systems and complete cranksets often require bottom bracket tools and torque wrenches that exceed most home mechanics’ toolboxes. Hub-based meters require wheel building expertise. When budgeting, factor in $50-150 for professional installation if you’re not completely confident in your mechanical abilities.
5. Do I need dual-sided power measurement?
For 90% of cyclists, single-sided measurement suffices for effective training. Dual-sided data reveals leg imbalances and true total power, which matters for injury rehab or advanced pedaling technique work. However, a reliable single-sided meter from an established brand provides better long-term value than a dual-sided system from a budget manufacturer with questionable support. Start single-sided and upgrade later if you hit performance plateaus.
6. How long do budget power meters typically last?
With proper care, expect 3-5 years of reliable service. Battery life varies from 200-400 hours depending on type and usage. The most common failure points are water intrusion (avoid units below IPX7 rating) and battery corrosion from infrequent use. Units from established manufacturers often last longer due to better seals and component quality. Register your warranty immediately and keep purchase documentation.
7. Will a power meter make me faster?
A power meter doesn’t create watts, but it optimizes how you produce them. By eliminating guesswork from interval sessions and preventing overtraining through precise fatigue monitoring, most cyclists see measurable improvement within one training season. The real value lies in training efficiency—you stop wasting time in the wrong intensity zones. Budget meters provide identical training benefits to premium units; the data quality is more than sufficient for effective program design.
8. What happens if my power meter breaks after the warranty expires?
Most manufacturers offer out-of-warranty repairs at fixed rates, typically 40-60% of retail price. Some budget brands, however, lack repair programs, forcing you to buy a complete replacement. Before purchasing, check the company’s policy on post-warranty service. Consider it a cost of ownership calculation: A $400 meter with a $200 repair option after three years costs less over five years than a $250 meter you must replace entirely.
9. Can I use a power meter for racing or is it just for training?
Absolutely use it for racing. Power data during events helps pace efforts, especially in time trials and long road races where going out too hard ruins your day. However, don’t become a slave to the numbers—race tactics and responding to attacks often require exceeding your sustainable power. Many racers hide power display during events but record data for post-race analysis. Budget meters work identically to premium units for racing applications.
10. How do I know if a budget power meter brand is trustworthy?
Research three key areas: longevity (have they been in business 3+ years?), community feedback (search forums for actual user experiences, not just influencer reviews), and firmware update history (check their support site for recent updates). Trustworthy brands maintain active social media presence and respond to customer issues publicly. Avoid companies with only a flashy website and no community engagement. A legitimate warranty means nothing if the company disappears before you need it.