Transforming your driveway into a regulation-style basketball court is no longer a weekend pipe dream reserved for the ultra-handy. With the evolution of precision-engineered stencils and advanced coating technologies, 2026 has become the breakthrough year for homeowners wanting professional-grade results without the five-figure contractor bill. Whether you’re nurturing the next generation of hoop stars or simply want a clean, organized space for pickup games, the right stencil system can mean the difference between crisp, durable lines that last for years and a faded, bleeding mess by next season.
But not all court stencils are created equal. The market has exploded with options ranging from flimsy single-use templates to heavy-duty reusable systems that can withstand multiple installations. Understanding the nuanced differences in materials, sizing protocols, and surface compatibility is critical before you invest your time and money. This comprehensive guide cuts through the marketing noise to equip you with the expert knowledge needed to evaluate any stencil kit like a seasoned court installer.
Top 10 Basketball Court Stencils for DIY Driveways
Detailed Product Reviews
1. Franklin Sports Basketball Court Stencil - Easy to Use Basketball Marking Kit - No Paint Included

Overview: The Franklin Sports kit provides an economical solution for converting driveways or backyards into regulation high school basketball courts. Constructed from durable PVC, this stencil set includes all essential line markings for official gameplay at an accessible price point for casual players and families.
What Makes It Stand Out: Its continuous-line stencil design enables simultaneous layout of all court markings, streamlining painting into a single session. The PVC material balances flexibility with reusability, allowing easy folding and storage between touch-ups while maintaining accurate high-school dimensions for authentic play.
Value for Money: At $34.95, this kit offers exceptional affordability. While paint is purchased separately, its low entry cost democratizes professional court marking. The reusable PVC construction provides reasonable longevity for occasional seasonal use, though it won’t match the lifespan of heavy-duty plastic alternatives costing significantly more.
Strengths and Weaknesses: Strengths include unbeatable pricing, lightweight portability, straightforward continuous-line layout, and official regulation sizing. The PVC material withstands moderate use. Weaknesses are the basic accessory package lacking alignment aids, PVC’s potential to crack after repeated folding, absence of protective storage, and minimal instruction detail. Paint must be purchased separately.
Bottom Line: Perfect for budget-minded buyers wanting regulation markings for occasional home use. It sacrifices premium durability for affordability but delivers where it counts.
2. Coivy Quick Setup Backyard Basketball Court Marking Kit – Snap-Fit Stencils for Concrete,Asphalt,Residential Driveway,with Reusable & Easy Storage Cardboard (for High School)-Paint not Included

Overview: Coivy’s kit targets families seeking a collaborative court-building experience. This cardboard-based system promises high school regulation markings with a self-aligning design that simplifies setup. Marketed as a 30-minute project, it emphasizes teamwork and includes protective storage solutions for repeated use.
What Makes It Stand Out: The snap-fit, puzzle-like connector system ensures perfect alignment without measuring expertise, making it genuinely family-friendly. Guided stickers and clear instructions enable parent-child assembly, transforming court creation into a bonding activity. The smart storage design with protective box addresses cardboard’s moisture vulnerability.
Value for Money: At $70.99, this mid-range kit sits between basic PVC and premium plastic options. The price reflects alignment innovations and storage solutions rather than material durability. While cardboard won’t match plastic longevity, the reusability features and 24-hour customer support add value for less frequent users.
Strengths and Weaknesses: Strengths include innovative self-aligning design, family-friendly assembly process, comprehensive accessory package with plumb bob and spray guard, and responsive after-sales service. The protective storage box is thoughtful. Weaknesses center on corrugated cardboard’s inherent moisture susceptibility despite protective measures, shorter lifespan than plastic, and moderate pricing for a cardboard product.
Bottom Line: Excellent choice for families prioritizing ease-of-use and shared activity over maximum durability. The alignment system justifies the price for those wanting hassle-free setup.
3. STENCILIT Basketball Court Stencil Kit for Concrete - Heavy Duty Plastic, Professional Kit for Driveway & Concrete, Reusable, Easy Assembly, Key & 3Point Lines Basketball Stencil

Overview: STENCILIT’s premium offering targets serious users requiring professional-grade durability. Constructed from 1mm thick PPE plastic, this heavy-duty kit promises weatherproof performance and repeated use. Designed by stencil specialists since 2013, it emphasizes rapid deployment and pro-level precision for high-traffic courts.
What Makes It Stand Out: The color-coded, three-part stencil system enables sub-one-hour court layout, significantly faster than piecemeal alternatives. Its 1mm PPE plastic provides exceptional rigidity and weather resistance, while video instructions demonstrate professional techniques. The brand’s decade-long specialization lends credibility to its regulation accuracy claims.
Value for Money: At $119.90, this is the premium investment option. The price reflects professional-grade materials and engineering. For schools, parks, or heavy home use, the durability justifies the cost over cheaper alternatives that require replacement. Casual users may find it excessive for occasional driveway games.
Strengths and Weaknesses: Strengths include superior 1mm PPE plastic construction, weatherproof durability, rapid color-coded assembly, professional-grade accuracy, comprehensive video instructions, and brand expertise. The complete kit includes spray guard. Weaknesses are the highest price point, potential overkill for casual residential use, and no mention of alignment aids beyond instructions.
Bottom Line: The top choice for institutions or serious players demanding maximum durability and professional results. Worth the premium for frequent, heavy-duty applications.
4. 𝑼𝒑𝒈𝒓𝒂𝒅𝒆 Basketball Court Marking Kit, Heavy-Duty Basketball Court Stencil Kit for Concrete or Driveway, Waterproof | Easy Install Plastic Templates, Over 100 Times, Fits Any Surface
Overview: This heavy-duty kit positions itself as a durable, versatile solution for multiple surfaces. Made from thick 0.08-inch PC plastic with a non-slip texture, it promises over 100 uses without deformation. The intuitive lettered panel system targets users wanting premium features without the highest price tag.
What Makes It Stand Out: The built-in plumb bob positioning system eliminates tape measure dependency, ensuring accurate curves and lines through gravity-based alignment. The PC plastic’s non-slip texture prevents shifting during painting, while compatibility with both spray paint and rollers adds versatility. Foldable panels enable compact storage despite thick construction.
Value for Money: At $89.99, this kit offers premium plastic durability at a mid-high price point. The 100+ reuse rating and waterproof construction provide excellent long-term value for regular users. It bridges the gap between budget PVC and top-tier PPE options, delivering professional features without maximum cost.
Strengths and Weaknesses: Strengths include thick PC plastic construction, innovative plumb bob alignment, non-slip texture stability, 100+ reuse capacity, easy cleaning, surface versatility, and comprehensive accessory package. The foldable design aids storage. Weaknesses include moderate brand recognition and a price that may still exceed casual user budgets. No protective storage case mentioned.
Bottom Line: A compelling alternative to premium brands, offering robust durability and clever alignment features. Ideal for regular users wanting professional results without paying the absolute highest price.
5. Murray Sporting Goods Basketball Court Marking Stencil Kit for Driveway, Asphalt or Concrete | Court Marking Stencil Spray Paint Kit for Backyard Basketball Court (2.0)

Overview: Murray Sporting Goods emphasizes American manufacturing and innovative design with their 2.0 kit. Using 6-inch wide cardboard pieces with puzzle-like connectors, it promises regulation accuracy for high school courts. The kit targets buyers valuing domestic production and patented alignment technology for quick, professional results.
What Makes It Stand Out: The patent-pending “puzzle-like” connector system ensures seamless, self-aligning assembly that stays firmly during spraying. As a proudly USA-made product, it appeals to patriotic buyers. The back-of-rim alignment tool and plumb bob demonstrate attention to placement precision, while 6-inch wide pieces reduce overspray better than narrower stencils.
Value for Money: At $109.99, this premium-priced cardboard kit trades material durability for American manufacturing and innovative design. The price reflects domestic production costs and patented features rather than longevity. For buyers prioritizing USA-made quality and alignment innovation over material, it offers unique value despite cardboard’s inherent limitations.
Strengths and Weaknesses: Strengths include innovative patented connector system, comprehensive alignment tools, 6-inch wide pieces minimizing overspray, USA manufacturing, regulation accuracy, and quick 15-20 minute layout time. The kit includes thoughtful accessories. Weaknesses are the premium price for cardboard material, moisture vulnerability despite width, and shorter expected lifespan compared to plastic alternatives at similar prices.
Bottom Line: Best for buyers prioritizing American-made quality and innovative alignment over maximum material durability. The patented design delivers professional results despite cardboard construction.
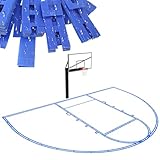
6. Basketball Court Marking Kit Basketball Court Stencil Kit for Concrete Driveway to Paint Basketball Court Lines Half Court High School Regulation Size 39.6’ x 21’

Overview: This half-court stencil kit delivers official high school regulation dimensions (39.6’ x 21’) for serious driveway basketball setup. Made from high-density cardboard, it includes all essential markings: three-point line, free throw line, and key. The manufacturer emphasizes a continuously connected design rather than puzzle-style pieces, claiming under-five-minute setup time. Paint is not included, but the kit comes with alignment accessories to streamline installation on concrete surfaces.
What Makes It Stand Out: The continuously connected stencil design eliminates the frustration of aligning multiple puzzle pieces, potentially saving significant setup time. The inclusion of a spray guard is a practical touch that prevents overspray and helps achieve cleaner lines. The plumb bob and masking tape (advertised as $30 value) demonstrate thoughtful planning for proper court alignment. The high-density cardboard construction offers a middle ground between flimsy paper and expensive plastic alternatives.
Value for Money: At $70.99, this kit positions itself in the mid-range market. While more expensive than basic cardboard options, it’s substantially cheaper than premium plastic kits. The included accessories add tangible value, and the reusable cardboard design offers decent longevity if properly maintained. For homeowners wanting regulation proportions without professional installation costs, it represents a reasonable investment.
Strengths and Weaknesses: Strengths include regulation sizing, quick setup claim, spray guard inclusion, and comprehensive alignment tools. The continuous stencil design reduces alignment errors. Weaknesses center on cardboard’s inherent limitations—susceptibility to moisture requiring thorough drying between uses, and limited durability compared to plastic alternatives. The “reusable” claim depends heavily on careful storage and weather conditions during use.
Bottom Line: This kit suits budget-conscious buyers seeking authentic high school court dimensions for occasional use. The thoughtful design and included accessories offset the cardboard material’s limitations. For seasonal repainting or moderate use, it delivers professional results without permanent installation costs.
7. Reusable Basketball Court Marking Kit, Basketball Court Stencil Kit for Concrete, NOT Paper Board, Sun-Resistant, Upgrade PC Material with Install Instruction

Overview: This premium marking kit upgrades from traditional cardboard to 0.07-inch thick PC plastic, targeting buyers prioritizing durability and repeated use. The half-court design promises over 100 applications while weighing only 6.6 pounds—lighter than conventional paperboard alternatives. It includes five labeled puzzle-style templates, painted boards for clean lines, and comprehensive alignment tools for various surfaces including wood, asphalt, and concrete.
What Makes It Stand Out: The polycarbonate plastic construction fundamentally solves the moisture and durability issues plaguing cardboard kits. Sun-resistance and waterproofing make it genuinely reusable across seasons without careful drying. The puzzle-style design, while requiring more initial alignment, enables compact storage and easier handling. Weighing 40% less than traditional 0.11-inch paperboard while offering superior longevity represents genuine material innovation.
Value for Money: Priced at $94.47, this is the premium option in the category. The cost-per-use becomes attractive when amortized over 100+ applications—under $1 per court marking. For community centers, schools, or households planning frequent repainting, the investment pays for itself quickly. Compared to cardboard kits requiring replacement every few uses, the long-term value proposition is compelling despite the higher upfront cost.
Strengths and Weaknesses: Strengths include exceptional durability, weather resistance, lightweight portability, and extensive reuse capability. The included touch-up board and dual plumb bobs ensure professional results. The puzzle design, while potentially more time-consuming than continuous stencils, enables better storage. The primary weakness is the premium price point, which may exceed casual users’ budgets. Some users might prefer the simplicity of a single-piece stencil.
Bottom Line: For serious basketball enthusiasts, schools, or facilities requiring frequent court marking, this kit justifies its premium price through unmatched durability and reuse. The plastic construction eliminates cardboard’s reliability concerns, making it the professional-grade choice for long-term use.
8. Reusable Waterproof Basketball Court Stencil Kit for Concrete, Basketball Court Marking Kit, Plastic Material, Sun-Resistant NOT Paper Board, Durable,Reusable, Can be Used More Than 20 Times

Overview: This plastic stencil kit offers a durable alternative to cardboard with 0.07-inch thick PC construction, designed for over 20 uses across various surfaces. The 19.9’ x 25’ half-court dimensions include six labeled templates (A-F) plus a border line piece. At 6.6 pounds, it prioritizes portability while providing weather resistance against rain, wind, and sun exposure for outdoor applications.
What Makes It Stand Out: The inclusion of a dedicated border line template provides a complete court outline, enhancing professional appearance. The six-piece puzzle system offers more granular alignment control than five-piece designs. Like premium competitors, the PC plastic solves moisture issues while remaining lighter than traditional materials. The kit balances durability with accessibility, positioning itself between single-use cardboard and ultra-premium options.
Value for Money: At $89.99, this kit sits in the upper-mid price range. The 20+ use rating offers better longevity than cardboard but falls short of competitors claiming 100+ applications. For homeowners planning to repaint their court annually for two decades, the investment works out to approximately $4.50 per use—reasonable for durable plastic. However, heavy users might find better value in kits with higher reuse ratings at similar price points.
Strengths and Weaknesses: Strengths include genuine weatherproofing, lightweight design, comprehensive six-piece layout, and surface versatility. The painted board and touch-up board ensure clean line work. Weaknesses include the modest 20-use claim, which seems conservative for plastic construction and limits its cost-effectiveness compared to higher-rated alternatives. The slightly smaller dimensions may not satisfy purists seeking exact high school regulation size.
Bottom Line: This kit serves as a solid middle-ground option for homeowners wanting plastic durability without the highest premium. While its reuse rating appears understated, the weather resistance and included accessories make it a reliable choice for seasonal court maintenance and moderate-frequency applications.
9. MAILEFU Basketball Court Marking Stencil Kit – Standard Size, Easy to Install, Ideal for Driveways, Asphalt or Concrete Surfaces, Court Marking Stencil Spray Paint Kit for Backyard Basketball 39.7FT

Overview: MAILEFU’s cardboard-based kit emphasizes speed and simplicity, promising complete installation in under an hour. The 39.7-foot design adheres to standard high school proportions with a 12-foot free throw zone, 15-foot free throw line, and 19'9" three-point arc. The innovative jagged joint system aims to keep templates locked during painting, addressing common alignment issues with multi-piece designs on driveways and asphalt.
What Makes It Stand Out: The sub-hour total installation time (15-20 minutes layout, 10-15 minutes painting) is the fastest claim in the category, appealing to impatient DIYers. The jagged joint design provides mechanical alignment assistance that puzzle-style connections lack. At $65.93, it’s the most affordable regulation-size option that includes multiple surface compatibility. The emphasis on “standard size design” rather than “high school regulation” suggests careful dimension verification.
Value for Money: This kit offers the lowest price point for a full-featured stencil system while maintaining regulation proportions. The reusable cardboard construction keeps costs down, though longevity won’t match plastic alternatives. For families wanting a properly dimensioned court for recreational use without long-term commitment, the value is exceptional. The trade-off between price and durability favors budget-conscious buyers.
Strengths and Weaknesses: Strengths include rapid installation, competitive pricing, innovative joint design for stability, and verified standard dimensions. The multi-surface compatibility adds versatility. Weaknesses stem from cardboard limitations—moisture vulnerability and finite reusability. The kit lacks a spray guard, requiring more careful painting technique. No explicit mention of alignment tools like plumb bobs may complicate centering for some users.
Bottom Line: MAILEFU delivers the best budget option for achieving regulation court dimensions quickly. While cardboard requires more care than plastic, the thoughtful joint design and fast setup make it ideal for families prioritizing immediate play over decades of reuse. Perfect for casual players wanting authentic lines without premium costs.
10. Spalding Basketball Court Marking Kit
Overview: Spalding’s entry-level kit takes a radically different approach, using colored chalk instead of paint for temporary court marking. The $11.66 system includes three chalk pieces (red, white, blue), a cord with four colored rings, and creates basic lane, free throw line, and three-point arc markings. Designed specifically for outdoor residential play, the chalk washes away with water, offering impermanence as a feature rather than a flaw.
What Makes It Stand Out: The chalk-based system eliminates paint costs, drying time, and permanence concerns entirely. Setup requires no stencils, spray guards, or alignment tools—just chalk and the included cord system. The sub-$12 price point makes it accessible to any household. Spalding’s brand recognition in basketball lends credibility to even this basic product. The washable nature allows for experimentation with court positioning before committing to permanent solutions.
Value for Money: Unbeatable price for introducing structured court boundaries to casual play. The kit costs less than a single basketball and requires no additional purchases. While it lacks durability and precision, the value proposition isn’t about permanence—it’s about immediate, affordable functionality. For families unsure about court placement or commitment level, this serves as a zero-risk trial solution.
Strengths and Weaknesses: Strengths include extreme affordability, simplicity, no equipment requirements, and easy removal. The multiple chalk colors allow for creative marking schemes. Weaknesses are substantial: chalk lacks precision for regulation play, requires frequent reapplication, washes away in rain, and offers no professional appearance. The cord system demands manual measurement and lacks the accuracy of stenciled lines. Not suitable for serious players or permanent installations.
Bottom Line: This kit excels as a temporary, experimental, or ultra-casual solution. It cannot replace painted courts for dedicated players but serves perfectly for testing locations, occasional pickup games, or children’s play where precision is secondary to basic boundary awareness. Buy it for flexibility, not permanence.
Understanding Basketball Court Stencils for DIY Projects
What Are Court Stencils and How Do They Work?
Basketball court stencils are precision-cut templates that create accurate boundary lines, arcs, and key markings on hard surfaces. Unlike traditional measuring and taping methods, these systems use either interconnected plastic panels or individual sheet layouts that map out entire court sections. Modern 2026 designs incorporate registration marks and alignment guides that eliminate guesswork, allowing even first-time users to achieve sub-inch accuracy. The best systems work by creating a physical barrier that prevents paint bleed while providing a clear painting channel—some advanced models even feature adhesive backing or weighted edges that conform to slightly uneven driveway surfaces.
Why DIY Driveway Courts Are Gaining Popularity in 2026
The post-pandemic shift toward at-home recreation continues to accelerate, with driveway courts becoming the centerpiece of residential sports entertainment. Advanced materials science has democratized what was once a specialized trade: today’s stencil kits leverage CAD-designed layouts and industrial-grade polymers that weren’t available to consumers even three years ago. Additionally, the rise of modular court systems and improved exterior paints means your DIY project can now rival municipal court quality at roughly 15-20% of the professional installation cost. For families with serious young athletes, this represents both a financial investment and a developmental tool that eliminates daily travel to practice facilities.
Key Benefits of Using Professional-Grade Stencils
Precision and Accuracy in Line Markings
Professional-grade stencils eliminate the human error inherent in manual measuring. The tolerance levels on premium systems reach ±1/8 inch across 94-foot layouts, ensuring your three-point line maintains consistent curvature and your free-throw lane meets regulation specifications. This precision impacts gameplay more than most realize—a free-throw line even two inches off can disrupt muscle memory and shooting mechanics. High-end stencils also account for paint thickness in their cutouts, compensating for the 3-5mm width that tape methods simply can’t calculate accurately.
Time and Cost Savings Compared to Freehand Painting
A full-court freehand paint job typically requires 12-16 hours of meticulous measuring, taping, and touch-ups. Quality stencil systems compress this into a 4-6 hour single-day project by removing the repetitive measuring phase. When you factor in the cost of painter’s tape (often $80-120 for a full court) and the labor value of your time, a $200-400 stencil kit pays for itself on the first use. Reusable systems amortize this further—premium kits rated for 20+ uses effectively cost $10-15 per installation.
Durability and Longevity of Professional Results
The mechanical edge definition created by rigid stencils prevents the paint bleeding that plagues tape jobs. This crisp separation means lines maintain their visibility 2-3 times longer, especially when using compatible paints. Professional installers have used similar systems for decades because the clean edges reduce paint waste and create a mechanical bond with the surface that’s less prone to peeling. Your driveway court becomes a long-term asset rather than an annual maintenance headache.
Essential Features to Evaluate Before Buying
Material Quality: Plastic vs. Cardboard vs. Composite
Material selection directly impacts both performance and longevity. High-density polyethylene (HDPE) stencils dominate the 2026 market—they’re flexible enough to conform to minor surface imperfections yet rigid enough to prevent warping. Thickness matters: 1/8-inch HDPE offers the sweet spot between durability and weight, while 1/16-inch versions are prone to buckling during application. Avoid cardboard-based systems entirely; they absorb moisture, swell, and disintegrate after a single use, making them false economy despite lower upfront costs. Emerging composite materials blend HDPE with fiberglass reinforcement for extreme durability, though these command premium pricing.
Thickness and Rigidity Considerations
Stencil thickness affects both paint control and reusability. Too thin (under 1/16 inch) and paint seeps underneath; too thick (over 1/4 inch) and the template becomes unwieldy and expensive. The ideal range of 1/8 to 3/16 inches provides sufficient edge depth to contain roller or spray applications while remaining lightweight. Rigidity must be balanced with flexibility—stencils that are completely rigid crack on uneven surfaces, while overly flexible ones distort during painting. Look for systems with reinforced edges or ribbed backing that maintains shape under pressure.
Reusability Factor for Multiple Projects
True reusability extends beyond material durability. Evaluate whether the stencil includes cleaning-friendly designs—smooth surfaces without intricate crevices where paint can accumulate and bond. Some 2026 models feature non-stick coatings similar to cookware, allowing dried paint to flake off with minimal scraping. Check for modular designs where high-wear sections (like the free-throw line) can be replaced individually rather than purchasing an entire new kit. Storage solutions matter too; stencils that nest together or roll without creasing preserve their flatness for subsequent uses.
Standard Court Dimensions and Stencil Sizes
Regulation vs. Customized Court Sizes
NBA and NCAA full courts measure 94×50 feet, but most residential driveways accommodate only modified dimensions. Quality stencil manufacturers offer proportional scaling algorithms that maintain correct line ratios while fitting your specific space. Half-court kits typically cover 47×50 feet but should include adjustable key widths and three-point distances. For youth players, look for kits with optional “junior” overlays that create appropriately sized free-throw lines and lane markings without requiring a separate purchase. The key is finding stencils that preserve the mathematical relationships between lines—simply shrinking everything proportionally can create awkward playing geometry.
Half-Court vs. Full-Court Stencil Kits
Half-court kits represent 80% of residential sales for good reason: they require less surface preparation, use significantly less paint, and complete in half the time. However, full-court kits often provide better value per square foot and include additional templates for center court logos and division lines not found in half-court versions. Some hybrid systems offer convertible designs where a half-court kit can be mirrored and aligned to create a full court, though this requires precise measurement skills. Consider your primary use case—half-court games dominate driveway play, but a full court adds resale value and tournament practice authenticity.
Key Markings: Free Throw Lines, Three-Point Arcs, and Lane Markings
The complexity lies in the curves. Three-point arcs require true radius construction, not approximated curves. Premium stencils use multiple interlocking sections with alignment pins to maintain the 19'9" (high school) or 23'9" (NBA) radius without distortion. The free-throw lane’s 12-foot width and 15-foot distance must integrate perfectly with the 6-foot radius free-throw circle. Advanced kits include ghost markings—lightly etched guide lines on the stencil itself that help position secondary elements like block marks and restricted area arcs. Ensure your chosen system accounts for paint line width in its measurements; a 2-inch line should measure exactly 2 inches finished, not 2 inches plus paint bleed.
Surface Compatibility Considerations
Asphalt Driveways: Preparation and Adhesion
Asphalt’s oil-based composition and slight texture require specific considerations. New asphalt must cure 30-90 days before painting to prevent binder migration that causes paint delamination. Older asphalt needs power washing and degreasing to remove surface oils. The best stencils for asphalt feature slightly flexible edges that seal against the textured surface, preventing paint from bleeding into the aggregate. Some installers recommend a light acrylic primer coat that both seals the asphalt and provides a uniform base color. Stencil adhesion can be enhanced with low-tack spray adhesive on the underside, though this risks leaving residue if left too long.
Concrete Surfaces: Porosity and Paint Absorption
Concrete’s porosity creates both opportunities and challenges. Unsealed concrete will absorb 30-40% more paint, requiring thicker application or pre-sealing. Etched or broom-finished concrete provides excellent mechanical bonding but can snag stencil edges. For these surfaces, weighted stencils (with built-in sand pockets or magnetic strips) outperform taped edges. The stencil material should be rigid enough to bridge minor cracks without bending. If your concrete has significant spalling or pitting, consider a self-leveling overlay before stenciling—the stencil will only replicate existing surface imperfections.
Alternative Surfaces: Pavers, Sport Tiles, and Coatings
Interlocking pavers present unique challenges due to joint lines. Flexible stencil sheets that can be cut to fit around pavers work better than rigid panels. For sport tile systems (like modular polypropylene courts), ensure the stencil’s backing won’t damage the tile’s textured surface—soft rubberized edges are ideal. Painted surfaces with existing coatings require stencils with minimal adhesive properties to avoid lifting old paint. Always test stencil compatibility on a small hidden section, especially with specialty surfaces like stamped concrete or exposed aggregate.
Paint Selection and Stencil Performance
Acrylic Latex vs. Epoxy-Based Paints
Your paint choice directly impacts stencil performance. Acrylic latex exterior paints offer easy cleanup and fast drying but may require more coats for opacity. They’re forgiving with stencil removal, peeling cleanly if lifted while slightly tacky. Epoxy-based court paints provide superior durability and chemical resistance but demand precise timing—remove the stencil too early and lines smear; too late and the paint film tears. Some 2026 stencil kits include paint compatibility charts specifying optimal products for their material composition. Water-based urethane hybrids represent the emerging sweet spot, combining epoxy’s toughness with latex’s user-friendliness.
Drying Times and Bleed-Through Prevention
Stencil design must account for paint rheology—thick paints need wider channels, while thin paints require tighter edge seals. Most quality stencils specify optimal paint viscosity ranges (typically 70-100 KU). For bleed prevention, look for stencils with beveled edges that create a knife-edge seal against the surface. Some advanced systems include absorbent gaskets along perimeters that wick away excess paint. Ambient conditions matter: paint applied above 85°F or below 50°F behaves differently, affecting bleed-through. The best practice is to apply two thin coats rather than one heavy coat, with stencil removal between coats for edge inspection.
Color Contrast and Visibility Optimization
High-visibility lines require both proper color selection and stencil precision. White remains standard for primary lines, but secondary markings (coaching boxes, substitution lines) benefit from contrasting colors. Modern stencils accommodate multi-color applications through overlay designs or negative-space techniques. Consider your driveway’s base color—light gray concrete needs less pigment load than dark asphalt. Some stencils include color-coded sections that guide you through painting sequences, ensuring you don’t accidentally paint over areas reserved for secondary colors. Reflective additives can be mixed into paint, but these require stencils with deeper channels to accommodate the larger particle size.
Installation Best Practices for Flawless Results
Surface Preparation: Cleaning and Priming
Preparation determines 80% of your outcome. Pressure wash at 2500-3000 PSI to remove all contaminants, then etch concrete with a mild acid solution or use a degreaser on asphalt. Allow 48-72 hours of dry weather before stenciling—moisture meters should read below 15% for concrete. Apply a primer coat using a roller with the stencil in place but not yet painted; this seals the surface and reveals any alignment issues. For asphalt, a dedicated acrylic sport court primer improves adhesion by 40%. Fill cracks wider than 1/4 inch with flexible sealant and sand smooth once cured.
Securing Stencils: Tape, Weights, and Adhesive Methods
The securing method must match your surface and stencil type. For rigid HDPE stencils on smooth concrete, double-sided carpet tape along the perimeter provides excellent hold without residue. On textured asphalt, combine perimeter taping with sandbags placed every 2-3 feet along long edges. Magnetic weights work brilliantly on steel-reinforced concrete but are useless on asphalt. Some 2026 kits feature integrated anchor holes for temporary stakes on dirt or gravel edges. Never stretch the stencil when securing—this introduces tension that releases during painting, causing line drift. Work in 10-foot sections, securing and painting progressively rather than laying out the entire court at once.
Painting Techniques: Spraying vs. Rolling vs. Brushing
Each method demands different stencil characteristics. Airless sprayers (0.015-0.017 tip) provide the fastest, most uniform coverage but require stencils with at least 3/16-inch thickness to withstand overspray pressure. Foam rollers offer more control and work well with 1/8-inch stencils, though they require careful loading to prevent seepage. Brushing is only viable for touch-ups; using a brush on large stencil areas introduces stroke marks and inconsistent thickness. For crisp lines, hold the sprayer 8-10 inches away at a 90-degree angle, moving parallel to stencil edges. When rolling, use a light touch and back-roll immediately to level paint. Remove stencils while paint is still tacky—typically 30-90 minutes after application, depending on temperature and humidity.
Weather Resistance and Climate Adaptability
UV Protection and Fade Prevention
Solar degradation remains the primary enemy of painted lines. Premium stencil kits now specify UV-stabilized paint formulations with lightfast pigments rated ASTM D4303 Level I. The stencil itself should resist UV embrittlement—HDPE with carbon black additive maintains flexibility for 5+ years of storage. Consider your latitude: courts in Arizona sun require different paint chemistry than those in Pacific Northwest overcast conditions. Some manufacturers provide regional paint recommendations based on UV index mapping. The stencil’s role extends beyond application; proper removal technique prevents pulling up partially cured paint, which thins the film and accelerates fading.
Rain and Moisture Barrier Properties
Unexpected rain can ruin a project if the stencil traps water against uncured paint. Hydro-channel designs—micro-grooves on the stencil’s underside—allow moisture to escape laterally rather than pooling. This is crucial for climates with afternoon thunderstorms. On the opposite end, high humidity slows cure times, requiring longer stencil contact periods. In coastal areas, salt air introduces corrosion concerns for metal stencil components; stick to all-plastic systems. For regions with freeze-thaw cycles, ensure your paint selection (guided by stencil manufacturer specs) includes elastomeric properties that flex with the substrate, preventing the stencil-created lines from becoming stress fracture points.
Temperature Extremes: Cold Crack Resistance and Heat Warping
Material selection becomes critical in extreme climates. HDPE stencils rated for -20°F maintain flexibility in northern winters, while polypropylene warps and cracks. Conversely, in desert climates where surface temperatures exceed 150°F, stencils must resist heat deformation. Look for glass transition temperature (Tg) ratings above 200°F for hot climates. Painting in extreme temperatures affects stencil performance too: cold makes paint thick and slow to level, while heat accelerates drying before proper flow-out occurs. The sweet spot is 65-80°F surface temperature, measured with an infrared thermometer. Some stencils include temperature-sensitive indicators that change color when conditions are optimal for application.
Cost Analysis and Budget Planning
Initial Investment vs. Long-Term Value
Entry-level stencil kits at $50-100 might seem attractive but often represent single-use, low-precision options. Mid-range systems ($150-300) typically offer 5-10 uses with decent accuracy. Professional-grade kits ($400-800) provide 20+ uses, include advanced alignment systems, and maintain dimensional stability across all applications. Calculate cost per use: an $600 kit used 25 times costs $24 per installation, while a $75 single-use kit is $75 per use. Factor in paint waste—cheap stencils often cause 30% more bleed-related touch-ups, adding $40-60 in extra materials per project.
Hidden Costs: Paint, Tools, and Sealants
The stencil is only one line item. Budget $150-250 for quality court paint (2-3 gallons for half-court), $50-100 for primer, $30-60 for cleaners and prep materials, and $40-80 for sealant topcoat. Tools add another $75-150: sprayer rental ($25/day), extension poles, rollers, and cleaning solvents. Some stencil kits require proprietary accessories like alignment jigs or spacing tools, adding $20-50. Don’t forget personal protective equipment and surface repair materials. A realistic total project budget runs $400-800 for a half-court, with the stencil representing 20-40% of that cost.
Warranty and Return Policy Considerations
Reputable manufacturers back their stencils with 1-3 year warranties covering material defects and dimensional accuracy. Read the fine print: many warranties void if you use non-recommended paints or clean with harsh solvents. Satisfaction guarantees (30-60 days) are valuable for DIYers—if the stencil proves too complex or doesn’t fit your space, you can return it. However, once paint contacts the stencil, returns are typically denied. Some companies offer “try before you buy” programs where you can test-fit unmarked stencil sections on your driveway before committing. This is particularly valuable for irregularly shaped driveways.
Common DIY Mistakes and How to Avoid Them
Improper Surface Preparation Pitfalls
The most catastrophic error is insufficient curing time. New concrete continues to hydrate for 28 days, releasing moisture that prevents paint adhesion. Painting too early causes the stencil lines to bubble and peel within weeks. Another common mistake is inadequate cleaning—oil spots from vehicles create “fish eyes” where paint won’t stick, breaking line continuity. Use a concrete grinder on stubborn stains. Failing to account for slope is another issue: driveways often pitch 1-2% for drainage, which distorts court geometry if not measured and compensated for in stencil placement.
Paint Bleeding and Edge Definition Issues
Bleeding typically stems from three causes: excessive paint application, poor stencil-surface contact, or removing the stencil too late. The “wet edge” technique—painting adjacent sections while previous areas are still tacky—prevents lap marks but requires precise timing. Back-brushing the stencil edge with a dry brush before painting creates a micro-seal that stops capillary action. If bleeding occurs, resist the urge to touch up immediately; let the paint cure 24 hours, then sand the bleeded area with 220-grit paper and apply a crisp correction coat using artist’s tape and a small brush.
Misalignment and Measurement Errors
Even with registration marks, cumulative error can throw off your court. Always establish a primary baseline using a laser level or chalk line, then work outward. The “3-4-5 triangle method” ensures square corners: measure 3 feet along one edge, 4 feet along the perpendicular, and the diagonal should measure exactly 5 feet. For three-point arcs, anchor the stencil’s center point precisely—being off by just 2 inches at the center creates a 6-inch error at the arc’s ends. Photograph your layout from an elevated position (ladder or drone) before painting to catch perspective distortions invisible at ground level.
Advanced Customization Options
Adding Personalized Logos and Branding
Modern stencil ecosystems support customization through modular inserts. Center court logos, family initials, or team mascots can be added via secondary overlay stencils that align with primary court markings. These typically use a three-layer technique: base color, detail colors, and outline. Some manufacturers offer digital design services where you upload vector artwork, and they produce a custom insert that integrates with their standard court kit. For DIY enthusiasts with cutting equipment, HDPE sheets can be custom-cut, though maintaining registration accuracy becomes challenging. Consider contrast requirements—intricate designs need larger scales to remain legible from a distance.
Multi-Sport Court Adaptability
Driveways rarely serve single purposes. Converting your basketball court for pickleball, volleyball, or foursquare maximizes utility. Multi-sport stencil kits use color-coded layers or reversible designs where one side features basketball markings and the opposite side shows alternative sport lines. The key is non-overlapping geometry—basketball keys and pickleball non-volley zones can share space if cleverly arranged. Look for kits with removable sections; the free-throw lane stencil might double as a pickleball court boundary when inverted. Paint color strategy becomes critical here—use contrasting colors for different sports to avoid visual confusion, and ensure your stencil material can handle multiple paint layers without buildup.
Temporary vs. Permanent Stencil Solutions
Not every homeowner wants a permanent court. Temporary stencils use low-tack adhesive backing that removes cleanly within 7-14 days, ideal for tournament hosting or seasonal use. These are typically thinner (1/16 inch) and designed for single or limited use. Permanent solutions involve thicker, non-adhesive stencils used with careful taping. A hybrid approach uses “removable paint” technology—stencils designed for use with temporary chalk-based or latex paints that wash away after 3-6 months. This is perfect for renters or those wanting to test layouts before committing. The stencil material must resist the removal process without degrading, which often means smoother, harder surfaces that clean easily.
Maintenance and Long-Term Care
Cleaning and Storing Your Stencils Properly
Proper cleaning begins immediately after use. For water-based paints, rinse stencils with a garden hose while paint is still wet, using a soft brush on stubborn spots. For epoxies, wait until paint skins over (30-60 minutes), then peel it off in sheets—never use metal scrapers that gouge the plastic. Dry stencils flat or hanging vertically; stacking wet or warped stencils creates permanent deformations. UV-protective storage bags prevent brittleness during long-term storage. Store in climate-controlled spaces; temperature swings in garages cause expansion-contraction cycles that stress the material. Before reuse, inspect for cracks at stress points, especially around alignment holes and narrow bridge sections.
Touch-Up Strategies for Faded Lines
Even the best paint fades, but stencil-created lines are easier to refresh. Use the original stencil sections as masks for spot-touch-ups, securing them with minimal tape to avoid pulling up adjacent paint. For minor fading, a single maintenance coat every 2-3 years suffices. Feathering techniques—thinning paint at the edges of touch-up areas—prevent visible ridges. If lines have worn unevenly (common under the basket), stencil only the worn section using alignment marks to match the existing geometry. Keep leftover paint from the original job; color matching new batches is nearly impossible due to manufacturing variations and UV exposure changes.
When to Replace vs. Repair Your Stencil Kit
Replace stencils when dimensional accuracy degrades—check key measurements against a steel tape annually. Cracks at bridge points (the narrow plastic connecting stencil sections) can be repaired with HDPE welding rods and a heat gun, but this requires skill to maintain flatness. Warping beyond 1/4 inch across a 4-foot section indicates material fatigue and necessitates replacement. If the stencil’s non-stick coating wears off (evidenced by paint sticking stubbornly), professional refinishing is possible but often costs more than replacement. Keep usage logs; most quality stencils show performance degradation after 15-20 uses, though proper care extends this significantly.
Safety and Regulatory Compliance
ADA Considerations for Residential Courts
While residential courts aren’t subject to ADA commercial requirements, forward-thinking design accommodates all players. Stencil kits that include wheelchair-accessible lane markings (wider free-throw lanes and lower hoop markings) future-proof your court. Ensure the stencil layout doesn’t block accessible routes from the house to the street. Paint texture matters—additives for slip resistance can create challenges for wheelchair maneuverability. Some municipalities classify permanent courts as “structures” requiring ADA-compliant pathways; check local interpretations before installing.
HOA Guidelines and Local Zoning Laws
Homeowner associations increasingly regulate court installations. Some prohibit permanent markings visible from the street, making temporary stencil systems necessary. Others restrict colors—bright orange lines might violate aesthetic guidelines. Stencil reversibility becomes a selling point here; if you can document that markings are temporary, you may bypass restrictions. Zoning laws occasionally address court placement relative to property lines and setbacks. While stencils themselves aren’t regulated, the resulting court might be. Obtain written approval before purchasing, and consider stencils that allow easy modification if HOA demands changes.
Slip-Resistance and Player Safety Standards
Court stencil systems indirectly impact safety through paint thickness and texture. Overly thick paint creates trip hazards at line edges. Beveled-edge stencils produce tapered paint profiles that reduce this risk. Paint additives like silica sand improve traction but require stencils with deeper channels to accommodate the texture. The stencil’s role is ensuring consistent application thickness—variations lead to uneven traction. For competitive play, consider stencils compatible with two-part polyurethane coatings that meet DIN 18032 sports surface standards, even if your installation doesn’t require certification.
Environmental and Sustainability Factors
Eco-Friendly Material Options
Sustainability-conscious buyers now have options. Recycled HDPE stencils made from post-consumer plastic bottles perform identically to virgin material while reducing environmental impact. Some manufacturers offer take-back programs, recycling worn stencils into new products. Biodegradable cardboard stencils exist but lack durability; they’re only viable for single use with water-based paints. Emerging bio-plastics derived from corn starch show promise for temporary stencils but haven’t yet achieved the dimensional stability needed for precise lines. Check for Cradle to Cradle certification or similar third-party validation of environmental claims.
Low-VOC Paint Compatibility
Volatile Organic Compound regulations tighten annually. Your stencil must tolerate modern low-VOC formulations, which dry differently than traditional paints. Low-VOC paints have higher water content, increasing the risk of stencil warping if the material isn’t moisture-resistant. They also skin over faster, requiring quicker stencil removal. Rapid-release stencil designs with minimal surface contact area work best. Some stencils include ventilation channels that accelerate drying in humid conditions where low-VOC paints struggle. Always verify that your paint’s VOC content complies with local regulations—many areas now restrict levels to 50 g/L, affecting performance characteristics.
Recyclability and End-of-Life Disposal
When your stencil reaches end-of-life, disposal matters. HDPE is recyclable (resin code #2), but paint contamination complicates this. Clean stencils thoroughly before recycling—many facilities reject painted plastic. Composite materials (HDPE/fiberglass) are generally not recyclable and must be landfilled. Some manufacturers offer closed-loop programs, accepting returned stencils for material recovery regardless of condition. Consider the total lifecycle: a $500 stencil used 25 times and recycled responsibly has lower environmental impact than five $100 single-use stencils that end up in landfills. Factor this into your purchase decision if sustainability is a priority.
Frequently Asked Questions
How long does a typical driveway court stencil project take from start to finish?
A half-court installation on a properly prepared surface typically requires 6-8 hours: 2-3 hours for final cleaning and layout, 1 hour for stencil placement, 2-3 hours for painting (including drying between coats), and 1 hour for stencil removal and touch-ups. Full courts double this timeline. Weather delays and surface repairs can extend the project across multiple days, but the actual painting window should be contained within a single dry day to ensure consistent curing.
Can I use regular house paint instead of specialized court paint with my stencil kit?
While physically possible, it’s strongly discouraged. House paints lack the abrasion resistance and flexibility of court-specific formulations, leading to rapid wear and peeling. They also have different viscosity profiles that increase bleed-through with standard stencils. If you must use house paint, choose 100% acrylic exterior grade with a satin sheen, and expect to repaint annually. Most stencil warranties explicitly void coverage if non-recommended paints are used, as the chemical interaction can damage the template material.
What’s the minimum driveway size needed for a regulation half-court using standard stencils?
A functional half-court requires a minimum clear area of 45×35 feet to accommodate a 42-foot three-point line and proper out-of-bounds margins. However, most stencil kits are designed for 47×50 foot standard half-courts. If your space is smaller, look for kits with proportional scaling guides, but understand that shrinking the three-point arc below 18 feet fundamentally changes the game’s geometry. Measure your available space carefully, accounting for slopes, drainage, and overhead obstructions before purchasing any stencil system.
How do I prevent the stencil from sticking to the paint and pulling it up during removal?
Timing is critical—remove stencils when paint is tacky but not fully cured, typically 30-90 minutes after application. Use a utility knife to score the paint edge where it meets the stencil, breaking the mechanical bond. Pull the stencil back at a 180-degree angle (flat against the surface) rather than lifting vertically. For stubborn adhesion, mist the stencil edge with water to reactivate water-based paints slightly. Ensure you’re using paint within the stencil manufacturer’s recommended viscosity range; overly thick paint creates stronger adhesion to the template.
Will repeated use of court stencils damage my driveway surface?
Properly used stencils won’t damage concrete or asphalt. Issues arise from improper prep: pressure washing too aggressively (removing surface paste), using harsh chemical strippers, or pulling up paint that takes substrate with it. The stencil itself is inert. However, the painting process can highlight pre-existing issues—if your driveway is spalling, paint removal during stencil cleaning might exacerbate it. Using too much adhesive tape can pull up sealant or surface layers, especially on older asphalt. Always use the gentlest securing method that prevents stencil movement.
Can stencil-created courts be removed if I sell my house or change my mind?
Yes, but removal difficulty varies by paint type and surface. Water-based acrylics can be removed with chemical strippers and pressure washing, though this is labor-intensive. Epoxy paints require grinding or shot-blasting. Some homeowners simply paint over lines with driveway sealant, though texture differences remain visible. Temporary stencils with removable paint offer the easiest reversal—power washing typically removes 95% of markings. If future removal is a concern, choose lighter paint colors and avoid epoxy systems, documenting the original surface condition with photos before installation.
How do I store my stencils between uses to ensure they last for years?
Clean thoroughly after each use, removing all paint residue. Dry completely—even residual moisture causes warping and mildew. Store flat on a level surface, weighted to prevent curling, or hang vertically using the stencil’s alignment holes. Avoid rolling unless the manufacturer specifically approves it; creases become permanent and affect sealing. Use the original packaging if it’s designed for storage, as it often includes protective layers. Climate-controlled storage (50-80°F, low humidity) prevents material degradation. Inspect annually and refinish any areas where the non-stick coating shows wear using HDPE-safe spray treatments.
What’s the best time of year to stencil a basketball court in different climate zones?
In temperate zones, late spring and early fall offer ideal 65-80°F temperatures with low humidity. Desert climates require early morning starts to avoid 150°F surface temperatures that cause rapid paint skinning. Northern states should complete projects at least 6 weeks before first frost to ensure full cure before freeze-thaw cycles. Coastal areas need low-wind days to prevent overspray and debris contamination. Always check the 48-hour forecast; rain within 24 hours of application can cause washout, while moisture during curing creates milky finishes. Paint manufacturers provide climate-specific application windows—align your stencil project accordingly.
Can I customize my stencil kit with additional markings like coaching boxes or alternate three-point distances?
Most quality kits include optional templates for advanced markings. If not, you can create custom additions using HDPE sheets and a router or hot knife, matching the original stencil’s thickness. Registration is key—use the existing stencil’s alignment holes as reference points. Some manufacturers sell expansion packs for specific needs (NCAA women’s three-point line at 20'9", FIBA distances, etc.). For youth courts, you can mask existing lines with tape and stencil intermediate distances. Always maintain the mathematical relationships—customizing one line without adjusting connected elements creates geometric inconsistencies that affect play.
How do I handle stenciling on a driveway with existing cracks or repairs?
Cracks under 1/4 inch can be bridged by rigid stencils if you fill them with elastomeric sealant and sand smooth first. For larger cracks, treat them as expansion joints and stop your stencil lines at each side, resuming on the other side with proper alignment. Consider routing out cracks and filling with semi-rigid epoxy to create a stable surface. Some stencil systems include crack-bridging inserts—flexible strips that span gaps while maintaining line continuity. If your driveway has extensive repairs, apply a thin overlay first; stencils perform best on uniform surfaces. Document crack locations and monitor them annually, as movement will eventually break painted lines regardless of stencil quality.