Building a serious strength training setup at home doesn’t mean you need to drop a fortune on commercial-grade equipment or sacrifice half your garage to a full power rack. In 2026, the half rack market has evolved dramatically, offering incredible value for lifters who want safety, versatility, and stability without the premium price tag. Whether you’re converting a spare bedroom corner or optimizing a compact garage gym, understanding what separates a budget-friendly bargain from a dangerous liability is crucial.
The landscape of affordable half racks has shifted—manufacturers are now delivering features that were once exclusive to high-end models, but the market is also flooded with options that cut corners where it matters most. This guide cuts through the noise, giving you the expert framework to evaluate any half rack on your shortlist. We’re diving deep into the engineering, safety standards, and practical considerations that will help you build a setup that grows with you for years, not months.
Top 10 Half Racks for Budget-Friendly Strength Setups
Detailed Product Reviews
1. Rugged Strength & Fitness Half Rack (Y120P3) with Lat Attachment - 300 lb. Weight Set Included, Ideal for Home Gym Strength Training, Squats, and Workout - Enhanced Power Cage for Fitness Reality
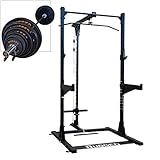
Overview: The Rugged Strength & Fitness Half Rack (Y120P3) is a comprehensive home gym solution from industry veteran Body Solid. This all-in-one system combines a heavy-duty half rack, lat pulldown attachment, and a 300-pound weight set, designed for serious strength training in limited spaces. Measuring 50.2"L x 52.5"W x 89.4"H, it targets intermediate to advanced lifters seeking commercial-grade durability without the commercial footprint.
What Makes It Stand Out: This unit’s 1,000-pound weight capacity and 2"x3" 11-gauge steel construction rival commercial equipment. The integrated lat attachment transforms it into a versatile cable station, while the included 300 lb Olympic weight set provides immediate training capability. Body Solid’s lifetime warranty on frames and welds demonstrates exceptional confidence. The scratch-resistant powder coat finish and 30+ year brand heritage further distinguish it from budget competitors.
Value for Money: At $1,529, this package delivers significant savings versus purchasing components separately. Comparable half racks alone cost $600-$800, quality lat attachments add $300-$500, and a 300 lb weight set runs $400-$600. The premium construction and extensive warranty justify the investment over cheaper alternatives that may require replacement within years. For committed lifters, this represents long-term value.
Strengths and Weaknesses: Strengths: Exceptional 1,000 lb capacity; commercial-grade 11-gauge steel; all-in-one versatility; outstanding warranty coverage; reputable manufacturer; included weight set enables immediate use. Weaknesses: Premium price excludes beginners; half rack design offers less stability than full cages; 300 lb set may limit advanced deadlifters; substantial footprint requires dedicated space.
Bottom Line: The Y120P3 is an excellent investment for serious home gym enthusiasts prioritizing durability and versatility. While the price and size demand commitment, the commercial-grade construction and comprehensive warranty ensure decades of reliable service. Ideal for lifters ready to move beyond entry-level equipment.
What Exactly Is a Half Rack?
A half rack is the sweet spot between a squat stand and a full power rack, offering a compact footprint while maintaining the safety features serious lifters demand. Unlike a full cage that encloses you on four sides, a half rack typically consists of two upright posts with a connecting rear stability bar or platform, creating an open-front design that saves space without sacrificing functionality. Think of it as a squat stand that grew up—engineered with integrated safety systems, pull-up capabilities, and the structural integrity to handle heavy compound movements.
The genius of the half rack lies in its minimal vertical support structure. You’re getting the core benefits of a power rack—safety spotters, J-hooks for racking the bar, and stability under load—in a package that demands roughly 30-40% less floor space. For budget-conscious builders in 2026, this efficiency translates directly to dollars saved, both on the unit itself and the square footage it consumes in your home.
Why Half Racks Are the Smart Choice for Budget-Conscious Lifters
Budget half racks deliver unparalleled bang for your buck because manufacturers can allocate more resources to quality components where they matter most. Without the additional steel required for four uprights and extra crossmembers, companies invest in thicker gauge steel for the main uprights and more sophisticated safety systems. You’re essentially getting a concentrated dose of what makes a rack safe and functional, without paying for structural redundancy.
The open design also means fewer wear points and less maintenance over time. Fewer bolts, less wobble potential, and simpler assembly translate to a setup that stays solid year after year. In the sub-$500 category, this focused engineering approach means you’re less likely to encounter the corner-cutting that plagues budget full racks—where manufacturers often thin out steel across more components to hit price points.
Key Factors to Consider When Shopping for Budget Half Racks
Weight Capacity: How Much Is Really Enough?
Don’t get hypnotized by inflated numbers on spec sheets. A legitimate 700-pound weight capacity is more than sufficient for 95% of lifters, even those pursuing serious strength goals. What matters more is how that capacity is calculated—static load rating versus dynamic load rating. Static ratings assume the weight sits calmly on J-hooks, while dynamic ratings account for the force generated when you re-rack a heavy squat with authority.
For budget racks in 2026, look for units advertising “true working load limits” rather than maximum static capacity. A rack rated for 800 pounds dynamic load will comfortably handle your 400-pound squat attempts with room for aggressive re-racking and the occasional missed rep on spotter arms. Anything below a 600-pound dynamic rating should raise eyebrows, regardless of how impressive the static number sounds.
Steel Gauge and Build Quality: The Foundation of Safety
Steel gauge is your non-negotiable starting point. Budget half racks should use 14-gauge steel as a minimum for the uprights, with 11-gauge being the gold standard you’ll find in some premium budget options. The difference isn’t just academic—14-gauge measures roughly 0.075 inches thick, while 11-gauge hits 0.120 inches, representing a 60% increase in material that directly impacts stability and longevity.
Pay attention to weld quality and finish. Powder coating should be consistent, even on the inside of uprights where manufacturers sometimes skimp. Welds should be full penetration and ground smooth, not just tack-welded beads that crack under torque. In 2026, laser-cut holes with UHMW plastic liners are standard on decent budget racks—this protects your barbell knurling and prevents steel-on-steel wear that degrades both your equipment and your grip.
Height and Footprint: Measuring Your Space Reality
Before falling in love with any rack, grab your tape measure and account for reality, not just the listed dimensions. A 92-inch tall half rack needs at least 96 inches of ceiling clearance to accommodate pull-ups without your head hitting drywall. Add another 6-12 inches if you plan on mounting a pull-up bar with neutral grip handles that extend above the main frame.
The footprint should include your lifting area. A rack with a 4’ x 4’ base needs a minimum workout zone of 8’ x 8’ to safely bail from lifts and load plates. Budget models often sacrifice depth—some cheaper units offer only 24 inches from upright to rear support, which can feel cramped when unracking for bench press. Look for at least 30 inches of usable depth, measured from the inside face of the front upright to the rear stability point.
Must-Have Safety Features That Should Never Be Compromised
J-Hooks and Spotter Arms: Your First Line of Defense
J-hooks should feature thick UHMW plastic liners that completely cover the metal cradle—not just thin strips that wear through after six months. The hook design matters too: a proper J-hook has a deep throat (at least 3 inches) and a secure locking pin that engages with the upright hole, not just a friction fit that can dislodge during aggressive reracking.
Spotter arms need to extend at least 20 inches from the upright to catch a failed squat safely. Shorter arms might work for bench press but become dangerous when you’re sinking into a heavy squat and need coverage for your full range of motion. The arm material should match your J-hook quality—fully lined with protective plastic and rated for the same dynamic load as the rack itself.
Pin Pipe Safeties vs. Strap Safeties: Which System Wins?
Pin pipe safeties are the traditional choice—solid steel bars that slide through holes in the uprights. They’re bombproof but can damage your barbell if you drop weight onto them repeatedly. Strap safeties, using heavy-duty nylon or Kevlar-reinforced webbing, have migrated down to budget racks in 2026 and offer superior bar protection with comparable strength.
For budget setups, strap safeties often indicate a more thoughtfully engineered rack. They require precise manufacturing tolerances to anchor securely, and quality straps are rated for 1,000+ pounds. Pin pipes are simpler and cheaper to produce, which is why they’re common on ultra-budget models. If you choose pin pipes, ensure they have thick plastic sleeves or buy aftermarket covers—replacing a bent barbell costs far more than upgrading your safety system.
Versatility on a Budget: Getting Maximum Value
Pull-Up Bar Variations and Grip Options
A basic straight bar is fine, but modern budget half racks are offering multi-grip pull-up stations that transform your rack into a complete upper body station. Look for units with at least three grip widths—narrow neutral, standard pronated, and wide—to target different muscle groups without buying additional attachments.
Knurling on the pull-up bar matters more than you’d think. Aggressive knurling tears up your hands during high-rep sets, while too-smooth bars become slippery when you sweat. The sweet spot is medium diamond knurling with a 1.25-inch diameter. Some 2026 models now feature removable pull-up bars, allowing you to swap between fat grip and standard options as your training evolves.
Attachment Compatibility: Future-Proofing Your Investment
The hole spacing pattern on your uprights determines your attachment ecosystem. Westside spacing—1-inch holes through the bench zone and 2-inch spacing above and below—has become the budget standard, giving you precise safety placement where it matters most. Some proprietary patterns lock you into a single brand’s expensive attachments, so verify compatibility before buying.
Check the hole diameter too. 5/8-inch holes accommodate the vast majority of third-party attachments, while 1-inch holes are less common and limit your options. The budget rack that accepts standard attachments from multiple manufacturers will save you hundreds over time as you expand your setup with landmines, dip stations, and cable systems.
The Great Plate Storage Debate: Built-In vs. Separate
Built-in plate storage pegs seem like a free bonus, but they fundamentally change your rack’s stability and footprint. Pegs mounted low on the uprights act as counterweights, which can be helpful for lighter racks, but they also reduce your interior working space and create shin-bruising hazards during lunges or split squats.
Separate plate trees or horizontal storage offer more flexibility and keep your lifting zone clean. Budget half racks under $400 often include storage pegs as a value-add, but this can indicate thinner steel elsewhere to compensate for the cost. If you opt for built-in storage, ensure the pegs are removable and rated for at least 300 pounds each—cheap pegs bend, and a falling 45-pound plate is a nightmare scenario.
Assembly and Stability: What to Expect at Different Price Points
Budget half racks have become remarkably stable, but assembly quality makes or breaks the final product. At the sub-$300 level, expect bolt-together construction with multiple small pieces. The key is bolt quality—grade 8.8 or higher hardware with nylock nuts that resist loosening under vibration. Cheap racks ship with soft bolts that strip during assembly or loosen after a month of training.
Stability improvements start with proper anchoring. Even if you don’t bolt your rack to the floor (though you should), look for units with pre-drilled base plates and included concrete anchors. Many 2026 budget models now feature “stability enhancement kits”—essentially angled support braces that reinforce the rear connection point. These add 15 minutes to assembly but eliminate wobble completely when you’re kipping pull-ups or reracking aggressively.
Budget Half Rack Red Flags: What to Avoid
Beware of racks advertising “800-pound capacity” without specifying dynamic versus static load. This is often code for “don’t actually test this with heavy weight.” Another red flag is plastic end caps on the uprights instead of welded steel caps—this suggests thin steel that can’t support proper welding.
Watch for spotter arms that attach with a single pin instead of two. That second pin isn’t just for stability; it’s a redundancy that prevents catastrophic failure if the primary pin shears. Also avoid racks with painted-over welds—this hides poor workmanship and can mask cracks. A quality rack shows clean welds with a consistent heat-affected zone, then receives powder coating.
Maximizing Your Half Rack Setup Without Breaking the Bank
Your rack is just the foundation. To build a complete system, prioritize a quality barbell and weight plates before splurging on attachments. A $200 rack with a $300 barbell will serve you better than a $400 rack with a $100 barbell that bends after a year. Look for used plates locally—iron is iron, and savings here fund better attachments later.
DIY solutions can bridge gaps in budget setups. A homemade deadlift platform using plywood and horse stall mats costs under $100 and protects both your floor and your plates. Resistance bands anchored to the rack’s base with homemade loop anchors add accommodating resistance for pennies compared to commercial systems. The key is solving problems with creativity, not cash.
Long-Term Value: When Spending Slightly More Makes Sense
The difference between a $250 rack and a $400 rack in 2026 often represents a quantum leap in quality. That extra $150 typically buys you 11-gauge steel instead of 14-gauge, Westside spacing instead of generic holes, and strap safeties instead of pin pipes. Spread over a five-year training lifespan, that’s $30 per year for dramatically improved safety and versatility.
Consider upgrade paths too. A rack with 1,000-pound capacity and full attachment compatibility grows with you. The cheaper rack you replace after two years when you outgrow it costs more in the long run. Think of your half rack as a 10-year investment—spending 20% more upfront often delivers 200% more longevity and resale value if you eventually upgrade.
Frequently Asked Questions
What’s the realistic weight limit I should look for in a budget half rack?
For most lifters, a dynamic load rating of 700-800 pounds provides ample headroom. This safely handles your working sets even as you progress, accounting for the force of reracking and occasional missed reps. Focus on dynamic ratings over static numbers, and verify the rating includes both J-hooks and spotter arms at full extension.
Can I safely bench press alone in a half rack?
Absolutely, provided you have proper spotter arms set correctly. Position the arms so they sit 1-2 inches below your chest at full pause, allowing a slight “sink” if you fail but preventing the bar from crushing you. Always test arm height with an empty bar before loading weight, and never use a half rack for benching without spotter arms or pins engaged.
How do I know if my floor can support a loaded half rack?
Most residential floors handle half racks easily since weight distributes across the base footprint. A rack plus 300 pounds of plates and a loaded barbell rarely exceeds 50-60 pounds per square foot. For second-story installations, position the rack perpendicular to floor joists and avoid placing it mid-span. If concerned, place a 3/4-inch plywood platform underneath to spread the load.
Will a budget half rack wobble during kipping pull-ups?
Quality budget racks under $400 with proper assembly and rear stabilization remain surprisingly solid during dynamic movements. The key is tightening all bolts to spec (use a torque wrench if provided), installing any included stability braces, and ideally anchoring the rack to the floor. Unanchored racks may have slight movement but shouldn’t feel unstable or tip.
What’s the difference between 5/8-inch and 1-inch holes for attachments?
5/8-inch holes are the industry standard, offering compatibility with hundreds of third-party attachments. One-inch holes are less common, typically proprietary, and limit you to a single manufacturer’s ecosystem. Unless you find a rack with 1-inch holes at an unbeatable price, stick with 5/8-inch for maximum future flexibility and attachment options.
Should I bolt my half rack to the floor?
If possible, yes. Anchoring eliminates any chance of tipping during failed lifts or aggressive movements and reduces wobble to zero. Most quality budget racks include concrete anchors. For rented spaces or concrete-free floors, build a 8’ x 8’ deadlift platform and lag-bolt the rack through the plywood into the underlying studs for a semi-permanent, damage-free solution.
How important is Westside hole spacing on a budget rack?
Westside spacing (1-inch through the bench/squat zone) is a significant quality-of-life feature that allows precise safety placement. While not absolutely essential, it becomes invaluable as you lift heavier and need exact pin heights. Many 2026 budget racks now include this feature, so prioritize it if you’re deciding between similarly priced options.
Can I add a lat pulldown attachment to a budget half rack?
Yes, but verify weight capacity and stability first. Most budget half racks support lat pulldown attachments that mount to the uprights, but the rack needs at least a 700-pound dynamic rating to remain stable when you’re pulling 150+ pounds. Look for dedicated mounting holes or reinforcement plates, and consider adding rear counterweights if you notice any tipping during use.
What’s the minimum ceiling height for a half rack with pull-up bar?
Plan for 8 inches above the listed rack height. An 85-inch rack needs 93 inches of clearance for pull-ups. If you’re between heights, remember that most racks list height to the top of the pull-up bar, not the uprights. Measure your actual ceiling, account for flooring thickness, and test your reach with a doorway pull-up bar before committing.
How long should a budget half rack last with regular use?
A well-built budget half rack using 14-gauge steel should easily last 5-7 years of consistent training. Units with 11-gauge steel and quality powder coating can exceed 10 years. The most common failure points are bolt loosening (solved with annual checks) and J-hook liner wear (replaceable for under $20). Proper care and avoiding dropped deadlifts directly on spotter arms dramatically extend lifespan.