If you’ve ever watched a Nordic skier glide effortlessly across a snow-covered landscape and thought, “I wish I could bottle that full-body power,” you’re in luck. The ski ergometer has revolutionized home and commercial fitness by capturing the essence of cross-country skiing in a single, brutal-but-brilliant machine. But here’s the thing—not all ski ergs are created equal, and that little adjustable damper setting? It’s the secret sauce that transforms this tool from a one-trick pony into a lifetime training partner for everyone from rehab patients to Olympic hopefuls.
Unlike static resistance machines that lock you into a single intensity, ski ergometers with adjustable dampers offer a dynamic range that mimics everything from powder skiing through deep snow to sprinting on hardpack. This versatility isn’t just a nice-to-have feature; it’s the difference between equipment that gathers dust and a machine that grows with you through every fitness chapter. Whether you’re building cardiovascular base, rehabbing a shoulder injury, or training for explosive power, understanding how to leverage that damper setting is crucial.
Top 10 Ski Ergometers with Adjustable Damper
Detailed Product Reviews
1. Ski Machine Foldable – Simulated Ski Trainer with 4-Level Adjustable Non-Slip Pedal Armrests for Home – Pelvic Floor & Full-Body Workout Equipment Steel Frame Lightweight Design

Overview: The Ski Machine Foldable delivers an authentic alpine training experience in a remarkably compact package. This simulated ski trainer replicates real skiing motions to provide a comprehensive full-body workout that targets legs, glutes, and crucially, pelvic floor muscles—making it especially beneficial for postpartum recovery. Constructed with a reinforced iron frame supporting up to 550 lbs, it accommodates users from 4'11" to 6'5" through its intelligent 4-level height adjustment system with safety locks.
What Makes It Stand Out: Unlike cumbersome cardio equipment, this machine folds to just 14" x 9.3" x 23.2" and weighs a mere 11.9 lbs, sliding effortlessly under beds or into closets. The dual-bearing pulley system ensures exceptionally smooth gliding, while dual handrails and textured, shock-absorbing pedals provide beginner-friendly stability. The pelvic floor focus is a rare differentiator, addressing a specific fitness need seldom targeted by traditional equipment.
Value for Money: At $47.99, this costs less than a single month at most gyms and a fraction of professional ski trainers priced in the hundreds. It offers comparable benefits to premium lateral trainers while adding authentic ski-specific motion patterns. The rust-resistant construction suggests longevity that budget equipment typically lacks, making it a wise investment for multi-user households.
Strengths and Weaknesses: Strengths include outstanding portability, high weight capacity, smooth operation, and targeted pelvic floor benefits. The 4-level adjustment ensures stability during intense workouts. However, resistance isn’t adjustable beyond body weight, potentially limiting progression for advanced athletes. The lightweight design, while portable, may feel less substantial than commercial gym equipment.
Bottom Line: For home fitness enthusiasts seeking ski-specific training or postpartum recovery support, this machine delivers exceptional value. It’s ideal for beginners to intermediate users who prioritize space-saving design and full-body engagement over advanced resistance options.
2. Pyle Multifunction Skiing Sports Training Watch - Smart Classic Fit Sport Digital Fitness Gear Wrist Tracker w/ Chronograph, Timer, Alarm, Altimeter, Barometer, For Men and Women PSKIW25O,2.4 ounces
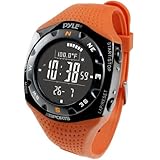
Overview: The Pyle Multifunction Skiing Sports Training Watch serves as a dedicated mountain companion, packing an impressive sensor array into a lightweight 2.4-ounce package. This digital wrist tracker monitors altitude, descent speed, slope data, and elapsed time, functioning as a personal ski logbook. With an altimeter, barometer, digital compass, thermometer, and chronograph, it covers essential alpine metrics for data-driven skiers.
What Makes It Stand Out: Ski-specific data tracking distinguishes this from generic fitness watches. It records maximum descent speed, altitude trends, and total elapsed time, storing history for performance analysis. The barometer’s weather prediction feature displays four graphical icons, helping skiers anticipate changing conditions. The EL backlight ensures readability in low-light environments, while 33ft water resistance handles snow and moisture exposure.
Value for Money: At $72.49, this dramatically undercuts specialized alpine watches often exceeding $200. While lacking GPS and advanced smart features, it delivers core ski metrics and environmental data casual to intermediate skiers need. The comprehensive function set rivals watches twice its price, making it accessible for enthusiasts avoiding premium brand premiums.
Strengths and Weaknesses: Strengths include dedicated ski logging, multiple environmental sensors, clear backlighting, and attractive pricing. The watch effectively tracks progress across multiple runs. However, 33ft water resistance is insufficient for swimming or heavy water exposure. The interface may feel dated compared to modern touchscreens, and Pyle’s brand recognition lags behind premium outdoor watchmakers.
Bottom Line: This watch suits budget-conscious skiers wanting run-tracking and mountain data without breaking the bank. It’s best for recreational skiers prioritizing function over fashion who don’t require deep-water resistance or smartphone integration.
What Makes a Ski Ergometer with Adjustable Damper a Game-Changer?
The adjustable damper is what separates serious training equipment from gimmicky gadgets. Think of it as the transmission in a car—while the engine (your effort) provides the power, the damper determines how that power translates into resistance and feel. This single feature fundamentally changes who can use the machine and how effective it will be for different goals.
Understanding the Damper Mechanism
At its core, the damper controls airflow to the flywheel. When you pull those handles, you’re spinning a fan through air. The damper setting—typically ranging from 1 to 10—adjusts how much air reaches the flywheel at any given moment. A lower setting (1-3) allows minimal air in, creating a faster-spinning flywheel that feels like gliding on fresh, fast wax. Crank it to 9 or 10, and you’re essentially skiing through molasses, requiring maximum force for each stroke.
This isn’t the same as simple resistance adjustment on a stationary bike. The damper changes the physics of the movement, altering the drag factor and forcing your muscles to recruit differently. Understanding this distinction is key to unlocking the machine’s potential.
Why Adjustability Matters for Different Fitness Levels
Beginners often make the mistake of associating high damper settings with “better” workouts. In reality, a beginner at damper 10 will likely develop poor form, fry their muscles in 30 seconds, and never touch the machine again. Conversely, an elite athlete stuck at a fixed resistance will plateau quickly, missing the nuanced training stimuli needed for peak performance.
The adjustable damper creates a scalable learning curve. A 65-year-old recovering from shoulder surgery can start at damper 1, focusing on range of motion and gentle cardio. That same person can progress to damper 5 for strength endurance six months later. Meanwhile, a CrossFit competitor can toggle between settings for interval training that builds both aerobic capacity and explosive power in the same session.
Key Benefits of Ski Erg Training for Every Athlete
The ski ergometer delivers unique physiological adaptations that are nearly impossible to replicate with other cardio equipment. The adjustable damper amplifies each of these benefits by allowing precise control over training stimulus.
Full-Body Conditioning Like No Other
Unlike rowing machines that heavily recruit legs, the ski erg distributes effort across your posterior chain, core, shoulders, and triceps in a way that mirrors functional movement patterns. Every pull engages your lats, rhomboids, deltoids, and core stabilizers while your lower body provides a stable base. With damper adjustments, you can emphasize different muscle groups—lower settings favor cardiovascular conditioning with quicker, lighter strokes, while higher settings demand brute strength from your back and arms.
Low-Impact, High-Intensity Cardio
Your joints will thank you. The seated or standing position eliminates the pounding of running, while the smooth pull motion avoids the shear forces sometimes associated with rowing. This makes ski erg training ideal for athletes managing knee issues, runners needing cross-training, or anyone wanting intense workouts without next-day joint pain. The adjustable damper lets you achieve high intensities without increasing impact—just increase the drag and maintain form.
Sport-Specific Training for Skiers and Beyond
Nordic skiers have long known the secret: nothing builds ski-specific power like a ski erg. But the benefits extend far beyond the snow. Rock climbers develop grip endurance and pulling power. Swimmers enhance their catch and pull-through mechanics. Combat sports athletes build the rotational core strength that translates directly to striking power. The damper setting allows you to simulate race conditions—dial it down for sprint simulation or crank it up for strength-building hill climbs.
Essential Features to Look for in a Quality Ski Ergometer
When evaluating ski ergs, certain features separate durable, effective machines from disappointing purchases. The adjustable damper is just the beginning.
Damper Settings Range and Precision
Look for machines offering at least 10 distinct settings with clear, tactile feedback. Some budget models claim “adjustable resistance” but offer only 3-4 vague settings that don’t correlate to actual drag factor changes. Premium machines provide precise damper controls that adjust the drag factor from below 50 to over 200, giving you measurable, repeatable settings for structured training.
Monitor and Performance Tracking Capabilities
The monitor is your training dashboard. It should display stroke rate, pace, distance, watts, and calories, but more importantly, it should calculate drag factor—a direct measurement of your damper setting’s effect. This data is crucial for tracking progress and replicating workouts. Look for monitors that store workouts, connect to heart rate monitors, and sync with training apps. Bluetooth connectivity isn’t just a luxury; it’s essential for long-term program design.
Build Quality and Durability
A ski erg experiences significant lateral and vertical forces. The frame should be heavy-gauge steel with quality welds. Check the handle construction—should be ergonomic with durable grips that won’t disintegrate after months of use. The cord or chain system should be enclosed and protected from dust. Remember: this machine will see thousands of explosive pulls; flimsy construction leads to dangerous failures.
Ergonomics and User Comfort
The pulling motion should feel natural, not forced. Quality machines allow slight adjustments to handle height or position to accommodate users from 5'0" to 6'6". The foot platform should be wide and stable, with non-slip surfacing. Some models offer optional seat kits for seated training, which is invaluable for adaptive athletes or specific rehab protocols.
Space Requirements and Storage Options
Most ski ergs mount to a wall and extend about 40-50 inches from it. Measure your space carefully, accounting for full arm extension plus room to move around the machine. Look for models with foldable arms or compact footprints if space is tight. Some commercial-grade machines are surprisingly compact, while budget options often have bulkier, less efficient designs.
How to Choose the Right Damper Setting for Your Goals
The damper isn’t a “more is better” dial. It’s a sophisticated training tool that should be manipulated based on specific objectives, current fitness, and time domain.
Beginner Guidelines: Starting Your Journey
New users should begin at damper settings 1-3 for at least their first two weeks. This develops neuromuscular efficiency and proper technique without excessive fatigue. Focus on maintaining 30-40 strokes per minute with smooth, continuous motion. The lower drag teaches you to apply force efficiently rather than muscling through each pull. Think technique first, intensity second.
Intermediate Strategies: Building Power and Endurance
Once you can maintain consistent form for 20+ minutes, experiment with damper settings 4-6. This range builds aerobic capacity while introducing strength endurance. Try interval workouts: 5 minutes at damper 3 for warm-up, then 1 minute at damper 6 followed by 2 minutes at damper 3, repeated 5-8 times. This teaches your body to recover while still moving—a critical skill for any endurance sport.
Advanced Techniques: Elite Performance Training
Advanced athletes use the entire damper spectrum strategically. For power development, perform 10-second max effort sprints at damper 8-10 with full recovery between attempts. For race simulation, settle into damper 5-6 for sustained threshold efforts. For active recovery, use damper 1-2 for 20-30 minutes of easy technique work. The key is matching damper to desired adaptation, not ego.
Understanding Flywheel Technology and Air Resistance
Not all resistance systems are equal. Understanding the physics helps you appreciate why air resistance with an adjustable damper creates superior training adaptations.
How Air Resistance Differs from Magnetic Systems
Magnetic resistance provides consistent, linear resistance that feels the same throughout the pull. Air resistance, by contrast, is exponential—the harder you pull, the more resistance you generate. This creates a natural movement pattern that rewards explosive power while still accommodating steady-state work. The adjustable damper modifies this exponential curve, making the machine more or less sensitive to your effort changes.
The Role of Flywheel Weight in Workout Feel
Heavier flywheels maintain momentum better, creating a smoother pull with less “choppiness” at lower stroke rates. However, they also require more initial force to accelerate. Quality machines balance flywheel weight with damper adjustability, typically using 5-7 pound flywheels that feel substantial without being sluggish. The damper setting compensates for flywheel weight by controlling airflow, so you can achieve the same drag factor on different machines with slightly different damper numbers.
Common Mistakes to Avoid When Buying a Ski Erg
Even savvy buyers fall into traps when selecting ski ergometers. Knowing these pitfalls saves money and frustration.
Overlooking Damper Versatility
Some machines boast “adjustable resistance” through tension knobs that simply tighten a belt around the flywheel. This isn’t true damper adjustment and won’t provide the drag factor range needed for serious training. Always verify the damper controls airflow to the flywheel, not mechanical friction against it.
Ignoring Monitor Functionality
A pretty LCD screen means nothing without accurate data. Test the monitor if possible: does it show consistent stroke rate? Does the pace respond appropriately to effort changes? Can you view drag factor? Machines with underpowered monitors often have laggy data that makes interval training impossible to execute properly.
Underestimating Space Needs
That sleek ski erg looks compact online, but in your 8x10 home gym, it might dominate the room. Account for not just the machine’s footprint but your movement around it, handle storage, and ventilation. Ski ergs generate significant airflow; you don’t want it blowing directly into a wall or corner.
Maintenance and Care for Longevity
A quality ski ergometer is an investment that should last decades. Proper maintenance ensures consistent performance and prevents costly repairs.
Daily and Weekly Maintenance Routines
Wipe down handles and the monorail after each use—sweat is corrosive. Weekly, inspect the cord or chain for fraying and check that all bolts remain tight. Dust the flywheel housing and monitor screen. These 5-minute habits prevent 90% of common issues.
Chain and Damper System Care
The chain requires periodic lubrication with manufacturer-recommended oil—typically every 20-30 hours of use. The damper mechanism itself rarely needs attention but should be checked monthly for smooth operation. If you feel “sticking” or inconsistency in damper adjustment, contact support immediately; don’t force it. A single grain of sand in the damper track can cause uneven resistance.
Integrating Ski Erg Training into Your Fitness Routine
The ski erg shouldn’t replace your entire program, but strategically inserted sessions can transform your fitness.
Sample Workout Structures for Different Levels
Beginners: 3x5 minutes at damper 2-3 with 2-minute rest between sets. Focus on consistent stroke rate and full extension.
Intermediate: 10 rounds of 1 minute at damper 5 (hard) followed by 1 minute at damper 2 (easy). This builds aerobic capacity and teaches pacing.
Advanced: Tabata protocol (8 rounds of 20 seconds max effort, 10 seconds rest) at damper 7-8 for power, or 30 minutes at damper 4-5 at 85% max heart rate for threshold development.
Cross-Training Applications
Pair ski erg sessions with strength training: use low damper settings (1-3) on heavy squat days for active recovery, or high damper settings (6-8) on upper body days for complementary pulling volume. The adjustable damper makes it the ultimate cross-training chameleon.
Price Ranges and What to Expect
Ski ergometers span a wide price spectrum. Understanding what each tier offers helps set realistic expectations.
Budget-Friendly Options
In the $300-$600 range, expect basic monitors with limited data, simpler damper mechanisms (often 5-7 settings rather than 10), and lighter construction. These machines work for casual users but may not withstand daily high-intensity training. Damper adjustability exists but might feel less precise.
Mid-Range Investments
$600-$1,200 buys significantly better monitors with drag factor display, robust 10-setting dampers, and commercial-grade frames. This is the sweet spot for serious home users and light commercial settings. You’ll get Bluetooth connectivity, better ergonomics, and warranties that actually protect your investment.
Premium Models
Above $1,200, you’re paying for ultimate precision, durability, and advanced features. Expect aluminum flywheels for perfect balance, medical-grade component tolerances, monitors that sync with multiple external devices simultaneously, and exceptional customer support. These machines are overkill for most home users but essential for high-volume training facilities.
Warranty and Customer Support Considerations
A 30-day warranty is a red flag. Quality manufacturers stand behind their dampers and monitors with at least 2-5 year frame warranties and 1-2 year component coverage. Read the fine print: some warranties exclude “commercial use” even in home gyms if you train like an athlete. Check customer support responsiveness before buying—send a pre-purchase email question and see how quickly and thoroughly they respond. When a damper fails at 5 AM before a competition, you want a company that answers the phone.
Frequently Asked Questions
1. What’s the difference between damper setting and resistance level?
The damper controls airflow to the flywheel, which changes the drag factor—essentially how heavy the flywheel feels. Resistance itself is generated by how hard you pull; the damper just modifies the flywheel’s response to your effort. Think of it like gears on a bike, not a volume knob.
2. Can beginners use high damper settings safely?
Not initially. Starting at high settings (8-10) without developed technique risks shoulder strain and reinforces poor movement patterns. Beginners should master form at settings 1-3 for several weeks before gradually increasing drag.
3. How often should I change my damper setting during workouts?
It depends on your goals. For steady-state cardio, keep it constant. For interval training, adjusting between work and rest periods is highly effective. Advanced athletes might change settings 5-10 times in a single session.
4. Will a ski erg with adjustable damper help me lose weight?
Absolutely. The combination of full-body muscle recruitment and adjustable intensity creates massive caloric burn potential. High damper intervals can burn 15-20 calories per minute, while lower settings support longer, fat-burning sessions.
5. Do I need a wall mount, or are freestanding options better?
Wall mounts provide superior stability and take up less floor space—generally preferred if you own your space. Freestanding models offer flexibility for renters or multi-purpose rooms but require more square footage and may have slight wobble during max efforts.
6. How does damper setting affect calorie calculations on the monitor?
Quality monitors calculate calories based on power output, not just damper position. However, the same perceived effort at damper 3 versus damper 7 will produce different power readings, so calories will vary accordingly. Always focus on power (watts) as the primary metric.
7. Can children or elderly users benefit from adjustable damper ski ergs?
Yes, this is where adjustability shines. Elderly users can exercise safely at damper 1-2 for joint health and cardiovascular maintenance. Children can learn proper pulling mechanics at low settings, building strength without injury risk.
8. What’s the ideal drag factor for training versus testing?
For most training, aim for a drag factor of 80-110 (roughly damper 3-5). For max power tests, use 130-150 (damper 6-7). For pure strength work, go higher. But remember, these numbers vary by machine—always check your specific model’s drag factor chart.
9. How loud are ski ergs, and does damper setting affect noise?
They generate significant whooshing noise—comparable to a loud fan. Higher damper settings increase noise because more air moves through the flywheel. If noise is a concern, look for models with sound-dampening housings and position away from shared walls.
10. Can I replace rowing machine workouts with ski erg sessions?
While both are excellent, they’re not interchangeable. The ski erg emphasizes pulling muscles and core rotation more than leg drive. For balanced development, use both. However, if you have knee issues, the ski erg can absolutely replace rowing for cardio while giving your upper body and core complementary work.