Picture this: You’re at the park, your five-year-old is pedaling confidently around the playground, and you notice they’re instinctively leaning into turns instead of relying on those trusty support wheels. In that magical moment, you realize they’re ready. With traditional training wheels, you’d be fumbling for a wrench, killing the vibe while your child waits impatiently. But in 2026, the game has changed. Tool-free pop-off training wheels have revolutionized how we guide our kids from wobbly first pedals to confident, independent riding. These ingenious systems let you whisk away the safety net in seconds—no tools, no frustration, just pure celebration.
The shift toward tool-free designs isn’t just about convenience; it’s about capturing those fleeting breakthrough moments when confidence peaks. Parents today demand gear that adapts as quickly as their children do, and manufacturers have responded with engineering marvels that prioritize both safety and spontaneity. Whether you’re a first-time parent navigating the bike aisle or a seasoned pro upgrading your youngest’s ride, understanding what makes these modern training wheel sets tick will transform your entire teaching experience.
Top 10 Kids’ Bike Training-Wheel Sets Tool-Free
Detailed Product Reviews
1. PRUNUS Flash BIKE Training Wheels for 12 14 16 18 20 Inch.Training Wheels for Kids Bike is Heavy Duty.Bicycle Training Wheel is Suitable Single Speed Bike
Overview: The PRUNUS Flash BIKE Training Wheels prioritize safety engineering for young riders. Designed for 12-20 inch single-speed bikes, these heavy-duty stabilizers feature a meticulous approach to installation and durability that appeals to detail-oriented parents who want maximum protection during the learning process.
What Makes It Stand Out: This product’s standout feature is its double high-carbon steel bearing system paired with an enlarged washer that completely covers the bearing assembly, preventing sudden failures that could cause accidents. The brackets are 20% thicker (0.12 inches) than standard models, significantly reducing deformation risk. PRUNUS also provides exceptionally detailed sizing and installation prerequisites, including the critical requirement of 0.4-inch visible axle stud length.
Value for Money: At $15.99, these training wheels sit in the mid-range category. The price is justified by superior safety engineering and material thickness that could prevent injuries. While not the cheapest option, the investment in reinforced construction and detailed guidance offers peace of mind that budget alternatives lack.
Strengths and Weaknesses: Strengths include robust bracket thickness, comprehensive installation instructions, double bearing system for smooth operation, and proactive safety design. Weaknesses involve the specific axle length requirement that may exclude some bikes, and installation requires tools and more time compared to snap-on systems.
Bottom Line: The PRUNUS training wheels are ideal for safety-conscious parents who value engineering over convenience. If your bike meets the installation requirements and you want maximum stability protection, these are an excellent choice that justifies their moderate premium.
2. FORTOP Bike Training Wheels, Pair of Heavy Duty Rear with Stabilizers Mounted Kit for Kids Boy Girls Bikes of Single Speed Bicycle with 12 14 16 18 20 Inch (Heavy Duty Pink, 12IN-20IN)

Overview: FORTOP’s pink training wheels blend heavy-duty construction with playful innovation for 12-20 inch bikes. Marketed toward American families seeking quality outdoor time, these stabilizers emphasize both durability and child-friendly features that make learning memorable.
What Makes It Stand Out: The patented glow-in-the-dark wheels create magical light trails without batteries, transforming evening practice into an adventure. The tool-free, snap-on installation system reportedly sets up in three minutes and earned a Parents’ Choice Award. Additionally, 304 stainless steel bearings provide true rust-proof performance for five-plus years of all-weather use.
Value for Money: Priced at $16.99, these represent a slight premium over basic models. However, the unique glow feature, corrosion-resistant bearings, and award-winning installation system justify the cost. Compared to replacing rusted wheels or struggling with complex setups, the time and longevity benefits add significant value.
Strengths and Weaknesses: Strengths include the innovative glow-in-the-dark feature, tool-free rapid installation, premium stainless steel bearings, and reinforced steel construction. Weaknesses are the pink color limiting universal appeal and the highest price point among competitors. The glow effect may also diminish over extended time.
Bottom Line: These FORTOP wheels excel for families wanting excitement and convenience. If the pink color works for your child and you value fastest installation with unique night-riding fun, the modest premium delivers memorable experiences alongside reliable safety.
3. FORTOP Bike Training Wheels, Pair of Heavy Duty Rear with Stabilizers Mounted Kit for Kids Boy Girls Bikes of Single Speed Bicycle with 12 14 16 18 20 Inch (Heavy Duty Black, 12IN-20IN)

Overview: This black variant of FORTOP’s training wheels delivers the same premium features as its colorful counterpart but in a versatile, gender-neutral finish. Designed for 12-20 inch single-speed bikes, it targets families wanting professional-grade durability without aesthetic limitations.
What Makes It Stand Out: The black version retains all flagship features: glow-in-the-dark wheels for night visibility, 304 stainless steel rust-proof bearings, and the award-winning three-minute tool-free installation. The neutral color scheme broadens appeal across different bike styles and child preferences while maintaining the reinforced steel construction.
Value for Money: At $15.49, this version offers better value than the pink model while delivering identical performance. The price is competitive with mid-range options but includes premium features like stainless bearings and glow wheels typically found in higher-priced products. This makes it the sweet spot in FORTOP’s lineup.
Strengths and Weaknesses: Strengths include universal black color, corrosion-resistant bearings, rapid installation, glow feature, and durable steel brackets. Weaknesses involve a slightly higher price than basic models and the glow effect’s potential to fade over years of sun exposure. The premium features may be unnecessary for short-term use.
Bottom Line: The black FORTOP wheels are the smart choice in the premium category. They combine fun features, weather resistance, and installation convenience at a reasonable price point, making them ideal for families seeking long-term value without sacrificing performance.
4. Schwinn Training Wheels, Fits 12 - 20 Inch Kids Bikes, Includes Mounting Hardware, Adjustable Steel Brackets, Detachable, Fun Sticker Decals, Easy to Install, Training Wheels for Kids Bike
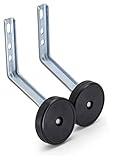
Overview: Schwinn leverages 130 years of American bike-building heritage with these classic training wheels. Designed for 12-20 inch bikes, they emphasize adjustability and brand trust while providing essential stabilizer functionality for new riders learning balance.
What Makes It Stand Out: The slotted bracket design allows height adjustments as children grow, extending product lifespan across multiple development stages. Schwinn includes two decal sets (stars and flowers) for personalization, and the brand’s century-plus reputation provides unmatched credibility. The detachable design enables easy removal when no longer needed.
Value for Money: At $15.37, these are competitively priced despite the premium brand name. The adjustability feature adds value by accommodating growth spurts, potentially saving replacement costs. While lacking flashy innovations, the trusted engineering and included customization options deliver solid utility for budget-conscious families.
Strengths and Weaknesses: Strengths include Schwinn’s legendary brand reliability, growth-adjustable brackets, fun customization decals, and comprehensive mounting hardware. Weaknesses are standard steel bearings (not stainless), no glow features, and installation requires tools unlike snap-on competitors. The design is functional but less innovative than premium alternatives.
Bottom Line: Schwinn’s training wheels are perfect for brand-loyal families prioritizing proven reliability over novelty. If you value heritage, simple adjustability, and trusted quality for one or more children, these deliver dependable performance at a fair price.
5. Children’s Bicycle Adjustable Training Wheels Flash Mute Wheel Bicycle Stabilizer Mounted Kit, for 12 14 16 18 20-inch Bikes, 1 Pair (Black)

Overview: This budget-friendly training wheel kit provides essential stabilization for 12-20 inch bikes at an unbeatable price point. The generic brand focuses on core functionality with flash mute wheels and comprehensive hardware inclusion, targeting cost-conscious families seeking basic safety.
What Makes It Stand Out: The remarkable $9.99 price makes this the most accessible option by far. The “flash mute” wheel design promises quieter operation than traditional plastic wheels, and the package includes every necessary component down to a single wrench. The structural reinforcement design aims to provide adequate durability despite the low cost.
Value for Money: Exceptional value dominates this product’s appeal. At half the price of premium competitors, it delivers fundamental training wheel functionality. While materials and bearings may not match expensive models, the price allows for easy replacement if needed, making it ideal for short-term use or families on tight budgets who prioritize immediate savings.
Strengths and Weaknesses: Strengths include unbeatable affordability, quiet operation, complete hardware kit, and basic adjustability. Weaknesses involve unknown brand reliability, potentially inferior bearing quality, no corrosion resistance claims, and lack of innovative features like glow effects or tool-free installation. Long-term durability remains questionable for heavy use.
Bottom Line: These training wheels are the practical choice for temporary use or extreme budget constraints. If you need functional stabilizers without frills and can accept potential trade-offs in longevity, this kit delivers essential safety at a fraction of standard costs.
6. Training Wheel Trainers - Indoor Kids Stationary Bike Trainer Stand for Kids Bikes with Training Wheels (1 Pack Black)

###6. Training Wheel Trainers - Indoor Kids Stationary Bike Trainer Stand for Kids Bikes with Training Wheels (1 Pack Black)
Overview: This innovative trainer stand converts your child’s existing training-wheel-equipped bike into an indoor stationary bike. Unlike traditional training wheels that roll on the ground, this device elevates the rear wheel, allowing kids to pedal in place safely inside your home. It’s designed for children who already have training wheels attached and want to ride regardless of weather conditions.
What Makes It Stand Out: The concept is genuinely unique—creating an indoor cycling solution that works with existing training wheels rather than replacing them. The zero-resistance design lets kids pedal freely without strain, making it ideal for beginners building confidence or experienced young riders burning energy. Setup is remarkably simple: just slot the training wheels into the stand’s grooves and go. The universal fit accommodates all children’s training wheel sizes, making it versatile for families with multiple kids.
Value for Money: At $29.95, this niche product offers fair value for parents seeking weather-independent exercise options. While more expensive than basic outdoor training wheels, it’s significantly cheaper than full indoor stationary bikes for kids. The year-round usability justifies the cost if indoor training is a priority.
Strengths and Weaknesses: Pros: Enables indoor exercise regardless of weather; extremely simple setup; works with existing training wheels; no resistance makes pedaling effortless; encourages physical activity during downtime. Cons: Requires training wheels to function; offers no resistance for strength building; limited to indoor use; must supervise closely to prevent falls; not suitable for bikes without training wheels.
Bottom Line: This trainer stand is a clever solution for specific scenarios—primarily indoor exercise for kids already using training wheels. It’s perfect for winter months or families wanting to ride alongside indoor-training parents. However, its limited functionality means it’s a supplement, not a replacement, for traditional outdoor riding.
7. HUASION Adjustable Bike Training Wheels Kids Bicycle Training Wheels Kit for 16, 18, 20, 22, 24 inch bike, Includes Stabilizers for Variable Speeds, Black

Overview: HUASION offers a premium training wheel kit designed for larger children’s bikes ranging from 16 to 24 inches. This comprehensive package includes everything needed for installation and caters specifically to kids transitioning to bigger bicycles, including those with variable speed systems. The black, understated design focuses on safety and durability.
What Makes It Stand Out: The exceptional build quality sets these apart—food-grade PVC outer wheels ensure non-toxic safety, while carbon steel hubs and 4mm thick metal brackets provide professional-grade stability. The wide wheel design maximizes ground contact, reducing wobbles. Notably, they’re compatible with derailleur-equipped bikes, a rare feature. The company provides outstanding support, offering pre-purchase compatibility checks and detailed video tutorials.
Value for Money: Priced at $29.99, these sit in the mid-to-high range, but the quality justifies the cost. The wide size compatibility (up to 24") means one purchase can last through multiple bike sizes, potentially saving money long-term. The inclusion of comprehensive accessories and stellar customer service adds significant value.
Strengths and Weaknesses: Pros: Premium non-toxic materials; exceptional stability; fits bikes up to 24 inches; works with geared bikes; excellent customer support; high weight capacity (106 lbs); detailed installation resources. Cons: Not compatible with quick-release axles; overkill for smaller 12-14" bikes; higher price point than basic alternatives; installation requires careful adjustment.
Bottom Line: HUASION’s training wheels are ideal for parents prioritizing safety and longevity on larger bikes. The ability to work with multi-speed bicycles makes them uniquely valuable for older beginners. While pricier than basic options, the build quality and size range make them a worthwhile investment for kids on 16-24" bikes.
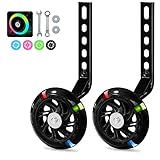
8. FORTOP Bike Training Wheels, Pair of Heavy Duty Rear with Stabilizers Mounted Kit for Kids Boy Girls Bikes of Single Speed Bicycle with 12 14 16 18 20 Inch - Yellow
Overview: FORTOP delivers heavy-duty training wheels with a playful twist, targeting single-speed bikes from 12 to 20 inches. The bright yellow design incorporates serious engineering—reinforced steel brackets and rust-proof bearings—while adding a fun, glow-in-the-dark feature that creates light trails during evening rides. This kit balances durability with child-friendly excitement.
What Makes It Stand Out: The patented glow-in-the-dark wheels create a magical riding experience without batteries or electronics, encouraging kids to practice longer. The industrial-strength steel construction claims triple the durability of plastic competitors, while 304 stainless steel bearings ensure smooth rotation in all weather. The tool-free installation system is a standout convenience feature, earning a Parents’ Choice Award.
Value for Money: At just $16.99, these training wheels offer exceptional value. The heavy-duty construction at this price point undercuts many competitors while adding unique features like glow-in-the-dark functionality. For parents seeking long-lasting equipment without breaking the bank, this is a compelling option.
Strengths and Weaknesses: Pros: Heavy-duty steel construction; rust-proof stainless bearings; innovative glow-in-the-dark wheels; tool-free 3-minute installation; competitive pricing; works in all weather. Cons: Limited to single-speed bikes only; yellow color may not suit all preferences; glow effect may diminish over time; unclear maximum weight capacity.
Bottom Line: FORTOP training wheels are an excellent budget-friendly choice that doesn’t compromise on durability. The glow-in-the-dark feature adds genuine excitement to practice sessions, potentially motivating reluctant riders. While restricted to single-speed bikes, the combination of heavy-duty construction, easy installation, and unique visual appeal makes this a top contender for most families.
9. Tayizoo Training Wheels for Bike,Compatible for Bikes of 12/14/16/18/20 Inch,Flash Mute Wheel,1 Pair

Overview: Tayizoo offers an affordable, feature-packed training wheel set for 12-20 inch single-speed bicycles. The “Flash Mute Wheel” design suggests both visual appeal and quiet operation, while the included bicycle bell adds extra value. This kit targets budget-conscious parents seeking a complete installation package without sacrificing basic quality.
What Makes It Stand Out: The comprehensive accessory bundle—including wrench, installation manual, and bonus bike bell—provides everything needed for immediate setup. The flash mute wheels likely incorporate LED lighting or reflective materials for visibility while maintaining quiet operation. High-quality ABS wheels and steel frames deliver adequate stability for riders up to 100 pounds. The anti-skid design enhances safety during early riding attempts.
Value for Money: At $15.99, this is the most economical option reviewed. The inclusion of installation tools and a bike bell makes it an exceptional value proposition. While materials may not match premium brands, the price point makes it accessible for families unsure about their child’s commitment to cycling.
Strengths and Weaknesses: Pros: Extremely affordable; complete tool kit included; bonus bike bell; anti-skid, noise-free operation; easy height adjustment; suitable for wide size range. Cons: Not compatible with multi-speed bikes; some Huffy 20" bikes excluded; unclear “flash” feature durability; 100 lb weight limit is lower than some competitors; potential quality control issues.
Bottom Line: Tayizoo training wheels are perfect for families seeking a budget-friendly, all-in-one solution for younger children on smaller single-speed bikes. The included accessories and bells-and-whistles approach delivers immediate value. However, carefully verify compatibility with your specific bike model before purchasing, as the restrictions on certain brands and multi-speed systems limit versatility.
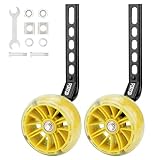
10. Training Wheels, Wider Flash Kids Bike Training Wheels for 12 14 16 18 20 Inch Single Speed & Variable Speed Bicycle Heavy Duty Rear with Stabilizers Mounted Kit

Overview: These versatile training wheels distinguish themselves through wide flash wheels and compatibility with both single-speed and variable-speed bicycles. Designed for 12-20 inch bikes, they feature premium steel support arms and a thoughtful multi-hole adjustment system. The set includes specialized limit blocks for precise installation, addressing common setup challenges.
What Makes It Stand Out: The dual compatibility with single and variable speed bikes is a major advantage, accommodating derailleur-equipped bicycles that many training wheels exclude. The wider 1.2-inch wheel profile provides superior stability compared to standard narrow wheels. The included limit blocks with prominent corners ensure proper frame alignment and prevent over-tightening—a detail that demonstrates thoughtful engineering.
Value for Money: At $16.99, these training wheels offer outstanding versatility for the price. The ability to work with geared bikes alone justifies the cost, potentially saving families from purchasing new wheels when upgrading from a single-speed to a multi-speed bike. The heavy-duty construction adds long-term value.
Strengths and Weaknesses: Pros: Compatible with variable speed bikes; wider wheels enhance stability; heavy-duty steel construction; detailed installation guidance; excellent price; multi-hole adjustment fits various bike sizes. Cons: Installation requires careful limit block placement; slightly higher ground clearance needed (0.2-0.4in) may feel unstable initially; “flash” feature durability uncertain; instructions may be complex for novices.
Bottom Line: These training wheels are an excellent choice for families with or planning to upgrade to multi-speed bikes. The combination of wide wheels, heavy-duty construction, and variable-speed compatibility at a budget price makes them highly recommended. While installation demands more attention than simpler models, the resulting stability and versatility are well worth the extra effort.
The Evolution of Kids’ Bike Training Wheels
From Wrenches to Quick-Release: A Brief History
Training wheels have been around since the 1950s, essentially unchanged for decades—clunky metal brackets bolted tightly to rear axles with nuts that always seemed to rust in place. Parents kept adjustable wrenches in their back pockets like badges of honor, and the removal process often involved scraped knuckles, stripped threads, and timing that never quite matched your child’s readiness. The bolt-on design created a psychological barrier; once they were on, they stayed on far longer than necessary simply because removal was a chore.
The mid-2010s saw the first quick-release prototypes, but these early versions sacrificed stability for convenience. They wobbled, they rattled, and many failed to support the weight of heavier bikes. By 2024, manufacturers had cracked the code, introducing robust locking mechanisms that rival traditional bolted systems. Now in 2026, we’ve reached peak innovation with magnetic-assisted releases, cam-lever locks, and self-aligning brackets that make the transition from four wheels to two feel like a ceremony rather than a repair job.
Why Tool-Free Design Matters in 2026
Today’s parenting landscape moves at the speed of Instagram stories and TikTok trends. Kids develop skills in bursts—what seems impossible on Tuesday becomes effortless by Saturday. Tool-free systems align perfectly with this rapid developmental pace. When your child suddenly masters balance during a single afternoon ride, you can respond immediately, removing the crutches while their confidence is still hot. There’s no “we’ll do it next weekend” that turns into next month.
Moreover, 2026’s designs account for the modern family lifestyle. Maybe you’re at a campground, a friend’s house, or a trailhead—places where your toolbox is miles away. The ability to adjust or remove training wheels on the fly means you’re never stuck with a setup that doesn’t match the terrain or your child’s mood. It’s about empowerment, both for the child gaining independence and the parent supporting their journey without logistical headaches.
Understanding Tool-Free Pop-Off Mechanisms
The Quick-Release Lever System
The most common design mimics the reliable quick-release skewers found on adult bikes, but supercharged for training wheels. A cam-action lever creates immense clamping force when closed, gripping the axle with serrated teeth that prevent rotation. When you’re ready to remove them, flipping the lever releases tension instantly. The key innovation in 2026 models is the dual-safety catch—a secondary locking tab that prevents accidental release from vibration but disengages with a simple thumb press. Look for levers with textured grips that small hands can operate (for height adjustments) while remaining tamper-proof against curious fingers.
Twist-and-Lock Technology
Twist-lock mechanisms employ a bayonet-style mount where the training wheel assembly rotates 90 degrees to engage or disengage. Internal ball bearings drop into detents, creating an audible “click” that confirms secure installation. This system shines for parents who want absolute certainty—if you don’t hear the click, it’s not locked. The 2026 iterations feature visual indicators: a green window that appears only when properly seated. These are particularly robust for aggressive riders who jump curbs or tackle bumpy terrain, as the rotational force actually tightens the connection under stress.
Magnetic Attachment Innovations
The newest entry uses rare-earth magnets paired with mechanical anchors. The magnets guide the bracket into perfect alignment, eliminating the fumbling that plagues other systems. Once aligned, a spring-loaded pin snaps into place, creating a mechanical lock that bears all the load while the magnets simply handle positioning. This hybrid approach offers the smoothest removal—just pull the pin and the assembly practically jumps into your hand. However, these command premium prices and require careful cleaning, as metal debris can interfere with magnetic alignment.
Key Benefits of Tool-Free Training Wheel Sets
Instant Transition Moments
Child psychologists emphasize the importance of immediacy when building new skills. The window between “I think I can” and “I know I can” is often just minutes long. Tool-free systems let you strike while the iron’s hot. Watch your child navigate a slight downhill with perfect balance, pull over, pop off the wheels in 15 seconds, and say “Guess what? You don’t need these anymore.” The emotional impact is profound—they graduate in the moment, not after a scheduled maintenance session.
Building Confidence Through Spontaneity
Kids thrive on spontaneity, and nothing kills excitement like waiting for Dad to find the right socket wrench. When removal becomes a celebration rather than a project, children associate progress with positive emotions. Many 2026 sets include decorative “graduation caps” that snap into the empty mounting points, turning the former training wheel bracket into a trophy. This transforms the bike’s appearance, making it look intentionally “big kid” rather than just missing parts.
Parental Convenience Factor
Let’s be honest—parenting is exhausting. The mental load of remembering where you stored that specific tool for that specific bike is real. Tool-free systems eliminate one more thing from your cognitive checklist. They also mean fewer scraped knuckles, no more cross-threaded bolts, and no need to teach your partner which way to turn the wrench. The time savings add up, but the stress reduction is the real win.
Critical Safety Considerations
Weight Capacity and Structural Integrity
Never assume all training wheels support the same weight. 2026’s tool-free models range from 50-pound capacities for toddlers to 100+ pounds for older kids on 20-inch bikes. The catch? That capacity must account for dynamic forces—hitting bumps, leaning into turns, even small jumps. Look for systems rated at least 1.5 times your child’s static weight. Check for reinforced gussets at stress points and avoid any set where the bracket flexes when you press down firmly with your hand. The best designs distribute load across at least three inches of chain stay contact.
Stability vs. Maneuverability Balance
Here’s where many parents get it wrong: tighter isn’t always better. Training wheels should allow 1-2 inches of bike lean before contacting the ground. This teaches counter-steering and weight shifting while preventing catastrophic falls. Tool-free systems with micro-adjustment detents let you fine-tune this gap in millimeter increments. Start with wheels slightly higher off the ground than you think—this accelerates skill development and prevents the “crutch dependency” that plagues many riders. The sweet spot is when the bike feels tipsy at very low speeds but steadies as your child pedals faster.
Ground Clearance and Tipping Points
Measure your bike’s bottom bracket height—the distance from the ground to the center of the pedal crank. Training wheels should mount so their contact point is no more than 1 inch below this height. Any lower and the bike becomes a tripod, teetering dangerously on one wheel during turns. Higher-end 2026 models include adjustable-length arms to match different bike geometries. Pay special attention on bikes with foot brakes; the coaster brake must remain functional with training wheels installed, which requires precise height alignment.
Material Matters: What to Look For
Aircraft-Grade Aluminum Frames
The benchmark for premium training wheels is 6061-T6 aluminum—lightweight, corrosion-resistant, and stronger than steel at half the weight. These brackets won’t bend if the bike tips over onto a curb, maintaining alignment through countless crashes. The anodized finish on 2026 models comes in colors that match popular bike brands, but more importantly, it prevents galvanic corrosion where the bracket contacts steel axles. Avoid plastic brackets entirely; they fatigue and crack, often without visible warning signs.
Reinforced Polyurethane Wheels
Hard rubber wheels from the 1990s cracked in sunlight and rattled teeth loose on rough pavement. Modern polyurethane wheels use a Shore A durometer rating of 85-95—soft enough to absorb vibration but hard enough to resist wear. Look for wheels with sealed cartridge bearings; exposed bearings seize after one muddy puddle. The best designs feature replaceable tires—yes, training wheel tires wear out—and 2026’s top models even offer tread patterns: smooth for pavement, knobby for gravel paths. Wheel diameter matters too: 6-inch wheels for 12-14 inch bikes, 8-inch for 16-20 inch bikes.
Weather-Resistant Hardware
Even tool-free systems have some hardware—adjustment pins, spring clips, magnetic shields. These must be stainless steel or coated with zinc-nickel plating that exceeds automotive salt-spray standards. The quick-release lever’s internal cam should be brass or bronze, materials that self-lubricate and resist seizing. If you live in coastal areas, look for sets specifically rated for marine environments; salt air destroys lesser metals in a single season. The 2026 standard includes silicone seals at all adjustment points to keep grit out of the mechanism.
Compatibility Check: Will They Fit Your Child’s Bike?
Axle Diameter Standards
Kids’ bikes use three primary axle sizes: 10mm (most common), 12mm (heavy-duty bikes), and 14mm (BMX-style). Premium tool-free sets include interchangeable inserts that snap into the mounting bracket, adapting to all three sizes without tools. Measure your axle with a simple ruler or check the bike’s specifications online. Critical detail: you must know if your axle is threaded or smooth. Threaded axles (with nuts) require brackets with open-bottom slots, while smooth axles (with quick-release skewers) need closed holes. Some 2026 universal kits include both bracket types.
Frame Clearance Requirements
Bring a ruler to the bike shop—or your garage. You need at least 1.5 inches of vertical clearance between the top of the chain stay (the frame tube connecting pedals to rear axle) and the training wheel bracket. Many modern kids’ bikes have disc brakes or chain guards that interfere with traditional mounting positions. Look for offset brackets that curve around obstacles. The best 2026 designs feature rotating mounting heads that let you clock the bracket to avoid frame features while keeping the wheel vertical. Take a photo of your bike’s drive side and bring it to the store; compatibility issues are obvious to experienced eyes.
Chain Stay Width Measurements
Training wheel brackets must span the distance between chain stays without flexing them inward. Measure the outside width at the axle—common sizes are 110mm, 120mm, and 130mm. Adjustable brackets exist but introduce potential weak points. For the most secure fit, buy a fixed-width bracket matched to your bike. Some 2026 models feature telescoping arms that adjust for width without tools, using the same cam-lever technology as the axle mount. These are ideal if you’re passing the training wheels down to younger siblings on different bikes.
Age and Skill Appropriateness
Toddlers (Ages 2-3): Ultra-Stable Designs
For the youngest riders, stability trumps all. Look for training wheels with extra-wide wheelbase—brackets that extend 8-10 inches from the bike’s centerline. These should have spring-loaded suspension to absorb the constant tipping and righting that toddlers do. The tool-free mechanism should be adult-only, with a safety lock that requires two simultaneous actions to prevent accidental removal. Height adjustment should offer 3-4 preset positions rather than infinite adjustability; simplicity matters when you’re dealing with a tired, cranky three-year-old.
Preschoolers (Ages 4-5): Transitional Features
This is the sweet spot for tool-free systems. Kids this age develop skills rapidly and love ceremony. Choose training wheels with graduated height settings that you can adjust without tools while at the park. The 2026 models for this age group often include “trainer mode” with wheels slightly higher off the ground, and “confidence mode” where they make full contact. Being able to switch between modes in seconds lets you adapt to different environments—higher for practicing on grass, lower for sidewalk cruising.
Early Elementary (Ages 6-8): Speed-Friendly Options
Older kids ride faster and harder, requiring training wheels that can handle centrifugal forces. Look for aerodynamic brackets that tuck close to the bike, preventing them from catching on obstacles during tight turns. The tool-free mechanism should be robust enough for repeated removal and reinstallation—some kids want them off for a bravery test, then back on when they get spooked. Weight becomes a factor too; at this age, every ounce matters for keeping up with friends. Premium aluminum sets weigh as little as 1.2 pounds total.
Installation Mastery: Getting It Right Without Tools
The Three-Point Stability Test
After snapping on your tool-free training wheels, perform this critical safety check. First, lift the rear wheel and spin it—training wheels should rotate freely without wobble. Second, push down firmly on one training wheel; the bike should tilt smoothly without the bracket shifting. Third, grab the seat and shake side-to-side; you shouldn’t hear clicking or feel looseness. If any test fails, recheck the mounting. The best 2026 designs include built-in spirit levels on the brackets to ensure perfect vertical alignment—critical for even wear and predictable handling.
Height Adjustment Best Practices
Start with training wheels 1.5 inches off the ground on level pavement. This forces your child to balance while still providing a safety net for major wobbles. As they improve, raise them in quarter-inch increments. Most tool-free systems have detents every 5mm—use them all. The adjustment should be tool-free but not child-playable; look for mechanisms that require adult grip strength. Pro tip: mark the ideal height with a silver Sharpie dot on the bracket arm. This lets you quickly return to the sweet spot if you need to lower them temporarily for a nervous rider.
Common Installation Mistakes to Avoid
The number-one error is mounting the brackets backward—check for arrows indicating forward direction. Second is over-tightening quick-release levers; they should be snug but not require Herculean effort. Third is ignoring the chain line; ensure the bracket doesn’t push the rear wheel out of alignment, which causes the chain to derail. Fourth is forgetting to check brake function—coaster brakes must engage fully, and hand brakes must not rub the training wheel bracket. Finally, never install training wheels on a bike that’s too large, hoping they’ll compensate. The bike should fit now, with or without assistance.
The Graduation Process: When and How to Pop Them Off
Signs Your Child Is Ready
Watch for these non-negotiable indicators: they can start from a standstill without putting feet down for at least 10 feet, they look straight ahead instead of at their front wheel, and they instinctively steer into small wobbles rather than freezing. The telltale sign is when they ride with the training wheels hovering above ground for entire stretches—they’re already balancing, just psychologically dependent. Don’t rush it, but don’t wait for perfection either. Most kids are ready between ages 5 and 7, but readiness varies more by personality than age.
Making the Big Moment Special
The tool-free advantage shines here. Plan a “graduation ride” at a favorite location. Let your child pop off the wheels themselves (with your guidance) to build ownership. Many 2026 sets include commemorative stickers or certificates—use them. Film the moment; parents report this ranks with first steps and first words in emotional impact. Have a small reward ready—a special bell, handlebar streamers, anything that marks the bike as now “big kid.” The key is immediacy: remove the wheels, celebrate, and ride away within five minutes. Don’t let the moment cool off.
Post-Training-Wheel Support Strategies
Even after removal, stay close. Run alongside holding their shoulder, not the bike—this lets them feel balance without your support. Choose a slight grassy downhill for the first solo attempts; the soft landing reduces fear. If they panic, tool-free systems let you reattach wheels in under a minute, turning a potential meltdown into a simple “we’ll try again tomorrow.” Keep the wheels in your car trunk for a week, just in case. Most kids experience one “regression day” where they suddenly lose confidence; being able to pop the wheels back on for a 10-minute refresher ride is invaluable.
Maintenance and Longevity
Quick-Clean Routines
Tool-free mechanisms attract grit like magnets attract metal. Once a month, flip the quick-release lever open and closed 10 times to dislodge debris. Spray the cam mechanism with dry silicone lubricant—never WD-40, which attracts dust. For twist-lock systems, remove the assembly completely and rinse with water, then dry thoroughly before reinstalling. Magnetic systems need special care: wipe the magnet faces with a clean cloth weekly, and run a cotton swab around the spring-loaded pin housing. This 5-minute routine triples the mechanism’s lifespan.
Storage Solutions for Off-Season
When training wheels come off for good, don’t toss them in a damp basement. Store them with the quick-release lever in the open position to prevent spring fatigue. Place them in a sealed bag with a silica gel packet to prevent corrosion. If you’re saving them for a younger sibling, hang them on a pegboard hook rather than letting them sit in a box where they can get crushed. The magnetic systems benefit from storing the bracket and wheel assembly together, as separating them can demagnetize the alignment magnets over time.
Wear Pattern Inspection
Check training wheel tires monthly. Uneven wear—one side bald, the other pristine—indicates the bracket is bent or the bike is consistently leaning. Cupped wear patterns mean the wheels are too low, dragging through turns. Cracks in the wheel center around the bearing hub signal imminent failure; replace immediately. For the brackets, look for stress cracks radiating from bolt holes, especially on aluminum models. The 2026 premium sets include wear-indicator dots on the bracket arms that fade when metal fatigue begins, giving you visual warning before catastrophic failure.
Budget vs. Premium: What Extra Dollars Buy You
Entry-Level Features ($15-$30)
At this price, you’ll find basic quick-release plastic brackets with steel hardware. They work but lack refinement—height adjustment is coarse, typically half-inch increments. Wheels are solid rubber, fine for pavement but jarring on gravel. The tool-free mechanism is functional but may develop play after repeated use. These sets weigh 2-3 pounds and typically last one child’s learning cycle. They’re perfect for cautious riders on smooth sidewalks but won’t withstand aggressive trail riding. Compatibility is limited; buy these only if you have a standard 12- or 16-inch bike with no brake or chain guard interference.
Mid-Range Advantages ($30-$50)
This is the value sweet spot. You get aluminum brackets, polyurethane wheels with sealed bearings, and micro-adjustment detents. Weight drops to 1.5 pounds, and the tool-free mechanism feels solid through hundreds of cycles. Many include both 6-inch and 8-inch wheel options in one box, adapting as your child grows. You’ll find better corrosion resistance and compatibility inserts for different axle sizes. These sets often include spare parts—extra springs, replacement pins—extending lifespan through multiple kids. The difference in ride quality is immediately noticeable; bikes feel more responsive, less sluggish.
Premium Innovations ($50+)
Premium sets justify their cost through materials and engineering. Expect 6061-T6 aluminum, replaceable wheel tires, and magnetic alignment systems. Weight plummets below 1.2 pounds, crucial for performance-oriented kids. The tool-free mechanisms include safety locks and visual indicators. Many feature integrated suspension with adjustable preload, letting you fine-tune how aggressively the wheels respond to terrain. Some even include Bluetooth sensors that track how often the wheels touch down, giving you data on progress. These are overkill for casual riders but invaluable for families where cycling is a core activity.
Environmental and Sustainability Factors
Recyclable Materials
The cycling industry is finally addressing end-of-life waste. Premium 2026 training wheel sets feature aluminum brackets that are 100% recyclable and polyurethane wheels that can be ground down and remolded. Look for sets with minimal packaging—some ship in reusable canvas bags instead of blister packs. Check if the manufacturer offers a take-back program; a few brands now accept worn-out training wheels for recycling, offering discounts on future purchases. Plastic components should be clearly labeled with resin codes for proper municipal recycling.
Modular Replacement Parts
The most sustainable training wheel is one you never throw away. Top-tier sets now sell every component individually: just the wheel, just the bracket, just the quick-release pin. A $8 wheel replacement beats buying a whole new set when one tire wears out. This modularity also lets you upgrade incrementally—switch from plastic to aluminum brackets without replacing perfectly good wheels. When shopping, check the brand’s website for a parts diagram; companies committed to sustainability publish exploded views with part numbers for every nut and bolt.
Carbon Footprint Considerations
Manufacturing location matters. Training wheels made in Asia and shipped globally carry a significant carbon footprint. Some 2026 brands have moved production to regional facilities, reducing transport emissions. While these may cost 10-15% more, the environmental impact is substantially lower. Consider the product’s lifespan too—a premium set that lasts through three kids has one-third the per-child footprint of disposable entry-level models. The tool-free aspect itself reduces waste by eliminating the need for replacement bolts and hardware lost during roadside adjustments.
Common Parental Concerns Addressed
“Will They Become Too Dependent?”
This is the classic worry, but research shows dependency correlates more with duration of use than design. The real culprit is leaving training wheels on too low, creating a tricycle effect. Tool-free systems actually reduce dependency because they encourage gradual elevation. Start high, raise them incrementally, and remove them the moment you see consistent balance. The psychological effect of seeing you remove them in seconds—rather than scheduling a “project”—teaches that they’re a temporary tool, not a permanent fixture. Most kids using tool-free systems transition 2-3 months faster than with bolt-on wheels.
“What If My Child Refuses to Ride Without Them?”
Fear of removal is normal. The tool-free advantage is you can negotiate: “Let’s ride without them for just five minutes, and if you hate it, they’ll pop right back on.” This low-stakes trial reduces anxiety. Some kids need multiple “pop-off pop-back-on” cycles before they’re comfortable. That’s okay. The mechanism is designed for this exact scenario. Avoid power struggles; frame it as their choice. I’ve seen parents succeed by making removal a “big kid secret” that younger siblings aren’t allowed to do yet, tapping into pride rather than fear.
“Can They Damage the Bike Frame?”
Properly designed tool-free systems distribute clamping force over a wide area, often using rubber-lined jaws that conform to frame tubes. Damage occurs from overtightening or from brackets that are too narrow for the chain stay. Never use training wheels on carbon fiber frames—the clamping force can crush the layup. For aluminum and steel frames, check for paint wear monthly; a small amount of rubbing is normal, but bare metal needs protective tape. The 2026 premium sets include replaceable frame protectors—thin polymer sheets that sacrifice themselves to save your paint. If you notice frame flex when the training wheels are installed, stop immediately and check for cracks.
Expert Tips from Cycling Coaches
The Gradual Elevation Technique
Professional cycling instructors have embraced tool-free systems for their ability to micro-adjust. The secret is raising wheels just 5mm per week—barely perceptible to the child but constantly pushing their balance threshold. Use the adjustment detents to track progress; after eight weeks, the wheels will be nearly an inch off the ground. At this height, they only contact during major wobbles, essentially becoming emergency training wheels. The final removal then feels like a formality rather than a leap of faith. Document each adjustment with a photo; kids love seeing the progression.
Terrain Selection Strategies
Match training wheel height to terrain. For grass or gravel, lower them slightly to prevent the bike from digging in. For pavement, keep them high. With tool-free systems, you can adjust at the trailhead. Coaches recommend starting on packed dirt—it provides enough slip that training wheels don’t grab aggressively, teaching smoother weight transitions. Avoid sand entirely; it creates false stability that doesn’t translate to real riding. Once your child can ride figure-eights on grass with wheels 1 inch off the ground, they’re ready for pavement without them.
Timing the Transition Seasonally
Spring and early summer offer the best learning conditions: warm weather, dry pavement, and the psychological boost of “summer riding.” Avoid transitions in fall when early darkness limits practice time. If you must transition in winter, use an empty parking garage or indoor bike park. The tool-free design is perfect here—pop them off for the indoor session, pop them back on for the snowy ride home. Many coaches note that kids who transition in spring are riding confidently within two weeks, while winter learners often take a month due to limited practice opportunities.
Future Trends: What’s Next After Tool-Free?
Smart Training Wheels with Sensors
The 2027 prototypes are already leaking into 2026’s high-end market. These feature accelerometers and gyroscopes that track lean angle, wheel contact frequency, and speed. An app provides real-time feedback: “Sarah’s training wheels touched down 12 times this ride, down from 30 last week.” While this feels like overkill, the data helps anxious parents know precisely when to remove them. Expect this tech to drop to mainstream prices by 2027. For now, it’s a novelty that hints at where we’re heading—quantified progression for even the youngest riders.
Integrated Balance Assist Technology
The next evolution may eliminate traditional training wheels entirely. Concepts in development use retractable outriggers that deploy automatically below 3 mph and retract at higher speeds, using centrifugal force. Others experiment with gyroscopic stabilizers in the rear hub that provide resistance to tipping without external wheels. These promise the same tool-free convenience but with even less visual stigma. The challenge is cost and complexity; a $200 stabilizer hub is a tough sell compared to a $50 training wheel set.
The Path to Two Wheels
Ultimately, training wheels are a bridge, not a destination. The tool-free revolution acknowledges this by making the departure as easy as the arrival. As balance bikes continue gaining popularity for toddlers, some experts predict training wheels may become obsolete for kids who start on strider bikes at age 2. However, for the millions of families who begin with pedal bikes, tool-free pop-off systems represent the final refinement of a 70-year-old concept. They’ve transformed training wheels from semi-permanent fixtures into true training aids—there when you need them, gone when you don’t, all without reaching for the toolbox.
Frequently Asked Questions
How do I know if tool-free training wheels will fit my child’s bike?
Measure the rear axle diameter and the outside width of the chain stays at the axle. Most 2026 universal kits accommodate 10-14mm axles and 110-130mm widths, but check your bike’s specs. Bikes with coaster brakes, rear derailleurs, or chain guards need extra clearance, so look for offset bracket designs. When in doubt, take a photo of your bike’s rear triangle and show it to a knowledgeable retailer.
Are tool-free systems as safe as traditional bolt-on training wheels?
When properly installed, they’re actually safer. The clamping force of a cam-lever quick-release can exceed 500 pounds, rivaling properly torqued bolts. The key is the three-point safety check: ensure the lever closes fully with firm resistance, verify the secondary lock engages, and confirm no wobble exists. Premium models undergo the same safety testing as bolt-on versions, including drop tests and fatigue cycling. The real safety advantage is psychological: you’re more likely to adjust them correctly when it’s easy.
Can my child remove the training wheels themselves?
Most designs require adult-level grip strength or a two-step process that toddlers can’t replicate. However, clever six-year-olds might figure it out. Look for models with child-resistant locks that require pressing a button while flipping the lever. If you’re concerned, a small zip tie through the lever and bracket (easily cut by you) adds a tamper-proof layer. Never rely on this for safety, though—proper supervision is always required.
How often will I need to replace tool-free training wheels?
A quality set should last through 2-3 children or approximately 500 hours of riding. The tool-free mechanism itself is rated for 1,000+ cycles. Wheels wear fastest; replace them when tread depth drops below 2mm. Brackets can last indefinitely if cleaned and stored properly. The most common failure point is the quick-release cam spring, which may weaken after years of use. Replacement springs cost under $5 and install in seconds on modular designs.
Do tool-free training wheels work on electric balance bikes or e-bikes?
Most are not rated for the higher speeds and weights of electric kids’ bikes, which can reach 15 mph. The centrifugal forces exceed standard design limits, and the additional battery weight stresses brackets. Some manufacturers now offer “e-rated” training wheels with reinforced arms and higher-weight capacities. Never exceed the posted speed rating; a training wheel folding under at e-bike speeds can cause serious injury. For standard balance-to-pedal conversion bikes without motors, regular tool-free sets work perfectly.
What’s the weight penalty compared to bolt-on models?
Premium tool-free sets are actually lighter—often 20-30% less than comparable bolt-on steel brackets. A typical pair weighs 1.2-1.8 pounds, with the mechanism adding only 2-3 ounces over a fixed design. Entry-level plastic tool-free sets can be heavier due to thicker sections needed for strength, but mid-range and up are weight-neutral or advantageous. The real weight savings comes from using aluminum instead of steel, a choice made possible by modern manufacturing that tool-free designs have embraced.
Can I use tool-free training wheels on a bike with gears?
Yes, but with caveats. The training wheel bracket must clear the rear derailleur, which often sits close to the axle. Look for “derailleur-compatible” sets with 15mm of extra offset. You may need to adjust the derailleur’s low-limit screw to prevent the chain from shifting into the wheel spokes, as the bracket can interfere with cable routing. Bikes with internally geared hubs are actually easier to fit, as the mechanism is contained within the wheel. Always test all gear combinations after installation to ensure smooth shifting.
How do I clean and maintain the tool-free mechanism?
Monthly, flip the release lever open and closed while spraying with dry silicone lubricant. Every three months, remove the assembly completely and wash with mild soap and water, drying thoroughly. For twist-lock systems, apply a drop of light machine oil to the detent balls. Magnetic systems need the magnet faces wiped with rubbing alcohol to remove metal filings. Never use high-pressure washers directly on the mechanism, as water can force past seals. If the lever becomes stiff, don’t force it—disassemble and clean instead.
Are there left-hand and right-hand specific versions?
Most are universal, but some premium sets have directional brackets optimized for chain-side clearance. The left (non-drive) side typically has a simpler design, while the right side may be contoured to avoid the chainring and derailleur. Installation arrows should point toward the front of the bike. If you accidentally swap sides, the brackets may not seat fully or could interfere with pedaling. When in doubt, the lever mechanism should be accessible from the outside (away from the bike), not tucked against the frame.
What should I do with the empty mounting points after removal?
Many 2026 sets include decorative plugs that snap into the vacant bracket holes, creating a finished look and preventing dirt ingress. Some parents leave the empty brackets on the bike for a week as a visual reminder of progress. Others remove everything and store it as a keepsake. If you discard the brackets, save the quick-release hardware—it’s handy for other applications, like securing cargo racks. The mounting points on the bike itself are just empty axle space; they require no special treatment and don’t affect riding once the training wheels are gone.