Picture this: you’re three days into a week-long wilderness river expedition, navigating a remote canyon where the nearest road is a two-day hike away. Suddenly, that barely-visible branch you couldn’t avoid punctures your pack-raft, and you hear the unmistakable hiss of escaping air. In that moment, your repair kit isn’t just another piece of gear—it’s your ticket back to civilization. As pack-rafting continues its explosive growth into 2026, with more paddlers pushing into extreme environments and multi-week adventures, the evolution of emergency repair technology has never been more critical. Modern pack-raft repair kits have transformed from afterthought accessories into sophisticated systems that can mean the difference between a minor inconvenience and a life-threatening situation.
The landscape of river emergency fixes is shifting rapidly, driven by advancements in material science, adhesive chemistry, and ultralight design philosophies. Whether you’re a weekend warrior on Class II streams or a seasoned expedition paddler tackling technical Class V drops, understanding what makes a repair kit truly expedition-worthy is non-negotiable. This comprehensive guide dives deep into the features, technologies, and strategic considerations that will define the best pack-raft repair solutions for 2026, helping you make informed decisions without getting lost in marketing hype.
Top 10 Pack-Raft Repair Kits for River Emergency Fixes
Detailed Product Reviews
1. GEAR AID Aquaseal FD River & Sea Repair Kit – Waterproof 0.25 oz Adhesive with Four Tenacious Tape Hex Patches (2.5", Black and Clear) for Fixing Holes in Waders, Boots, Inflatables, and Outdoor Gear
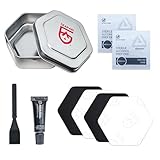
Overview: The GEAR AID Aquaseal FD Repair Kit is a compact, field-ready solution for repairing outdoor gear. This all-in-one kit includes a 0.25 oz tube of Aquaseal FD adhesive and four 2.5-inch Tenacious Tape Hex Patches (two black, two clear) stored in a reusable metal tin. Designed for waders, drysuits, boots, and inflatables, it creates permanent, flexible, waterproof repairs on materials like neoprene, nylon, GORE-TEX, PVC, and coated fabrics.
What Makes It Stand Out: Unlike generic repair kits, this system combines a professional-grade urethane adhesive with industrial-strength patches that bond permanently without peeling or cracking. The hexagonal patch shape provides better coverage and adhesion on curved surfaces. The metal tin packaging is a thoughtful touch, protecting contents from crushing in tackle boxes or dry bags while keeping everything organized for on-the-spot repairs during fishing, diving, or paddling trips.
Value for Money: At $12.95, this kit offers solid value for outdoor enthusiasts who need reliable repairs in harsh conditions. Comparable adhesives alone cost $8-10, making the inclusion of four Tenacious Tape patches a worthwhile bonus. The reusability of the tin and the ability to fix high-value gear like GORE-TEX waders justifies the price compared to cheaper alternatives that may fail under stress.
Strengths and Weaknesses: Strengths include exceptional material compatibility, compact portability, and proven durability in wet environments. The adhesive remains flexible after curing, preventing cracks in high-movement areas. Weaknesses are the small adhesive volume (0.25 oz limits multiple large repairs) and only four patches, which may be insufficient for heavily damaged gear. The 8-12 hour cure time also requires planning ahead.
Bottom Line: This is an essential kit for anglers, kayakers, and divers who need dependable field repairs. While not suited for major damage, it excels at fixing pinholes, seam leaks, and small tears on premium outdoor equipment. Keep one in your gear bag—it’s cheap insurance against ruined adventures.
2. Quadence Heavy Duty Vinyl Repair Kit for Air Mattress, Waterproof Air Mattress Patch Kit Inflatable Repair Kit for PVC Boats, Raft, Kayak, Swimming Ring, Inflatable Toys, Vinyl Glue for Boats (80 ML)

Overview: The Quadence Heavy Duty Vinyl Repair Kit delivers an 80 ML tube of specialized adhesive with transparent patches for fixing PVC and vinyl inflatables. Designed for air mattresses, boats, rafts, kayaks, and pool toys, this kit promises permanent, airtight bonds that withstand water exposure and UV degradation. The clear patches blend seamlessly with original materials for discreet repairs.
What Makes It Stand Out: This kit’s UV-resistant formulation prevents yellowing and degradation under sun exposure, a critical feature for marine and pool applications. The transparent finish maintains aesthetic appeal on visible surfaces like white watercraft or colorful inflatables. Its versatility across PVC, vinyl, and rubber materials makes it a true multi-purpose solution, while the straightforward application process requires no special skills—just clean, glue, patch, and wait 24 hours.
Value for Money: Priced at $8.99, this kit offers excellent value with generous adhesive volume. Most competitors provide 30-50 ML at similar prices, making the 80 ML quantity a standout. The ability to repair multiple items—from air mattresses to inflatable boats—eliminates the need for separate specialized kits, saving money and storage space for families and outdoor adventurers.
Strengths and Weaknesses: Strengths include waterproof/UV-resistant performance, large adhesive volume, beginner-friendly application, and invisible repairs. The 24-hour cure time ensures maximum bond strength. Weaknesses include the waiting period (can’t use items immediately) and potential overkill for minor pool toy repairs. The adhesive may be too aggressive for delicate vinyl coatings, requiring careful application.
Bottom Line: For anyone owning multiple inflatables, this is the most cost-effective repair solution available. The generous quantity and durable performance make it ideal for camping families, boat owners, and pool enthusiasts. Just plan repairs a day ahead and store the tube properly to prevent drying.
3. Tear-Aid Repair Type B Vinyl Kit (4 Pack)

Overview: The Tear-Aid Type B Vinyl Kit includes four pre-cut repair patches designed exclusively for vinyl and vinyl-coated materials. Unlike glue-based systems, these patches use a proprietary elastomer with instant adhesion that conforms to irregular surfaces without messy adhesives. Each matte-finish patch resists abrasion, punctures, and tearing while maintaining flexibility.
What Makes It Stand Out: Type B patches contain a unique oil inhibitor that prevents vinyl’s natural oils from breaking down the adhesive—a common failure point in standard repairs. The instant adhesion means no waiting for glue to cure; simply peel and stick for immediate use. The material remains stable in high heat without turning gummy and resists UV yellowing, making it ideal for outdoor equipment exposed to harsh conditions.
Value for Money: At $37.45 ($9.36 per patch), this is a premium-priced solution. While expensive compared to glue kits, the convenience of instant, tool-free repairs and exceptional longevity on vinyl justifies the cost for high-value items like vinyl boat covers, convertible tops, or inflatable boats. For vinyl-only applications, it outperforms cheaper alternatives that may fail prematurely.
Strengths and Weaknesses: Strengths include immediate repair capability, superior vinyl-specific chemistry, clean application, and excellent stretch resistance. The matte finish blends better than glossy alternatives. Weaknesses are the limited material compatibility (vinyl only), high per-patch cost, and lack of included adhesive for non-patchable areas. The 4-pack may be excessive for users needing only one or two repairs.
Bottom Line: This is the gold standard for vinyl repairs where quality trumps cost. Perfect for marine vinyl, pool liners, and expensive inflatables where failure isn’t an option. Skip it if you need multi-material versatility, but for dedicated vinyl applications, nothing beats Tear-Aid’s reliability and ease of use.
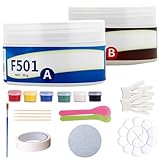
4. Marine Fiberglass Repair Kit for Boats, Quadence Gel Coat Repair kit for Boats, Fiberglass Repair Kit, Waterproof Epoxy Filler for Kayaks Sailboats Fix Holes, Chips, Deep Cracks, Scratches-Color Match

Overview: Quadence’s Marine Fiberglass Repair Kit is a complete gel coat restoration system for fiberglass watercraft. The kit includes epoxy filler, five color tints (brown, blue, yellow, red, black), a scraper, push rod, stirring sticks, sandpaper, and toothpicks. It repairs chips, cracks, gouges, and holes on kayaks, jet skis, sailboats, and surfboards with a fast-drying, UV-resistant waterproof finish.
What Makes It Stand Out: The color-matching system sets this apart from single-color fillers. By mixing tints into the white base, users can create custom shades matching their vessel’s original gel coat for invisible repairs. The eco-friendly, non-toxic epoxy eliminates harsh fumes, making it safer for indoor application. The included application tools provide everything needed for professional-looking results without additional purchases.
Value for Money: At $11.99 ($3.40/ounce), this kit offers mid-range pricing with premium features. Comparable gel coat repair products cost $15-25 without color tints or tools. The ability to match colors eliminates the need for expensive professional touch-ups, making it cost-effective for maintaining a boat’s appearance and preventing fiberglass degradation.
Strengths and Weaknesses: Strengths include the comprehensive color-matching system, fast cure time, complete tool set, and safe formulation. The 1:1 mixing ratio simplifies preparation. Weaknesses include the 24-hour full cure time and the learning curve for color blending. Small repair areas may require careful tint measurement to avoid waste. The epoxy may not bond to some exotic resin formulations without proper surface prep.
Bottom Line: An excellent choice for DIY boat owners wanting professional cosmetic repairs without the shop bill. The color-matching capability makes it superior to generic white fillers. While not structural-grade, it perfectly handles gel coat damage that leads to osmotic blistering if left untreated. Practice on a test area first to master color mixing.
5. Krbnk Fiberglass Boat Repair Kit, Gel Coat & Marine Grade Fiberglass Repair Kit for Boats, Kayaks, Jet Skis - Color Matching Epoxy Filler for Holes, Cracks, Chips - UV Resistant, Waterproof
Overview: The Krbnk Fiberglass Boat Repair Kit offers an all-in-one solution for repairing fiberglass, gel coat, and wooden surfaces on watercraft. This budget-friendly kit includes a white base epoxy with multiple color tints to match various shades (Arctic, Biscuit, Almond, Bone, Cream, Linen, Ice Gray). It permanently fixes holes, cracks, chips, and gouges while providing UV resistance and waterproof protection in harsh marine environments.
What Makes It Stand Out: This kit’s unbeatable $4.62 price point makes professional-grade repairs accessible to every boat owner. The extensive color palette with seven tints surpasses many premium kits for achieving seamless color matches. The simple six-step DIY process requires no expertise, and the satisfaction guarantee demonstrates manufacturer confidence. It forms an ultra-hard, flexible seal that prevents future cracking.
Value for Money: At $4.62, this is the most affordable marine repair kit available—often costing less than a single tube of marine epoxy alone. The inclusion of color tints and applicators at this price is remarkable. While the quality may not match $20+ professional systems, the value for minor to moderate repairs on older or less valuable watercraft is exceptional.
Strengths and Weaknesses: Strengths include the incredibly low price, comprehensive color options, UV/saltwater resistance, and clear instructions. The 1:1 mixing ratio is foolproof. Weaknesses involve the unknown brand reputation, potentially shorter shelf life, and limited quantity for large repairs. The ultra-low price may reflect lower-grade resin compared to premium alternatives. Cure time is 24 hours, standard but not fast.
Bottom Line: A no-brainer for budget-conscious boaters needing cosmetic gel coat repairs. Perfect for fixing dock rash on kayaks, jet ski hull chips, or minor sailboat damage without breaking the bank. While pros may prefer established brands, this kit delivers surprising quality for the price. Buy it as a backup or for learning DIY fiberglass repair before investing in premium materials.
Why Every Pack-Rafter Needs a Repair Kit
The mathematics of river emergencies are brutally simple: every minute your raft loses air, your risk exposure increases exponentially. A slow leak might give you 30 minutes of paddling time, but a significant gash can render your vessel useless in under five. Unlike traditional rafting where you might have a spare boat or extensive group gear, pack-rafters operate with minimalist principles that make self-sufficiency paramount.
The 10-Minute Rule: When Disasters Strike
Professional pack-rafting guides operate under a strict protocol: any repair that can’t be completed in under 10 minutes isn’t a field repair—it’s a trip-ending failure. This benchmark shapes everything from kit design to practice protocols. Your repair strategy must prioritize speed over perfection, with the understanding that a “good enough” fix that gets you to camp is infinitely better than a “perfect” repair that takes an hour in the rain.
Real-World Scenarios That Demand Immediate Action
Beyond the obvious puncture, consider these common failures: valve delamination at the base, seam blowouts along the floor, abrasion wear-through on the bottom, and damage to the spray deck attachment points. Each failure mode requires different materials and techniques. A kit designed only for simple punctures will leave you helpless when a seam gives way in the middle of a gorge. The 2026 standard demands versatility that addresses the full spectrum of potential failures.
Understanding Pack-Raft Materials and Repair Compatibility
Your repair kit is only as good as its compatibility with your raft’s construction. The pack-rafting industry has largely standardized around thermoplastic polyurethane (TPU) coatings, but legacy PVC boats and emerging hybrid materials still populate the rivers. Using the wrong adhesive or patch material creates a bond that will fail catastrophically when you need it most.
TPU Coatings: The Modern Standard
TPU’s flexibility, abrasion resistance, and environmental friendliness have made it the dominant material for 2026’s premium pack-rafts. However, TPU requires specific solvent-based adhesives that chemically weld the material rather than just sticking to it. The key is finding adhesives with cyclohexanone or tetrahydrofuran (THF) bases that actually dissolve and fuse with the TPU coating. Water-based or generic “vinyl” adhesives will create a temporary bond at best, often peeling away under flex or temperature changes.
PVC Legacy Rafts: What You Need to Know
If you’re paddling a PVC boat, your adhesive needs are completely different. PVC requires two-part adhesives that work through a chemical reaction, typically involving methyl ethyl ketone (MEK) and a separate hardener. The critical detail for 2026 is that many modern “universal” adhesives claim to work on both TPU and PVC—they don’t, at least not reliably. Dedicated PVC repair systems remain the gold standard for these older boats, and mixing TPU and PVC repair materials in the same kit is a recipe for failure.
Nylon vs. Polyester Base Fabrics
The fabric substrate beneath the coating matters enormously for repair strategy. Nylon absorbs water and stretches when wet, requiring patches with more overlap and flexible adhesives that can accommodate movement. Polyester maintains its dimension when wet, allowing for more precise repairs. Your kit should include patches sized appropriately for your boat’s base fabric—generally 25% larger patches for nylon boats to account for stretch.
The Anatomy of a Professional-Grade Repair Kit
Professional guides don’t just throw random tubes of glue and fabric scraps in a bag. Their kits are meticulously organized systems where every component serves multiple purposes and can be deployed blindfolded in a rainstorm. The 2026 standard involves modular organization, color-coded components, and redundancy in critical items.
Adhesives: The Heart of Your Repair System
A serious repair kit needs at least two types of adhesive: a primary solvent-based TPU adhesive and a secondary “quick-fix” option. The primary adhesive should come in multiple small tubes rather than one large one—once opened, these adhesives begin curing and have a limited shelf life. Quick-fix options include pressure-activated adhesive films that require no curing time, perfect for temporary patches while your main repair sets.
Patch Materials: Size and Shape Matters
Pre-cut patches waste space and rarely match the damage. The 2026 approach favors rolls of repair material that you cut to size, but with a twist: pre-rounded corners. Sharp corners on patches are peel points where failure begins. Your kit should include patch material with factory-rounded corners in multiple sizes, plus uncut material for custom shapes. Include both thick reinforcement patches for high-stress areas and thin, flexible patches for curves and corners.
Application Tools: Beyond the Basics
Beyond the standard brush or applicator, modern kits include microfiber swabs for surface prep, flexible spreaders for even adhesive application, and small rollers to eliminate air bubbles. The most overlooked tool? A dedicated pair of micro-shears that can cut patch material cleanly without fraying edges. Dull scissors create patch edges that will delaminate.
Adhesive Technologies: What Works in Wet Conditions
The holy grail of pack-raft repair is creating a reliable bond on wet surfaces. While “dry is best” remains the ideal, river emergencies rarely provide that luxury. 2026’s adhesive innovations focus on water-displacement chemistry rather than simple water-resistance.
Solvent-Based vs. Water-Based Formulations
Solvent-based adhesives work by chemically melting the TPU surface, creating a weld. They can actually displace small amounts of water through solvent action, making them superior for emergency field repairs. Water-based adhesives simply dry to create a sticky surface—they fail immediately if applied to wet material. For 2026, look for adhesives specifically labeled “water-displacing” or “wet surface compatible.”
Two-Part Epoxies: Are They Worth It?
Two-part urethane epoxies create incredibly strong bonds but require precise mixing and longer cure times. In cold water conditions, cure times can extend to 24 hours, making them impractical for field repairs. However, they excel for permanent repairs at home or in base camp. The smart approach is carrying a tiny two-part syringe for critical structural repairs while relying on faster solvent adhesives for most field work.
The Role of Accelerators in Cold Weather
Adhesive cure time doubles for every 10°F drop in temperature. At 40°F water temperature, a standard 30-minute cure becomes two hours. Accelerators—chemical additives that speed curing—are essential for cold-weather paddling. The latest 2026 formulations come in micro-capsules you crack and mix into your adhesive, giving you on-demand acceleration without shortening the shelf life of your main adhesive supply.
Patch Materials: TPU vs. PVC vs. Urethane
The patch market has exploded with options, but material selection remains critical. A patch that works perfectly on one boat type might fail spectacularly on another due to differences in flexibility, thermal expansion, and chemical bonding.
Pre-Cut vs. Custom-Cut Patches
Pre-cut patches offer convenience but limit your options. The 2026 solution is hybrid: kits include pre-cut patches for common failures (valve bases, small punctures, corner reinforcements) plus a roll of material for custom cuts. Look for patch material with a “scrim” pattern printed on the back—this grid helps you cut straight lines and maintain consistent patch dimensions without carrying a ruler.
Reinforced vs. Standard Patches
Standard patches work for punctures, but seam failures and high-stress areas need reinforced patches with internal fabric scrim. These patches are 2-3 times thicker but provide structural integrity that prevents the tear from spreading. Your kit should include at least one reinforced patch large enough to cover a 6-inch seam blowout—this is the difference between a repair and a permanent fix.
Essential Tools Beyond Patches and Glue
The difference between a hobbyist’s kit and a professional system lies in the tools. Adhesives and patches are useless without proper surface preparation and application equipment. Each tool must earn its place through multiple uses and reliability in harsh conditions.
Abrasion Tools: Scuffing for Success
Adhesives bond to abraded surfaces 300% better than to smooth factory finishes. Your kit needs two abrasion options: fine-grit sandpaper (400-600 grit) for controlled scuffing and a small abrasive pad for quick prep. The sandpaper should be waterproof and backed with a flexible substrate that conforms to curves. Pro tip: pre-cut sandpaper into postage-stamp sizes to save space and prevent waste.
Clamping Systems: Holding Power in the Field
A patch under pressure cures stronger and faster. While heavy C-clamps are impractical, 2026’s solutions include inflatable clamping bags that wedge inside the raft tube, applying even pressure to the repair. Alternatively, rare-earth magnets encased in soft rubber can sandwich a patch from both sides, providing clamping force without added bulk. These weigh mere grams but provide pounds of clamping pressure.
Cleaning Solutions: Surface Prep Essentials
Oil, sunscreen, and river grime prevent adhesion. Your kit needs a small vial of isopropyl alcohol (99% concentration) and dedicated cleaning swabs. Avoid alcohol pads from first-aid kits—they contain moisturizers and lanolin that contaminate the bonding surface. Pure isopropyl alcohol evaporates completely, leaving no residue.
Size and Weight Considerations for Ultralight Paddlers
The ultralight movement has revolutionized pack-rafting, but cutting weight from your repair kit is dangerous. The 2026 philosophy is “intelligent minimalism”—every gram is scrutinized, but critical capability is never compromised. A true ultralight repair kit for a solo paddler should weigh between 8-12 ounces complete.
The Ultralight Dilemma: Comprehensive vs. Compact
The lightest kits on the market weigh under 4 ounces but contain only enough material for one small puncture. For remote expeditions, this is reckless. The sweet spot is a 10-ounce system that can handle three significant repairs: a puncture, a seam failure, and a valve issue. This provides redundancy without bulk. Weight savings come from eliminating duplicate tools and using multi-function components, not from reducing repair capacity.
Modular Kit Design: Building Your System
Smart paddlers build their kits in modules: a core repair module (adhesives, patches, tools), a valve repair module, and a structural reinforcement module. For day trips, carry only the core module. For expeditions, add all modules. This approach prevents over-packing while ensuring you have capability matched to your mission profile. Each module should be in its own color-coded sub-bag for instant identification.
Waterproofing Your Repair Kit Storage
A repair kit that gets wet is worthless. Adhesive tubes leak, patches absorb moisture, and tools rust. Your storage system must be as robust as the repair components themselves, protecting against immersion, condensation, and accidental spills.
Dry Bag Selection for Repair Supplies
Your repair kit deserves its own dedicated dry bag, not just a Ziploc tossed in your main pack. A 2-3 liter ultralight dry bag with a transparent window allows you to verify contents without opening. The bag should have a purge valve to compress it and remove dead air space. Avoid bags with roll-tops that can unroll—use zip-seal closures that lock positively.
Sub-Packaging Strategies
Individual components need protection too. Adhesive tubes should be wrapped in wax paper, then sealed in heat-sealed foil packets. Patches belong in vacuum-sealed bags with desiccant packets. Tools get a light coat of corrosion inhibitor (a drop of mineral oil) before being wrapped in microfiber cloth. This triple-redundancy ensures that even if your main dry bag fails, components remain viable.
Field Testing: How to Practice Emergency Repairs
Owning a repair kit without practicing is like carrying a compass without knowing how to use it. Professional paddlers conduct quarterly repair drills, timing themselves in realistic conditions. Your practice should be deliberate, timed, and progressively challenging.
Creating Practice Scenarios
Don’t just practice on scrap material. Inflate your raft and create realistic damage scenarios: a puncture on the tube curve, a seam separation near the floor, a valve base delamination. Use a dull awl to create small holes in inconspicuous areas (the underside of the floor is perfect). Practice your repair, then test it under pressure—literally. Over-inflate the tube and see if your patch holds. This builds confidence and reveals weaknesses in your technique.
Timing Yourself: The Reality Check
Set a stopwatch. Your goal is complete repair prep, application, and initial cure in under 10 minutes. Most first-timers take 45 minutes, fumbling with packaging and reading instructions. The difference between a 10-minute repair and a 30-minute repair isn’t just convenience—it’s the difference between making it to shore before your raft becomes unmanageable and swimming through a rapid. Video yourself to identify wasted motions and inefficiencies.
Multi-Use Items: Maximizing Your Kit’s Versatility
Every item in your repair kit should serve at least two purposes. This philosophy reduces weight while increasing capability. The most creative paddlers integrate repair components into their daily gear, ensuring they’re always accessible.
Medical Tape as Emergency Patch Material
High-quality medical tape (the fabric kind, not plastic) makes an excellent emergency patch when combined with adhesive. It conforms to curves, breathes to prevent trapped moisture, and provides structure to thin patches. Wrap a few feet around your water bottle or paddle shaft so it’s always handy. In a pinch, medical tape alone can seal a small leak long enough to reach shore.
Dental Floss: The Unsung Hero
Waxed dental floss isn’t for teeth in the backcountry—it’s a structural stitching material for large tears. Sew a tear closed with dental floss before applying a patch, creating a mechanical bond that adhesive alone can’t achieve. The wax coating prevents water wicking and adds slight adhesive properties. A small spool weighs nothing but can save a shredded boat.
Color Coding and Organization Strategies
In an emergency, you don’t have time to read labels. Professional kits use a universal color-coding system that allows identification by touch and sight, even with cold, gloved hands. This system has become the de facto standard for 2026 expedition planning.
The Visual ID System
Red = adhesives and accelerators. Blue = patches and reinforcement materials. Green = cleaning and prep supplies. Yellow = tools and application equipment. This matches the color coding used in medical and rescue equipment, leveraging existing muscle memory. Each sub-bag should have a colored tab, and individual items should have colored tape wraps at their ends.
Quick-Access Pockets
Your repair kit bag should have external pockets containing only the items needed for the most common repair: a small puncture. This includes one adhesive tube, one pre-cut patch, sandpaper, and an alcohol swab. Everything else stays in the main compartment. This prevents you from dumping your entire kit in the river while searching for the basics.
Expiration Dates and Shelf Life Concerns
Adhesives aren’t wine—they don’t improve with age. In fact, most pack-raft adhesives begin degrading the moment they’re manufactured. Using expired adhesive is the most common cause of field repair failure, yet it’s the most ignored maintenance item.
Adhesive Degradation: What to Watch For
Solvent-based adhesives lose potency as the solvent slowly evaporates through the tube walls. Unopened tubes have a 24-month shelf life; opened tubes last 6-12 months. Mark every tube with the date you added it to your kit. If the adhesive becomes thicker than honey or develops a skin, it’s dead. The 2026 best practice is replacing adhesive tubes annually, regardless of use.
Patch Material Aging
TPU patch material is relatively stable, but PVC patches become brittle as plasticizers leach out over time. Store patches in airtight, opaque bags to prevent UV degradation. If a patch won’t lie flat or cracks when bent, it’s compromised. Test-flex your patches every six months, especially if you paddle in hot climates where plasticizer loss accelerates.
Customizing Your Kit for Specific River Grades
A repair kit for gentle float trips differs dramatically from one for technical whitewater. The consequences of failure increase with river difficulty, as does the likelihood of severe damage. Smart paddlers scale their repair capabilities to match the objective hazards.
Class I-II: Minimalist Approaches
For mellow rivers within cell service and a day’s hike from roads, a core repair module suffices. Focus on punctures and small abrasions. The likelihood of catastrophic failure is low, and assistance is relatively accessible. Your kit can weigh as little as 6 ounces but must still contain quality components—this isn’t the place for cheap adhesives.
Class III-IV: Comprehensive Coverage
Technical whitewater demands a full suite of repair options. Seam failures and valve blowouts become realistic scenarios. Your kit should include reinforced patches, valve replacement parts, and structural adhesives. Weight should be 12-16 ounces. Consider adding a small hand pump because repairs in this environment often require re-inflation in challenging locations.
Class V+: Professional-Level Preparedness
For expert-level runs, your repair kit approaches that of a commercial rafting operation. Multiple adhesive types, extensive patch material, spare valves, and even a small tube of urethane coating for abrasion resistance. The kit might weigh 20+ ounces, but that’s insignificant compared to the consequences of failure. Many Class V paddlers also carry a compact backup raft—a “boat-in-a-bag” that weighs under two pounds but provides a true emergency evacuation option.
Budget vs. Premium: Where to Invest Your Money
The repair kit market ranges from $15 bargain kits to $200 professional systems. Understanding where extra money buys real performance versus just fancy packaging is crucial for building a cost-effective system that doesn’t compromise safety.
Non-Negotiable Items: Never Skimp Here
Adhesive quality is non-negotiable. A $5 tube of generic “vinyl repair” adhesive has a 70% failure rate in field conditions. Spend the $15-20 on professional-grade, raft-specific adhesive. Similarly, patch material thickness matters—thin, cheap patches tear at the edges. Invest in patches at least 0.5mm thick for standard repairs and 1.0mm for reinforcements.
Areas Where You Can Save
You don’t need name-brand sandpaper or alcohol. Standard hardware store 600-grit wet/dry sandpaper works perfectly. Buy isopropyl alcohol in bulk and fill tiny reusable bottles. Tools like spreaders and rollers can be improvised from paddle shafts or river rocks. The premium is in the chemistry, not the accessories.
The Environmental Factor: Eco-Friendly Repair Options
The pack-rafting community has always been environmentally conscious, and 2026 sees this reflected in repair kit design. Low-impact options now perform as well as traditional chemicals, addressing the paradox of using toxic substances to repair boats used in pristine environments.
Low-VOC Adhesives
Volatile Organic Compounds (VOCs) in traditional adhesives are potent greenhouse gases and water pollutants. New low-VOC formulations use citrus-derived solvents that bond TPU nearly as strongly as traditional chemicals. They cost 30% more and have slightly longer cure times, but the environmental benefit is substantial. For remote alpine environments where water sources are critical, low-VOC is becoming the ethical standard.
Biodegradable Packaging
Traditional repair kits generate significant plastic waste. Forward-thinking manufacturers now use biodegradable pouches made from cornstarch-based films for patch storage. These break down in commercial composting within months. The adhesive tubes remain problematic, but refillable aluminum tubes are entering the market, allowing you to buy adhesive in bulk and refill your field kit, reducing single-use plastic by 90%.
Frequently Asked Questions
How long does a typical field repair last?
A properly executed emergency repair using quality materials will last the remainder of your trip—often weeks—if you avoid reinflating to maximum pressure. However, consider it temporary. Permanent repairs require controlled conditions and often different adhesives. Re-patch the area properly once you’re home.
Can I use bicycle tire patch kits on my pack-raft?
Absolutely not. Bicycle patches use rubber cement that bonds poorly to TPU and PVC, and the patch material isn’t designed for flexing on water-filled tubes. The bond will fail within hours, often catastrophically. Always use raft-specific materials.
What’s the best way to test if my adhesive is still good?
Apply a small dab to a scrap piece of patch material. If it spreads smoothly and remains tacky for 5-10 minutes before setting, it’s viable. If it’s thick, stringy, or dries instantly, replace it. Never test on your actual boat—you’ll create a mess that’s hard to clean.
How many patches should I carry for a week-long trip?
Carry enough material for three significant repairs: three small puncture patches, one medium patch (4x4 inches), and one large reinforcement patch (6x8 inches). This provides redundancy for the most common failures while keeping weight reasonable.
Should I carry different adhesives for summer and winter paddling?
Yes. Cold-weather adhesives contain accelerators and remain flexible at low temperatures. Standard adhesives become brittle below 40°F and may crack. If you paddle year-round, build a winter kit with cold-weather formulations and keep your summer kit separate.
Can I repair my raft on the water, or do I need to reach shore?
Small punctures can be repaired on calm water, but it’s risky and ineffective. Water pressure works against you, and movement prevents proper curing. Always aim for shore. The only exception is using pressure-activated adhesive patches as a temporary measure to slow a leak while you paddle to safety.
How do I remove old, failed patches before applying new ones?
Use a rotary tool with a fine sanding drum to grind off the old patch without damaging the underlying material. In the field, carefully slice the patch edge with a sharp knife and peel slowly, using adhesive solvent to soften the bond. Never just stick a new patch over a failed one—the uneven surface guarantees another failure.
What’s the biggest mistake people make with repair kits?
Storage negligence. Leaving kits in hot cars or damp basements destroys adhesives and patches. The second biggest mistake is not practicing. A $100 kit is worthless if you can’t deploy it in 10 minutes during a thunderstorm. Practice quarterly, replace adhesives annually.
Are UV-cured adhesives viable for pack-raft repair?
Not yet. While UV-cure technology works for flat surfaces, it can’t penetrate overlapping patch layers or cure on shaded areas of the boat. Current formulations also remain too brittle for the flexing pack-raft environment. Stick with proven solvent-based or two-part systems for now.
How do I dispose of expired adhesives and chemicals responsibly?
Take them to a household hazardous waste facility—never pour them down drains or throw them in regular trash. Many outdoor retailers now accept expired repair materials for proper disposal. For low-VOC adhesives, some municipalities allow evaporation in a well-ventilated area, but check local regulations first.